I can’t believe that the series is already coming to an end!!! How did September fly by? AHHH! Today’s guest is a real life in person friend of mine from our local quilting guild! Vicki blogs over at Sew Inspired and makes amazing pieces. I’m in love with her new moths project! And you’ve got to see her rhino quilt. One day she’s going to teach me how to do free motion quilting beciase she’s a PRO at it! Until then, let’s check out her project!
Welcome Vicki!
Thanks, Louise, for inviting me to participate in Sew Ready to Play! I enjoyed looking through all the past years’ projects while I was brainstorming what I wanted to make. I ended up deciding to make a case for our new Uno cards. My dad bought a few games to play with my kids when he and my mom visited us this summer, and the Uno card box isn’t holding up that well. So I put together an easy fabric card case that can hold our Uno cards without tearing, complete with a pocket on the back to hold the instruction sheet. Here’s how you can make your own.
Materials needed:
1 fat quarter of fabric (do you like my corndog fabric??)
9″ x 18″ of moderately heavy interfacing (I prefer sew-in interfacing, but you can use fusible if you want)
1.5″ of hook and loop fasteners
Thread
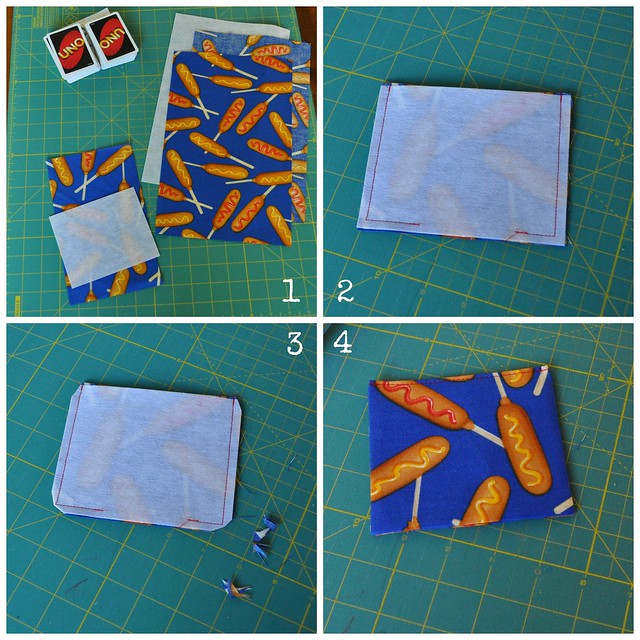
Step 1: Cutting. From the fabric, cut two 7.5″ x 12″ rectangles for the main pouch, and one 5 ¼” x 8 ½” rectangle for the pocket. From interfacing, cut one 7.5″ x 12″ rectangle and one 5 ¼” x 4 1/8″ rectangle.
Step 2: To make the pocket, fold the 5 ¼” x 8 ½” rectangle in half with right sides together, then place the interfacing on top of the folded fabric rectangle. Pin. Using a ¼” seam allowance, sew the three sides of the rectangle, leaving an opening so you can turn the pocket right side out.
Step 3: Trim the corners on the pocket piece.
Step 4: Turn right side out. Poke corners out and press, with the edges of the opening folded in. Edgestitch close to the fold edge of the pocket.

Step 5: Layer the two large fabric rectangles right sides together and place interfacing on top. Pin and sew ½” from edge, leaving an opening so you can turn it right side out.
Step 6: Trim corners. Trim interfacing to about ¼” wide.
Step 7: Turn right side out, poke out the corners, press. Make sure the edges of the opening are folded in.
Step 8: The opening with edges folded in is at the bottom. Place pocket (hemmed edge on top) on main pouch piece 4″ up from the bottom edge. Pin in place.

Step 9: Edgestitch pocket in place, about 1/8″ from edge of pocket. Backstitch at both top corners to reinforce the pocket. Make sure your instruction sheet fits in pocket.
Step 10: Pin hook part of hook and loop tape to the main pouch piece, centered and about 1 ¼” up from the bottom edge. Also, sew 1/8″ from bottom edge to close the opening left from turning.
Step 11: Zigzag hook tape in place, backstitch to secure.
Step 12: Fold bottom edge of pouch up 4″ and stitch sides in place. Backstitch at top corners. My seams are about 3/16″ here. Topstitch around edges of the top flap.
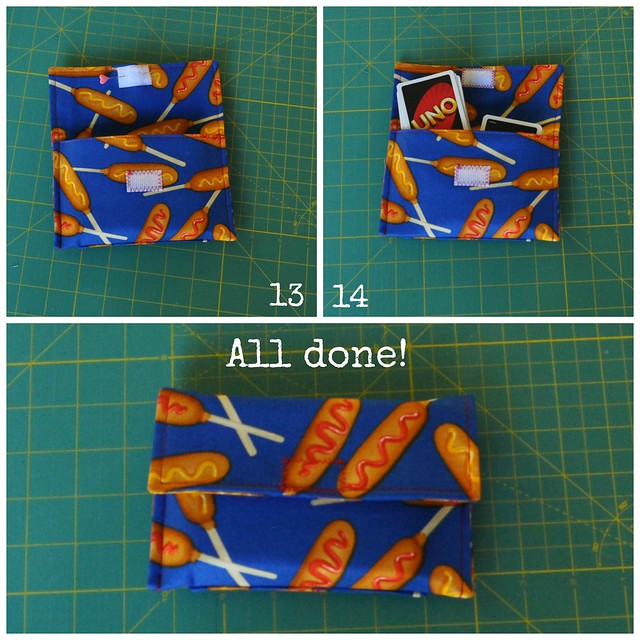
Step 13: Pin the loop part of the hook and loop tape to the top edge of the pouch so it will fasten correctly. Also, make sure the cards fit in the pouch.
Step 14: Zigzag loop tape in place.
All done, congratulations! I’d love to see pictures if you make a card pouch with this tutorial!


Oh that’s very fun! UNO is one of our family favorites!