Junior Ranger Badge Banner Tutorial

Since Spring Break is coming up for us and is happening around the states, I thought I’d share something we like to do on our vacations! We love to visit State and National Parks and do their Junior Ranger Programs!

JuniorRangerBanner-Main-ImFeelinCrafty

Do you like to do this? I love it because the kiddo will put down that silly tablet and actually take the time to enjoy where we are. You have to actually look at where you are and draw pictures of what you see. Sit and listen and draw what you hear. Some have scavenger hunt type activities. Each place has different requirements for getting a badge, but they are all pretty easy and fun!

JuniorRangerBanner-ImFeelinCrafty

JuniorRangerBanner-Badges-ImFeelinCrafty

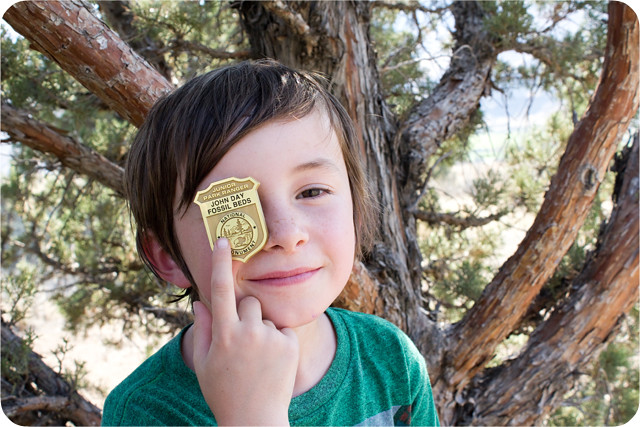
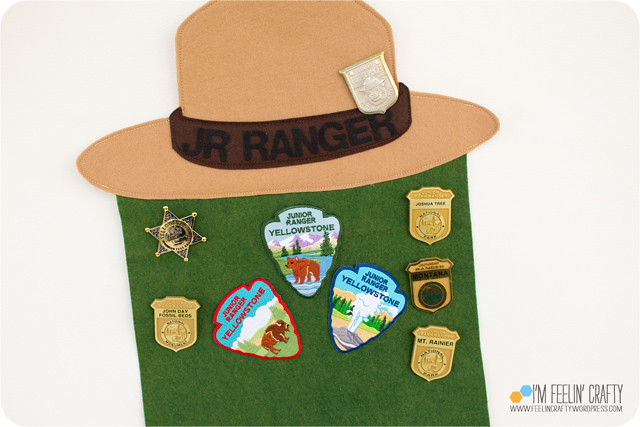
And you get to collect cool badges! We’ve gotten all sorts of kinds. Fabric ones, buttons and the more traditional versions… But then they come home and get stashed somewhere with the other souveniers…. So I knew I could make a little something to display the badges!

JuniorRangerBanner-VintageBadge-ImFeelinCrafty

And after we started collecting, my husband found this vintage badge at his Dad’s house!

JuniorRangerBanner-Materials-ImFeelinCrafty

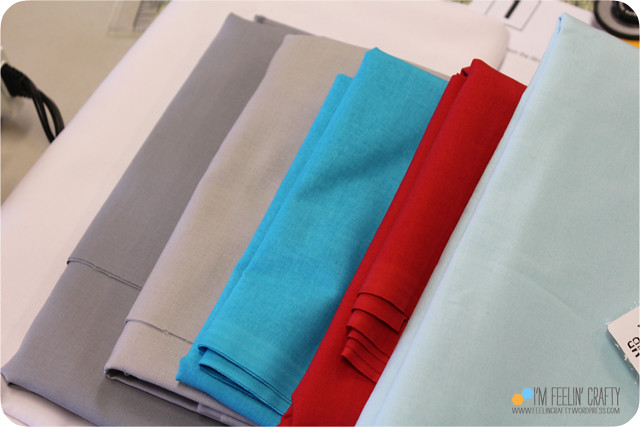
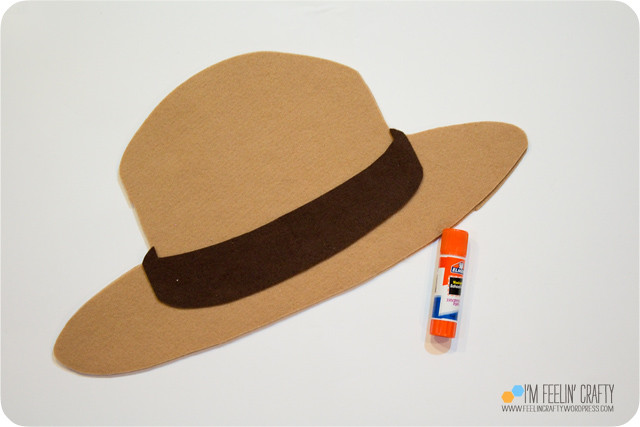
So, I’ll show you how I made it! You’ll need felt- tan, dark brown and green. You’ll also need some fusible interfacing, a little bit of ribbon and some sticky back felt letters. Ignore the wooden dowel. I thought I would use it, but decided against it. And I used a picture of a ranger hat to get the right shape.

JuniorRangerBanner-Step1-ImFeelinCrafty

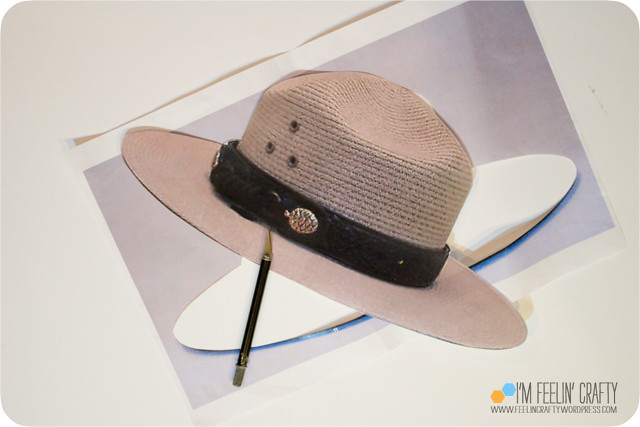
I printed the hat that I found online here, on 11×17 paper. Then cut it out!

JuniorRangerBanner-Step2-ImFeelinCrafty

JuniorRangerBanner-Step2_1-ImFeelinCrafty

JuniorRangerBanner-Step2_2-ImFeelinCrafty

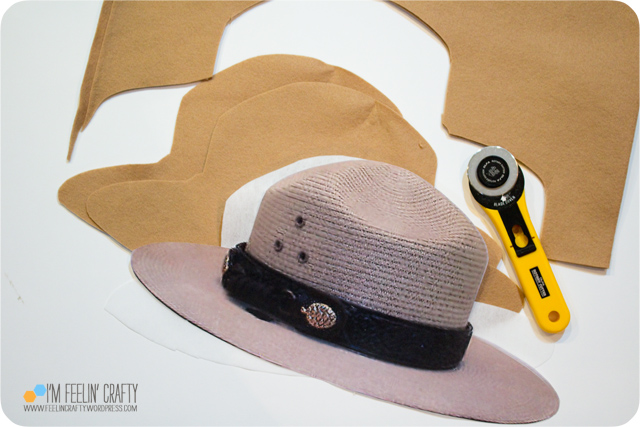
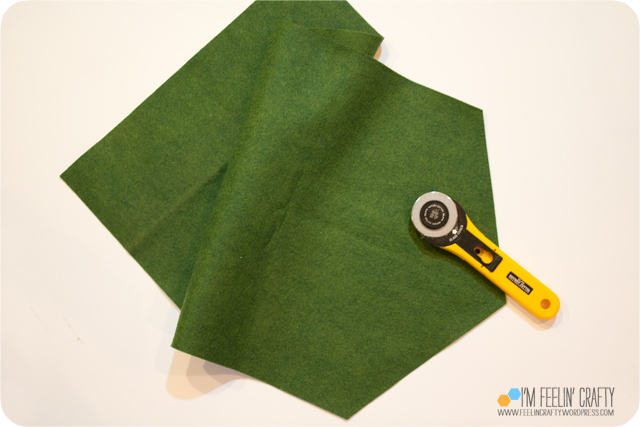
Next, let’s cut out the pieces you’ll need. Cut the main hat pieces from the tan (2) and the heavyweight fusible interfacing (1). Cut down the pattern to the band and then cut it out of the brown felt. Lastly, cut out the green banner, 10×22, and angle one end.

JuniorRangerBanner-Step3-ImFeelinCrafty

JuniorRangerBanner-Step4-ImFeelinCrafty

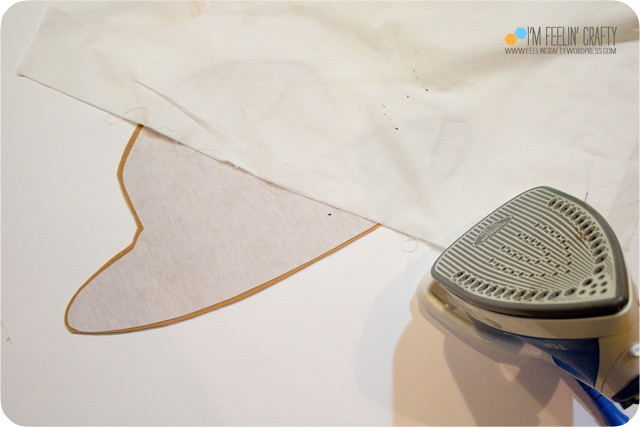
Trim the interfacing down about an 1/8″ all the way around and iron it to one side of the hat piece.

JuniorRangerBanner-Step5-ImFeelinCrafty

JuniorRangerBanner-Step6-ImFeelinCrafty

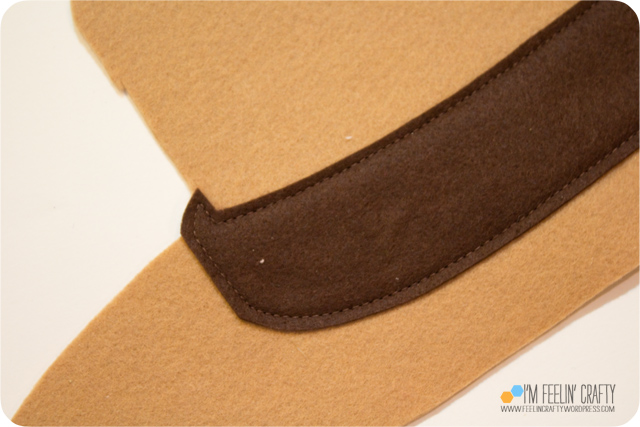
Use a bit of glue to just secure the band and then topstitch it in place.

JuniorRangerBanner-Step7-ImFeelinCrafty

Stack the front and back of the hat with the banner in the middle. Then sew all the pieces together.
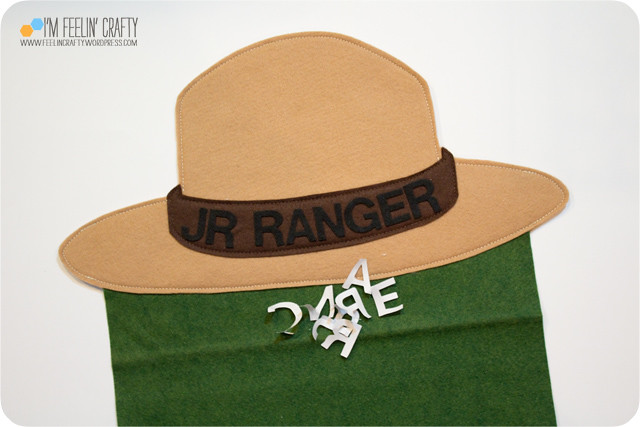
JuniorRangerBanner-Step8-ImFeelinCrafty

Add the letters.

JuniorRangerBanner-Step9-ImFeelinCrafty

Center the ribbon and sew in place.

JuniorRangerBanner-Banner-ImFeelinCrafty

Then hand in place and start collecting (and finding…) those Junior Ranger Badges!

JuniorRangerBanner-BannerClose-ImFeelinCrafty

Enjoy Spring Break!! I can’t wait!


Easter Crafting Over the Years

I had some fun Easter crafts planned for this year. We were going to do that this weekend. Then my son got invited to a sleep over and ditched me and my crafting!

EasterCrafts-ImFeelinCrafty

So I decided to take a walk down memory lane and reminence on the past Easter projects we’ve done together! That’s the one thing about the blog, projects get buried!

The first Easter project I made for the kiddo was the super easy Bunny BaRoo stuffy! He was pretty cute if I do say so myself!

Another early project was a beautiful yarn wreath by Hugs, Kisses and Snot. I just love the felt lilies! And you should check out her site, because she has another beautiful wreath posted recently!

I LOVED perler beads as a kid, so you know I am super excited that my kiddo loves them too. Even though he insists they are called Fuse Beads… One year we made Easter cards with Perler Beads Easter decorations!

And last year we used toilet paper rolls to stamp Easter egg placemats! These I made a no sew project, but you can stamp on anything!

I’m still going to get some Easter crafting on with the kiddo before the big day comes though… Have you made any Easter crafts this year?

Mighty Lucky Quilting Club- January Bias Tape Challenge

Did you join the Mighty Lucky Quilting Club this year? If you didn’t, you still can. I chose to do the yearly membership and get a challenge each month. Am I behind already? Of course!

MightyLuckyJan-Title-ImFeelinCrafty

The January Challenge was Bias Tape. I already knew how to do the bias tape from the Technicolor Galaxy Quilt I’m (still) working on, so it wasn’t totally a new thing to me. It took me a while to decide what do to, and then it hit me!

MightyLuckyJan-Main-ImFeelinCrafty

A tile rep had come into our office and had given us an update on her products and there was this one tile that I loved and of course my first thought was, ‘That would make an awesome quilt!’ But I wasn’t sure how I wanted to get the curves and the thin lines. Then that’s when the bias tape challenge came into play!

MightyLuckyJan-CuttingBinding-ImFeelinCrafty

I found this blue in my stash that I have had, but had not had a use for yet. So I made it into bias tape!

MightyLuckyJan-Blocks-ImFeelinCrafty

Then I started making my blocks. They went super fast. Mostly scraps from my stash.

MightyLuckyJan-AddBiasTape-ImFeelinCrafty

Then I glued on my bias tape. The instructions I’ve always seen say to use this wonder tape stuff. I’ve tried. I can NOT for the life of me get it to work. So I use washable elmer’s glue.

MightyLuckyJan-Block-ImFeelinCrafty

And this is what I got! If you search the group on IG, most of the projects are probably more free form and seem more sketchy than mine, but I actually really like how this turned out!

MightyLuckyJan-Quilt-ImFeelinCrafty

So the plan is to keep making more blocks until I get this! I LOVE it! I can’t wait! I just need 8 more blocks…

MightyLuckyJan-Last-ImFeelinCrafty

Off to make more!


Modern Sampler Quilt Along

I’ve been preoccupied with the kiddos school! I’ve somehow worked myself into updating the school website, resurrecting our school newsletter, starting a PTSA email group and making a PTSA webpage! Wow! Not sure what I was thinking really… But way before I signed up for all this, I joined the Modern Sampler Quilt Along with Salty Oat!

Quilt Along Image

The quilt is actually a design by Yoshiko Jinzenji, a Japanese quilter. I love the pops of color in the quilt, which is why I decided to take the plunge and go for it!

ModernSampler-Main-ImFeelinCrafty

Does this look like me? It’s a bit more low volume than I am used too! But it’s been fun making all the blocks challenging myself to stay away from the solid brights!

ModernSampler-BlkA-ImFeelinCrafty

The first block was Block A. Makes sense, huh! I think this might be my favorite one!

ModernSampler-BlkB-ImFeelinCrafty

Block B. I set this up a paper pieced block. I’m not sure about this one. That center color seems a bit much…

ModernSampler-BlkC-ImFeelinCrafty

Block C was actually like a tea cup and saucer. Or a coffee cup… I don’t like tea or coffee, so I didn’t want a tea or coffee cup in my quilt. I took off the handle hoping the shapes would read just as shapes. I think it worked!

ModernSampler-BlkD-ImFeelinCrafty

Block D. Another one I turned into a paper pieced block so I didn’t have to measure anything!

ModernSampler-BlkE-ImFeelinCrafty

And Block E. I like it! I’m two blocks behind…. So I need to catch up and make 2 more blocks to be caught up.

ModernSampler-CornerNo-ImFeelinCrafty

One thing I didn’t realize about this quilt is that each block is made of blocks with mitered corners borders… It’s good practice…. not that I was really wanting to practice Y seams. But I’m doing it. And sometimes I get corners like the one above. Just not quite right…

ModernSampler-CornerYes-ImFeelinCrafty

And other times they are right one and I do a little happy dance!

ModernSampler-Together-ImFeelinCrafty

Here they are all laid out…

ModernSampler-Last-ImFeelinCrafty

What do you think? Are you making it? Want to join in and get caught up??? Go for it!

Seattle Modern Quilt Guild Swap

OK, this one has been sitting around for a while now. I totally forgot to post it!

SMQGSwap-Mini-Main-ImFeelinCrafty

Last fall we had a quilted gift swap with Seattle Modern Quilt Guild. Each of our swaps are a bit different. FOr this one we were randomly assigned someone to make a gift for. We used some website that we were able to tell each other what we liked, our favorite colors, if there was something we wanted and of course, what we don’t like. My partner’s favorite colors were celadon, coral and purple and she wanted a mini that was about 12″.

SMQGSwap-Mini--ImFeelinCrafty

12 inches? I can’t make someone something that small! I totally felt like I was skipping out on my partner. So for a while I decided to ignore that request. Then thought better and decided there must be a reason, right? Ends up there was! She wanted something for a little table she has! Glad I stuck with her request.

SMQGSwap-Mini-Detail-ImFeelinCrafty

And then it took me a while to come up with what to make someone that only wants a 12 inch block… What block to make? Do I make it up? I love Wombat Quilt’s list of free paper piecing patterns, so that is where I headed. This was another source of internal debate! Which one to use! I finally ended up using the Celebration by Quilting on the Square Block.

SMQGSwap-Mini-Back-ImFeelinCrafty

Another debate I seem to always have with myself is how to quilt quilts. Especially mini’s. And this one I didn’t want to distract from the design, so I decided to quilt in the ditch around the star. I think it really makes the back cool too!

SMQGSwap-Mini-Last-ImFeelinCrafty

And these were all fabrics I had on hand! I love sewing from my stash! And I’m so happy that the little mini was very well received by it’s new owner! It has a happy home!

SMQGSwap-Received-Main-ImFeelinCrafty

And what did I get? A super big pillow to match our living area by my pal Allison from Allison Sews. It’s lovely! And matches our living room perfectly! We have a green leather couch with yellow walls, which leads into an orange dining room. Trust me, it looks much better than I am explaining it! Anyway, the pillow picks up on all those colors!

SMQGSwap-Received-Fabrics-ImFeelinCrafty

SMQGSwap-Received-Back-ImFeelinCrafty

And check out these fabrics! I love them!!! I don’t sew much with prints, so I don’t know what they are, but I love them! And I love have something with prints!

SMQGSwap-Received-Couch-ImFeelinCrafty

SMQGSwap-Received-Last-ImFeelinCrafty

And here it is in it’s new home. It fits right in! And is getting loved by all! Thank you, Allison!


A Weekend of Quilting Classes

This past weekend I took two classes and went to a lecture by Libs Elliot!

WeightofLove-ColoringPage-ImFeelinCrafty

The first class I took was her Weight of Love quilt class. The quilt is really cool. Honestly, I was hoping to learn more in the class than I did… But none the less, I had a great day hanging out with friends and sewing.

I love a pattern with a nice coloring page. This pattern is only available when you take her class. But you can see the quilt here.

WeightofLove-Fabrics-ImFeelinCrafty

The pattern is numbered based on 17 fabrics. But I narrowed it down to 5 fabrics. Black, white and light grey. The my colors are a reddish coral and deep purple. Not two colors I have ever put together. They were actually two fabrics that had been sitting on my shelf not getting used. I just happened to pull them out and realized they look fabulous together! I love them!

WeightofLove-Cutting-ImFeelinCrafty

I also got to learn how to use the Hex ‘n More ruler. I love it! I’ve been wanting it for a couple of years, but never actually got it until it was required for this class. So glad I have it now!

WeightofLove-HalfWay-ImFeelinCrafty

Between the class and a little extra sewing that night, I have it half way finished! Now just to keep sewing…

EmbraceChaos-Pattern-ImFeelinCrafty

The second class I took was her Embrace the Chaos class. with another coloring page! But this time, we made up the pattern in class. Each person designed their own quilt. We picked a certain number of blocks and then played a version of quilt bingo to layout the patterns!

EmbraceChaos-Fabrics-ImFeelinCrafty

I used another pallette of 5 colors, dark and light grey, dark and light teal and red. Oh, and white. So 6 colors!

Each block is different. There’s no chain piecing going on with this one! But I’m half way through making my blocks for this one.

Can’t wait to show you the final pieces!