#What Shade Are You with RJR Fabrics

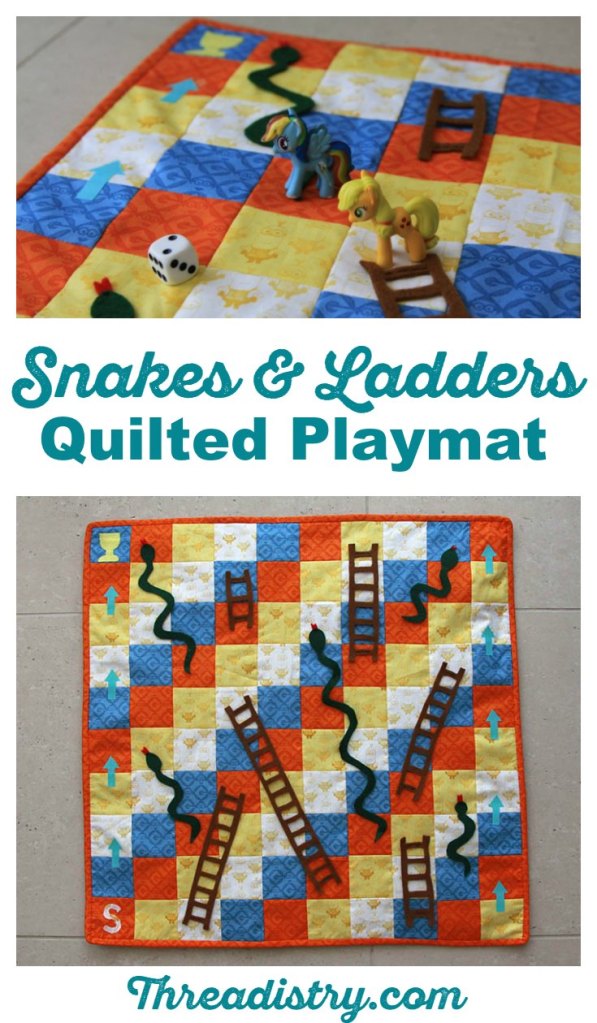
It’s my turn on the RJR What Shade Are You blog hop!! Have you been following along with the #whatshadeareyou series with RJR Fabrics? I started following RJR fabrics when I found the series or blog hop or whatever you want to call it!

What is this # I keep talking about? Each week or so, they feature a quilter with a quilt made from a bundle of RJR Fabric and then have a giveaway of that fabric bundle! The fabric bundle was what originally hooked me, but the quilters are amazing! I’ve found some new quilters to add to my IG feed, for sure. One day they had a call for bloggers interested in participating, so of course I volunteered and they accepted me.

I used the following colors:

Eggnog 228
Canvas 150

Carrot 131
Oriole 314
Bandana 367
tangerine Dream 276
Orange Crush 372

Cove 294
Riviera 274
Luau 376
Turks and Caicos 292
horizon 354

Pistachio 404
Spring 405
Lucky Green 406
Sour Apple 346
Grass is Always Greener 347

2961-001
2960-004
2960-001

Super excited, right?? Yes, I was. Then panic struck! Me being in the lineup with all these other quilters that use tons of different fabric. I typically only use a few different colors in one quilt, but all these others use tons of colors. I remember walking around Quiltcon looking at the quilts with more than just a few colors for inspiration…

Then I decided on a design I had made in one of my office meeting sketches. It was a design I could incorporate a bunch of colors into. The kiddo and I got to work and picked the fabrics, finally… Then they came. And stage fright set in again. And I decided I didn’t want to make the design I was starting to make…

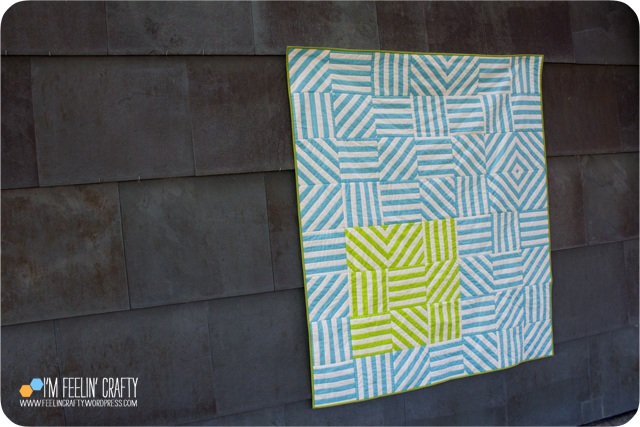
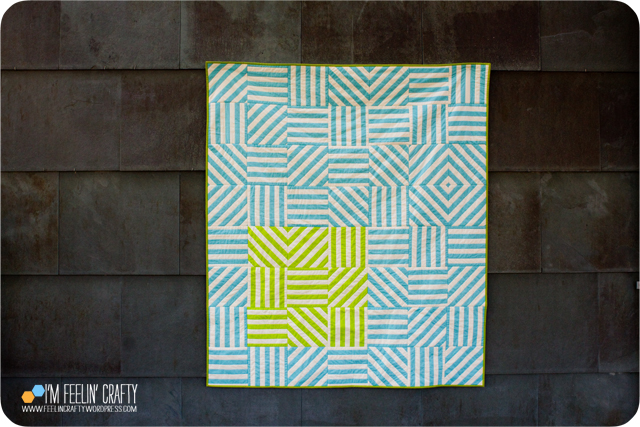
So in came design idea number 2. A Quilt Design A Day design! The ‘spark’ above from Design Seeds inspired my purple design. And that purple design became my #whatshadeareyou quilt! I thought it would be cool, but I still wasn’t sure it would stand up against all the other quilts in the series. Once I started going, it kept growing on me and I liked it more and more! And now I love it! I hope you do too!

I’m calling it Raindrops on Wildflowers! As I was quilting it, I debated, one big spiral or three spirals? The whole family agreed on three circles. The kiddo said it was like raindrops in water!

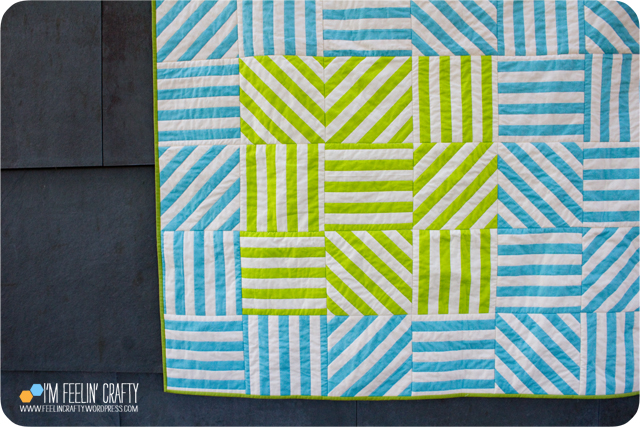
The quilt block is obviously something I just made up, but then I realize it was full of inset corners! Ergh… But I remembered they aren’t so bad and I pretty much mastered it! Well, for this block at least! I’ll post a tutorial soon.

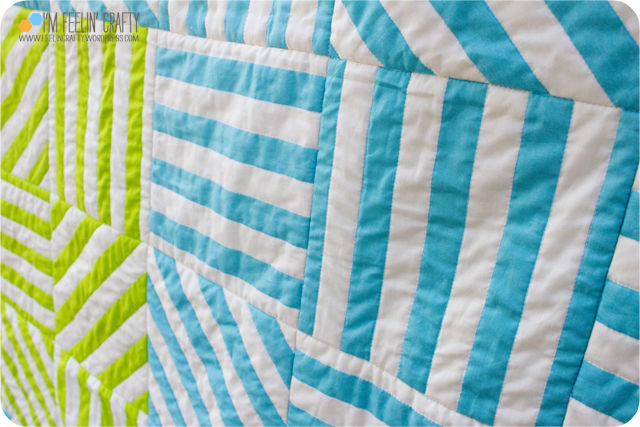
The front had to be the solids collection, which I love. My go to solid fabric is typically another brand that I won’t mention here… But I might have just been swayed! This fabric is much softer than my usual. And there’s still tons of colors to choose from. No reason this fabric can’t be my new go to!

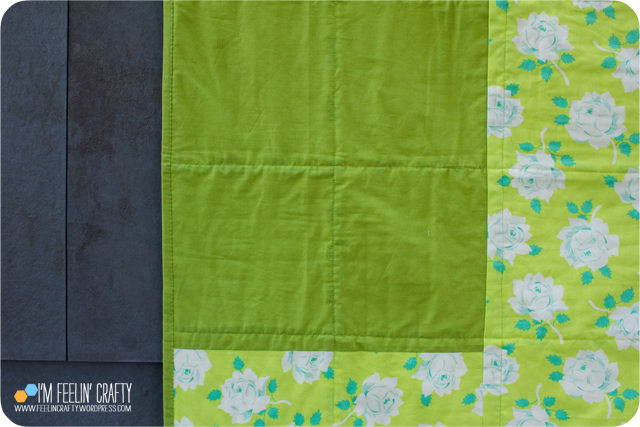
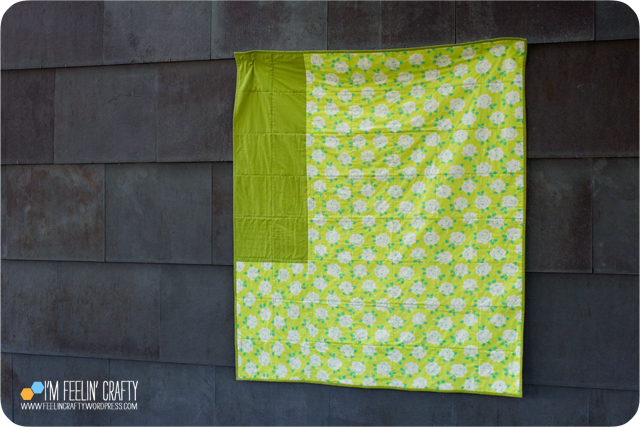
And the back is actually a really fun polka dot fabric. The front had to be solids, but you could choose anything for the back. Obviously I had different intentions since it was a different quilt design I ordered the fabric for, but I like the polka dots and stripes together!

And stayed tuned… A tutorial and giveaway will be popping up here shortly!


Sew Ready to Play 2016 Recap!

Time to say goodbye to this year’s season of Sew Ready to Play! it’s been another great one! Which project are you going to make? We’d love to know! I want to give a HUGE shout out to all the amazing guests that agreed to join me and play along this year! THANK YOU!!!

srtp2016button


pokemongo

Sept 9th- Liz and LiZ  from Simple Simon and Co

pokemon-shirt-1

Sept 14th- Stacey from Boy, Oh Boy, Oh Boy Crafts

snakes-and-ladders-quilted-playmat

Sept 16th- Narelle from Threadistry

img_9345labled2

Sept 19th- Debbie from A Quilter’s Table

sewreadytoplay-main-imfeelincrafty

Sept 21st- Louise from I’m Feelin’ Crafty

angry-birds-toss-childrens-game

Sept 23rd- Al from Shaffer Sisters

img_7267

Sept 26th- Michelle from Factotum of Arts

olivers22tunic11

Sept 28th- Ashley and Emily from Frances Suzanne

Sept 30th- The Recap!

Dominos with Frances Suzanne

Well, there’s good new and there’s bad news today! The bad news… It’s the last day of this season of Sew Ready to Play! It’s been a good one, but it’s almost over… The good news… My lovely ‘Bama friends, the ladies at Frances Suzanne, are here today with an adorable outfit for their niece! These ladies are truly inspiring with the beautiful pieces they make for their three adorable nieces!

olivers22tunic11

Their project is inspired by Dominoes this year. It’s so cute! What a great way to include the game into an cute outfit! Be sure to jump on over to Frances Suzanne to check it out!


srtp2016button

Sept 9th- Liz and LiZ  from Simple Simon and Co

Sept 14th- Stacey from Boy, Oh Boy, Oh Boy Crafts

Sept 16th- Narelle from Threadistry

Sept 19th- Debbie from A Quilter’s Table

Sept 21st- Louise from I’m Feelin’ Crafty

Sept 23rd- Al from Shaffer Sisters

Sept 26th- Michelle from Factotum of Arts

Sept 28th- Ashley and Emily from Frances Suzanne

Sept 30th- The Recap!

Angry Birds with Shaffer Sisters

Welcome back to another fun day of Sew Ready to Play! Today’s guest is another one of my favorite online friends, Al, from the Shaffer Sisters! Al has been awesome to also be a returning Sew Ready to Play guest for a few years now! I always love seeing what she sends over!

angry-birds-toss-childrens-game

And this year it’s Angry Birds! Come On!! Let’s head over to the Shaffer Sisters blog and learn more about what she did to make these guys! I love it!


srtp2016button

Sept 9th- Liz and LiZ  from Simple Simon and Co

Sept 14th- Stacey from Boy, Oh Boy, Oh Boy Crafts

Sept 16th- Narelle from Threadistry

Sept 19th- Debbie from A Quilter’s Table

Sept 21st- Louise from I’m Feelin’ Crafty

Sept 23rd- Al from Shaffer Sisters

Sept 26th- Michelle from Factotum of Arts

Sept 28th- Ashley and Emily from Frances Suzanne

Sept 30th- The Recap!

Ultimate Frisbee with A Quilters Table

Let’s kick off another week of Sew Ready to Play with my quilty friend, Debbie, from A Quilter’s Table!

img_9345labled2

Debbie and I have become great friends over the years participating in Seattle Modern Quilt Guild activities. And just recently we were roommates again at our retreat. I can’t wait to show you more about that weekend. Debbie came to retreat with a bunch of triangles and left with a finished quilt top! She’s speedy! And I’m so glad she decided to play along again this year!

Be sure to go to her blog to learn more about it!


srtp2016button

Sept 9th- Liz and LiZ  from Simple Simon and Co

Sept 14th- Stacey from Boy, Oh Boy, Oh Boy Crafts

Sept 16th- Narelle from Threadistry

Sept 19th- Debbie from A Quilter’s Table

Sept 21st- Louise from I’m Feelin’ Crafty

Sept 23rd- Al from Shaffer Sisters

Sept 26th- Michelle from Factotum of Arts

Sept 28th- Ashley and Emily from Frances Suzanne

Sept 30th- The Recap!

Snakes and Ladders with Threadistry

Yeah! Another Day of Sew Ready to Play!

Today we have a long term Sew Ready to Play player! She’s played along every year! Yea! Today is my blogger friend Narelle. She was originally from Cook, Clean Craft, but now blogs over at Threadistry.

snakes-and-ladders-quilted-playmat

She has a tutorial today for making a Snakes and Ladders game board. I’m used to Chutes and Ladders, so I had to google Snakes and Ladders! All sorts of interesting articles! What did we do before Google?? Sounds like it’s what Milton Bradley based Chutes and Ladders on! Head on over to her blog, Threadistry, to learn more!!!


srtp2016button

Sept 9th- Liz and LiZ  from Simple Simon and Co

Sept 14th- Stacey from Boy, Oh Boy, Oh Boy Crafts

Sept 16th- Narelle from Threadistry

Sept 19th- Debbie from A Quilter’s Table

Sept 21st- Louise from I’m Feelin’ Crafty

Sept 23rd- Al from Shaffer Sisters

Sept 26th- Michelle from Factotum of Arts

Sept 28th- Ashley and Emily from Frances Suzanne

Sept 30th- The Recap!

Pokemon- The Card Game with Boy, oh Boy, oh Boy Crafts

Pokemon is having a full fledged comeback if I do say so myself! It was big when I was a kid, then I don’t remember hearing much about it… Until the last few years! Now it’s ALL over! Even here on the ‘ole blog!

pokemon-shirt-1

And today, we’re welcoming back an awesome lady,  Stacey from Boy, oh Boy, oh Boy Crafts. Last year she was here and played along with the game Othello. This year, Pokemon! And she already has an idea for next year! My favorite game! I knew I liked this lady!

Be sure to go check out her project on her blog, Boy, oh Boy, oh Boy Crafts! Thanks Stacey!


srtp2016button


Sept 9th- Liz and LiZ  from Simple Simon and Co

Sept 14th- Stacey from Boy, Oh Boy, Oh Boy Crafts

Sept 16th- Narelle from Cook, Clean, Craft

Sept 19th- Debbie from A Quilter’s Table

Sept 21st- Louise from I’m Feelin’ Crafty

Sept 23rd- Al from Shaffer Sisters

Sept 26th- Michelle from Factotum of Arts

Sept 28th- Ashley and Emily from Frances Suzanne

Sept 30th- The Recap!


Pokemon Go with Simple Simon and Co

It’s time to really kick off this season of Sew Ready to Play! And to start us off right, our first guests are the ladies behind Simple Simon and Co!

pokemongo

Simple Simon and Co have a lovely blog chock full of fun inspiration! They are the ones behind the Skirting the Issue series I participated in earlier this year. The series collects skirts for foster kids. But not only skirts, blankets too!

Head on over to their blog to learn more about their Pokemon Go inspired project!

This year the ‘rules’ to game are a little different. Traditionally, the guest posted all the details on my blog. This year, I’m posting the teaser and sending you to their blog for more details! Enjoy!


Skirting the Issue with a QAYG Row by Row Tutorial

I’m honored to have been invited by Simple Simon to participate in their yearly series, Skirting The Issue! Skirting the Issue is a  month long event every July where you are invited to sew along with us to make skirts (and quilts)  to donate to local Foster Care centers for the girls to receive just in time for back to school.

SkirtingTheIssue-Main-ImFeelinCrafty

Of course, I was excited that quilts are now included in their series. As most of you know that I also participate in a quilting bee that used to donate our quilts to a foster child organization. We no longer do, which is another reason I was excited to make another quilt for foster kids. Can you imagine not having anything? Not even a blanket? That’s what so many of these foster kids move from house to house with. Nothing. I’m hoping I can change that for at least one kiddo! And hoping I’ll inspire others to also participate and help another kiddo!

SkirtingTheIssue-Sketch-ImFeelinCrafty

This quilt started as a office meeting doodle. I doodle so that I don’t day dream in meetings! I think some people think I’m not paying attention, but really the doodling helps me focus on the meeting…. So I doodled this and a co-worker asked if it was going to be another quilt design. No…. I mean YES! That would make a cool quilt! I had grand plans of piecing each block with strips of fabric… Then I came to my senses and realized, they make striped fabric! Hello!

SkirtingTheIssue-FrontDetail1-ImFeelinCrafty

I wanted to make an easy quilt for new quilters to be able to make and share with the kids! This quilt uses blocks cut from striped fabric using a modified Quilt As You Go method. There are many QAYG tutorials out there. But my biggest thing with QAYG is the bulk at the seam allowance. I found a way to get around that and I’ll show you how I do it. So here’s how I do QAYG….

SkirtingTheIssue-Front-ImFeelinCrafty

SkirtingTheIssue-Tutorial1-ImFeelinCrafty

First, I cut all the pieces. This fabric has 1″ stripes. And a shout out to It’s Just Sewing for the awesome fabric! I want 8″ blocks for this quilt to really show off the stripes. So cute your blocks to be 8 3/4″ blocks. Here’s my biggest QAYG secret…. I don’t use 1/4″ seam allowances. I use 3/8″ seam allowances! Why? I’ll tell you… It’s hard to iron flat 1/4″ seams when you have both the fabric and the batting to be ironing open. And if it’s not ironed flat, it’s hard to catch the seam allowance when you’re quilting….

SkirtingTheIssue-Tutorial2-ImFeelinCrafty

Next I quilt the batting to the fabric, but not a full QAYG style! I chain pieced each row with just one row of quilting. Just enough to hold the fabric to the batting. I’ll tell you why later!

SkirtingTheIssue-Tutorial3-ImFeelinCrafty

Combine the blocks into rows. Are you wondering why I have quilted yet??? Hold on… Keep with me!

SkirtingTheIssue-Tutorial4-ImFeelinCrafty

Then combine the first two rows….

SkirtingTheIssue-Tutorial5-ImFeelinCrafty

NOW QUILT the top row only! I know it’s hard to see in this picture, but the top row is actually quilted.

Now here’s the thing. You could combine all the rows and then quilt the whole thing. But… For me, with all the quilting in this quilt and all the moving around of the quilt, it is easier to me to quilt a row, then another row, etc…. I’m avoiding stuffing my whole quilt through the machine over and over and over each time I change directions.

SeaSlabBOM-April-QuiltedBack-ImFeelinCrafty

I’m doing this same technique with my SMQG BOM quilt. So this may look familiar to you… (Of course, I forgot to take a picture of the backside of this blue and green quilt once I started quilting it!) So this is what the back will look like.

As you are quilting the lines, you will be stitching in the ditch between each quilt line and then quilting over the seam allowance as you continue quilting the stripes.

SkirtingTheIssue-Tutorial6-ImFeelinCrafty

Now we continue on. Top row is quilted and combined with the second row. Then add another row. Quilt the second row. And on and on.

This quilt has 8 rows. So again to eliminate a lot of quilt being moved around and stuffed through my sewing machine, I did four rows. Then started again with the bottom row and worked my way up. Then I combined the two pieces and quilted down the middle.

SkirtingTheIssue-FrontQuilting-ImFeelinCrafty

And you end up with this! Yea!

SkirtingTheIssue-BackQuilting-ImFeelinCrafty

Add your back and quilt in the ditch. and you don’t have the bulk of the seam allowances!

SkirtingTheIssue-Back-ImFeelinCrafty

Another way to do it would be to quilt all the lines on your blocks. Combine them all and then not quilt in the ditch, but do your quilting over the seam allowances. Easy Peasy…

SkirtingTheIssue-FrontDetail1-ImFeelinCrafty

So why didn’t I do it this way? The plain and simple reason…. Aesthetics. I didn’t want the straight lines at the seam allowance to be quilted over the quilting of each stripe. Make sense?

SkirtingTheIssue-Label-ImFeelinCrafty

My son asked why I take pictures of the labels… Because I do! ha!

Recap:

So the two things I do a little different with quilt as you go.

1. 3/8 seam allowances.

2. I don’t ‘quilt as you go’ prior to combining blocks. I quilt as I go, row by row. (or as with the SMQG BOM, block by block.) I don’t do the quilting until at least a couple of the blocks are joined  so that I can quilt over the seam allowance.

SkirtingTheIssue-FrontDetail2-ImFeelinCrafty

Where is this quilt going? I haven’t figured that out yet. There’s a great organization, My Very Own Blanket, in Ohio that organizing matching quilts with foster kids. I’m looking for a local group here in Seattle that does the same thing.

Here’s another secret… I got the fabric for this quilt Friday night. Then I marathon quilted all weekend to get it done by Sunday night. I thought I had until August 26th to share my project with the Skirting the Issue series…. So I’m a bit behind on finding the right home for this quilt….

SkirtingTheIssue-Last-ImFeelinCrafty


And this is also a finish on my Quarter 3 Finish Along!

2016 Finish-A-Long

A Backsplash How To Idea!

Today I’m welcoming Merri Cvetan from the blog Design Coach and she’s going to show us a fun take on a DIY Backsplash! Welcome!

Image 9

The two most expensive aspects to kitchen remodeling are the cabinets and countertop. First, you choose your cabinet style, color and design. Next, you pick out the countertop. There are many countertop options to choose from. Before making a decision, check out the pros and cons of each. The most popular countertop materials are:

 Granite continues to be a popular choice. It’s a natural stone that comes in a variety of colors, veining and patterns. No two pieces are ever the same. It’s resistant to heat, scratches and stains.

 Quartz counters are man made from ground quartz and resin and are extremely durable. It’s available in many colors and textures.

 Solid Surface countertops are also man made and completely non-porous. Since the finish goes all the way through, scratches can be sanded out.

 Laminate countertops are the most affordable option. It comes in a multitude of colors and patterns and faux finishes.

There’s also stainless steel, concrete, wood, copper, marble, soap stone, recycled material, glass, travertine and tile.

Image 2 copy

Depending on the countertop you choose, you may decide to install a coordinating or matching backsplash. There are no hard press rules; it’s a matter of taste, style and budget. The previous owners of this house decided against a matching granite backsplash. They probably planned to install tile backsplash at some point, but never got around to it. Now, it’s in the hands of new homeowners. Although they would love to add color and pattern to their kitchen, a tile backsplash isn’t in their budget at this time.

Image 3

I decided to offer them an alternate solution. I framed vintage recipes passed down from the couple’s grandmothers!

Image 4

Image 5

To do this project yourself, gather a variety of 5 in. x 7 in. picture frames with glass (glass will protect the recipes). I prefer the original recipes, but you can make photocopies and choose a scrapbook paper that coordinates with your kitchen décor.

Image 6

Image 7

Cut the scrapbook paper to fit the inside of the frame and attach recipe cards with adhesive squares.

Image 8

Layout the frames on the counter and rearrange until you get an arrangement you like. Make as many as you need to fill in the space between the countertop and bottom of the upper cabinets.

Image 9

As an interior designer, I always recommend you choose the best countertop you can afford. But you should also consider your personal style and lifestyle: do you cook and entertain? Are durability and maintenance a concern? Do you want a countertop to look like new ten years from now, or do you prefer the patina you get from use? There are hundreds of finishes and colors: Polished or honed? Natural stone or man-made? Bold color or neutral? Countertops cover a large surface in any kitchen, so choose wisely and think about how it will mesh with your backsplash. And if you inherit—or simply choose—bare walls as their backsplash, consider how you can get creative with family heirlooms like old recipes to fill the space. Have fun with the process!

Merri Cvetan in an interior designer that likes to incorporate cool crafty DIYs into her designs. She also gives great kitchen design advice that includes how to match your countertop with your cabinets and backsplash.  To see more info on countertop options, visit homedept.com.