Happy Halloween from my little Demon!

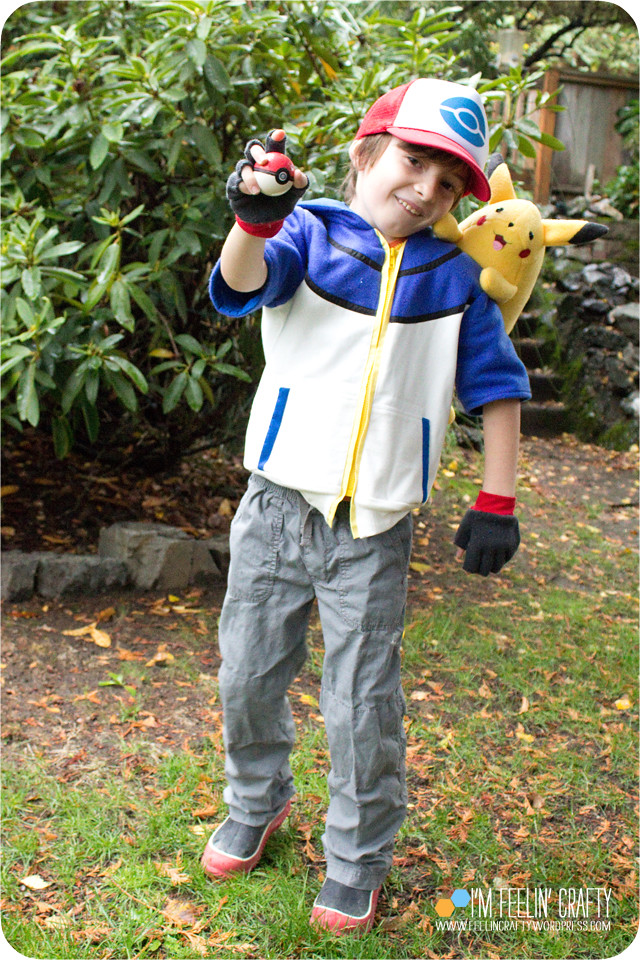
This year the kiddo didn’t go with a handmade costume. And it totally makes me sad! I hear other parents cheering when they don’t have to make a costume, but not me. It makes me sad!

Last year he wasn’t going to have a handmade costume either and it made me sad then, too! Last year he was going to be Harry Potter. We had the whole costume! But he got so sick we had to call off all the Halloween festivities that we typically do. And no trick or treating. So sad…

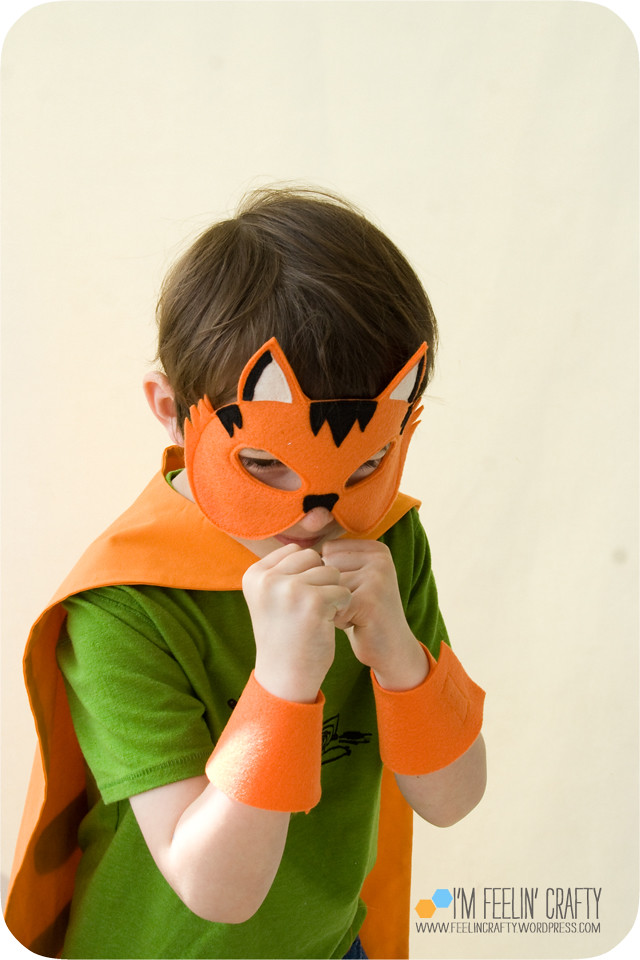
He did get to wear his costume when we went to see Harry Potter at the Seattle Symphony. So this year he was going to be Harry Potter for sure for Halloween! No getting sick!

Costume-Searching2-ImFeelinCrafty

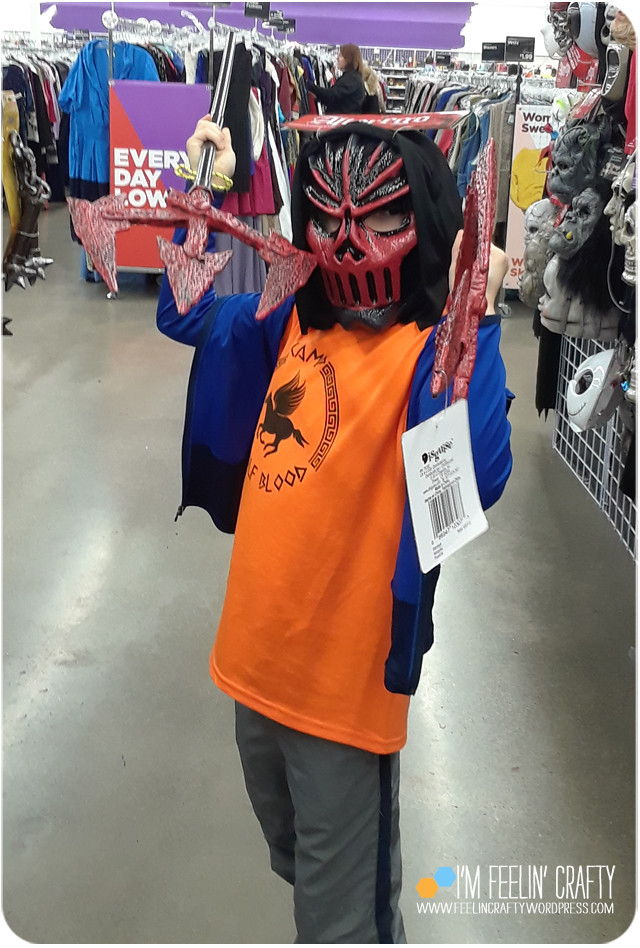
That is until we went to Value Village….

Costume-CostumeFind-ImFeelinCrafty

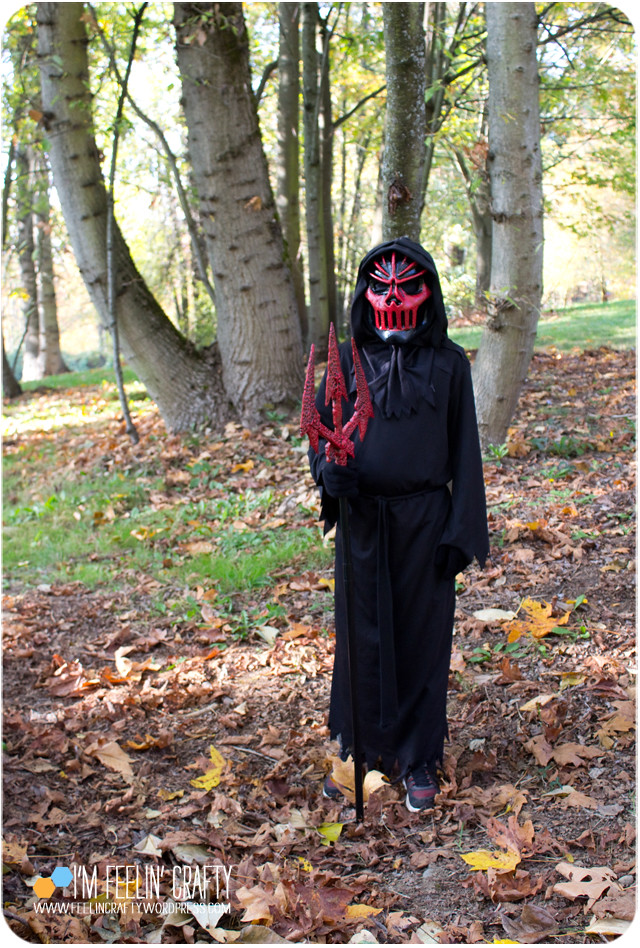
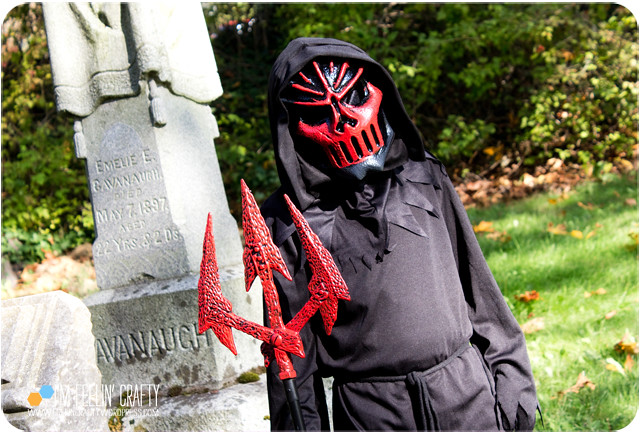
He picked out a costume, a mask and this scary pitchfork thing… Being the mom that I am, I kept saying ‘No…. I don’t know….’ The kiddo kept trying! Then he said, It is creative. I didn’t just pick out an already made costume. I’m picking different pieces and putting them together to be my own costume!’ And then Dad reminded me that it’s his costume not mine and he can pick his own. Ok, fine. Y’all, got me! How can I say no to those two arguments???

Costume-Searching-ImFeelinCrafty

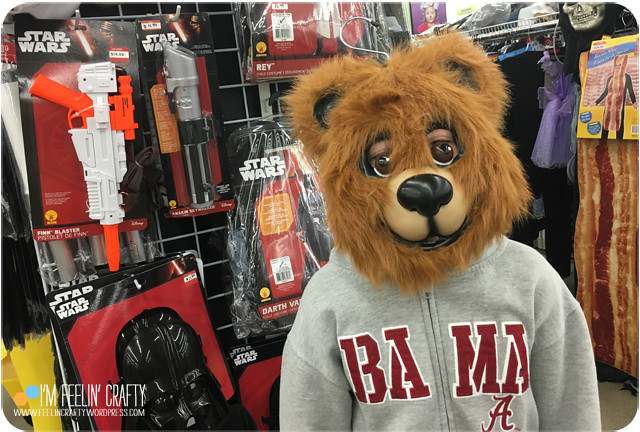
What about a cute bear costume? um, no, mom….

Costume-Searching3-ImFeelinCrafty

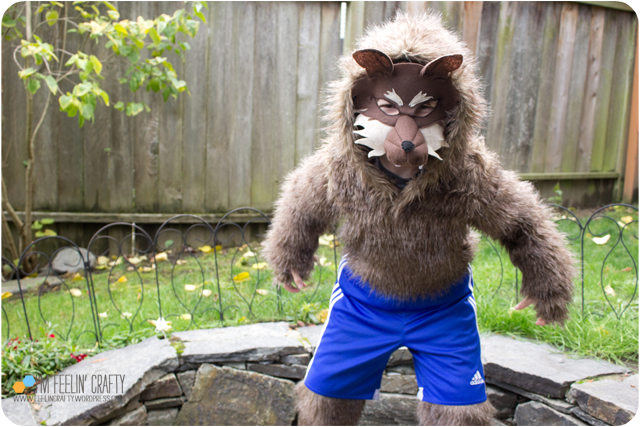
What about this used costume? By Dad’s expression, you can probably tell that that didn’t work! To get the exact thing he wanted and that fit, we had to go new. We could have gone used and altered it, but when they had the exact ‘cape’ he wanted in the exactly right size for only a couple more dollars…. We went new. And he’s super excited!

Costume-Woods-ImFeelinCrafty

Costume-Woods2-ImFeelinCrafty

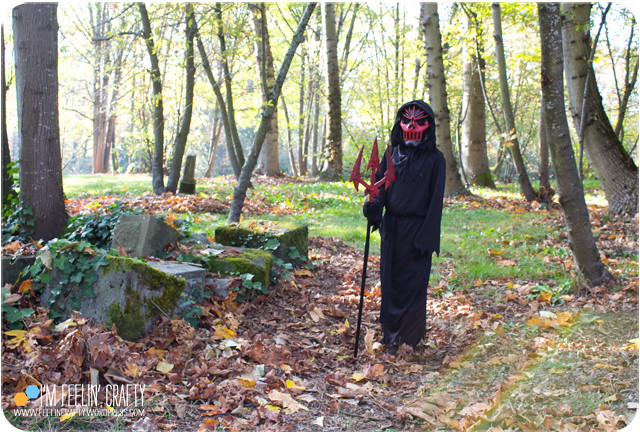
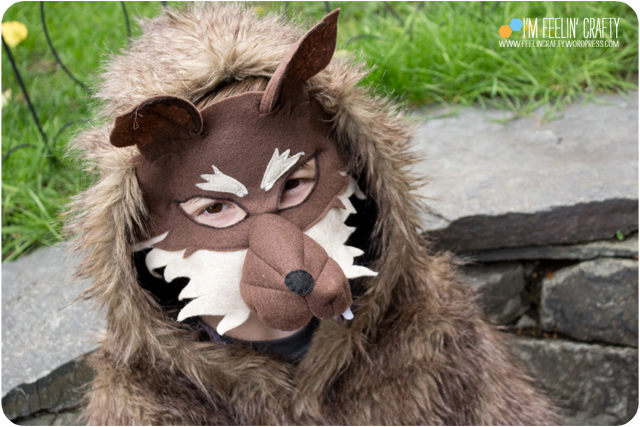
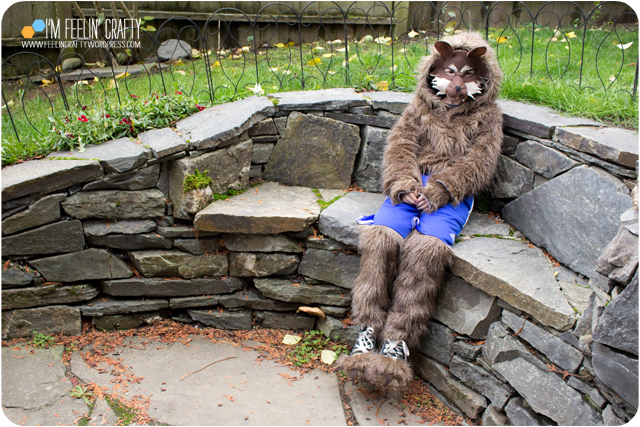
We went to our neighborhood cemetery for the photo shoot. It’s an odd cemetery with not a lot of people resting there. I should find out the story behind it. Either way, it made for some kinda creepy photos!

Costume-Last-ImFeelinCrafty

What do you prefer? Handmade, store bought completely put together or store bought mix and match?


Happy Halloween!


I have been compensated with either payment or product for this post. All opinions are my own, honest opinions!


A Werewolf Halloween 2016

I’m back!!!! Thanks to my good friend Debbie and her family, my computer is back and all my data is saved! I know Halloween was a whole week ago, but I can’t NOT share our Halloween costume!

imfeelincrafty-werewolf-store

It’s not just a werewolf. It’s just any ‘teen wolf’.

goosebumps_werewolf_by_jd1680a-d9nwj92 copy

image via

It’s the werewolf from Goosebumps!

ImFeelinCrafty-Werewolf-Main

I was a little surprised and didn’t take the Goosebumps werewolf seriously at first. But he stuck with it and of, course, I had to oblige! This was my first attempt at sewing with fur. The trick I learned was to use a knitting needle and part the fur. Then I cut down the part. I know there are tons of tutorials for fur, so I won’t go into those details. But the parting of the fur worked great for me!

ImFeelinCrafty-Werewolf-Pieces

I made a bunch of pieces and kinda made it up as I went along. I made a hoodie, leggings, fingerless gloves, paws, and a mask. For the hoodie and leggings, I used Peek a boo Pattern Shop Patterns. I actually made another hoodie and another pair of leggings to make sure I had the right size. I’ll have to share those soon. It was fun sewing for the kiddo again! So, the hoodie is the Boardwalk Hoodie and the leggings are the Winter PJ Bottoms. I almost used the Skinny Jeans Pattern, but decided I didn’t need all that! Especially not out of fur!

ImFeelinCrafty-Werewolf-Mask

As you might know, I’ve made a few masks on my own over the years… A lion, an arctic fox, a fox, a tiger, and a few superhero masks! But I’ve never made one with a snout… So I bought this pattern from EbonyShaeDesigns. She has some amazing masks!

ImFeelinCrafty-Werewolf-Shoes

ok. The shoes were my favorite part! Love them!

ImFeelinCrafty-Werewolf-Shoes2

Technically, he wears hightops, but these were free and my son hates Converse…. So I wasn’t going to buy new to cut open. So we went with free low tops! So then I made little socks, kinda! Kinda mittens. With a little stuffing and elastic to hold them on his foot. Then stuffed them through the hole in the toe of the shoe!

ImFeelinCrafty-Werewolf-Waiting

He loved it! He wore it to school. Since he really was a book character, Dress Like Your Favorite Book Character, instead of dress up for Halloween at school went nice and smooth. I was nervous the costume might come all stuffed in his backpack, but nope! He liked it! He even wanted to sleep in it!

ImFeelinCrafty-WerewolfGlacier-Main

Our dog, who dressed up like a wolf, was very confused about why his boy was so furry! Almost every day, someone asks us if our husky is a wolf! And the week before Halloween a kid at school told her mom to look at the wolf, I responded with, ‘Well, no, he’s not a wolf, but he’s going to dress up like one for Halloween.’ The family didn’t think it was as funny as I did! ha!

ImFeelinCrafty-Werewolf-MyFeet

I even started to feel a transformation coming on while I was sewing and I looked down and it looked like I was turning into a wolf too! Or a hobbit, as someone on IG pointed out!

ImFeelinCrafty-Werewolf-Family

For a few years, I tried to coordinate family costumes, but… It didn’t happen this year! I had a good time making myself a Perler bead mask!

ImFeelinCrafty-Werewolf-Main2

I hope everyone had a great Halloween! I’m glad to be back online, too!


Handmade Halloween

Yes, Halloween has come and gone, but I wanted to share the costumes we had this year!

Halloween-Ash-Main-ImFeelinCrafty

The ‘real’ costume was Ash, the Pokemon trainer, and his Pokemon, Pikachu! We went back and forth and back and forth between costumes. FIrst it was Ash, then Shaggy from Scooby Doo, then another Pokemon character, and back around to Ash!

Ash_Ketchum

Do you know Ash? Well, this is what he looks like as a cartoon….

Halloween-Ash-Whole-ImFeelinCrafty

And this is my real life version! As we were trick or treating, kids kept saying Hello to Ash! Then Dad and I were waiting on the kiddo to trick or treat and these older kids came by talking about the kiddos costume. One kid was telling the other kid about how he’d seen the kid in the Ash costume and,

‘It’s so LEGIT, man’

Talk about making a Momma proud! Oh, yeah! The kiddo came back and I told him about the huge compliment he got and he said, ‘What’s that mean?’ Ha! It means you have a really cool Momma that makes you really cool costumes! hehehe!!!

Halloween-Ash-Pieces-ImFeelinCrafty

This costume was a mish mash of handmade and not. The coat, totally all handmade. I used the Kitschy Coo Reversible Zippy Hoodie Pattern for the jacket. I got the hat online and painted on the symbol with fabric paint. I was planning on making the pants, but when I found then for ten bucks at Target, I just bought them…. The gloves are half and half! I tried to make my own, but then found some just the right color. I cut them down and added on the red cuffs.

Halloween-Ash-Last-ImFeelinCrafty

And Pikachu! I made Pikachu! I made a neighbor one a while back using the Ikat Bag’s Menagerie Pattern with a few alternations. And now the kiddo gets his own!

Halloween-Shaggy01

And remember I mentioned Shaggy? Well, the Friday before Halloween school had a Dress Like Your Favorite Book Character Day. Max choose Shaggy from Scooby Doo! Yes, they are books now. He’s become obsessed with those meddling kids in both book and video form!  And yes, that’s Scooby dressed as a wolf for Halloween! hehehe!

Halloween-Shaggy03-ImFeelinCrafty

Originally, I was just going to whip up a tshirt for him. Then I headed into Old Navy I just happened to find one last green short sleeved shirt with a V-neck, in his size, for $1.50! Um, can’t pass that up! I very liberally used See Kate Sew’s Surfer Slacks for the bell bottoms. I started at one size of the pattern at hte waist, then just drew the pants out at the knee for the bell bottoms. I should have exaggerated even more….

Halloween-Shaggy02-ImFeelinCrafty

You aren’t Shaggy without the silly whiskers! And I found the Scooby Snacks at Target!

Halloween-Ash-Pokemon-ImFeelinCrafty

We had a fun Halloween! The kiddo said it was his best one yet! Awesome! I told him that I hope that when he grows up that he has fond memories of Halloween and being involved with all his custom made Halloween costumes. And I told him, if he has a wife that doesn’t sew, that means he has to make his kids costumes! I hope so!


Who needs Super Man when there’s Tiger Man???

We have great friends that moved across the world, but they come back to visit every now and then! And last month they came home and we all got to celebrate their kiddos birthday together!

TigerMan-Main-ImFeelinCrafty

I got to make a Party Animal Birthday Party theme for him, which I’ll show off soon! But his parents also asked if I could make him a Tiger Man costume! Of course I can!

TigerMan-serious-ImFeelinCrafty

Wait…. Who’s Tiger Man?

TigerMan-Cape-ImFeelinCrafty

Tiger Man is a made up super hero, made up by my friend and his son! Ok, sure I can do it, but what does he look like? They didn’t know. They tell stories about Tiger Man, but he’s never been seen before!

TigerMan-Mask-ImFeelinCrafty

I used the same basic mask design that I used for the arctic fox and the fox. I obviously changed the colors. And of course, I had to add some tiger stripes. Since he is Tiger Man, of course!

TigerMan-Jump-ImFeelinCrafty

TigerMan-Cuffs-ImFeelinCrafty

I decided Tiger Man totally needed some super hero cuffs. And I’m glad I did, I heard that the real Tiger Man (my son was just modeling) uses the cuffs for all his adventures and they’ve become a very integral part of Tiger Man!

TigerMan-OuttaHere-ImFeelinCrafty

And before he runs off to protect us, Tiger Man’s cape includes tiger stripes and the special letter T!

Have you and your family made up special super heroes?


Lion Mask Tutorial with My Own Fringemaker

There are all sorts of projects to do with the My Own Fringemaker, but in the spirit of Halloween I’m thinking of costumes! Like maybe a Lion costume…..

LionMask-Mask1-ImFeelinCrafty


I was going to make a lion stuffie. Maybe I still will, because our neighbors are having a baby any day now! Anyway, I’ll keep you posted on that! I’ve been wanting to do something lion since I found out about the My Own Fringemaker! Register to win a Fringemaker here!

LionMask-Masks-ImFeelinCrafty

And if you’ve been around here for long, you know I like masks! Especially masks! We’ve done the Mr. Fox and the Arctic Fox and now it’s the Lion. Ready to make your own?

LionMask-Step1-ImFeelinCrafty

You’ll need a fringemaker (register to win here, or buy it here), yarn, felt, 14,5″ elastic, the pattern, pipe cleaners, and cutting materials. For the felt I used four colors, cream, orange, yellow and a brownish yellow.

LionMask-Step2-ImFeelinCrafty

Cut out all your pieces.

LionMask-Step3-ImFeelinCrafty


Sew the elastic to the back piece of the mask.

LionMask-Step4-ImFeelinCrafty

LionMask-Step4b-ImFeelinCrafty

LionMask-Step4c-ImFeelinCrafty

LionMask-Step4d-ImFeelinCrafty

Make the mane! Start by tying off the yarn on the Fringmaker in a knot. Wind the yarn around and around and around! With this one I used 2 kinds of yarn, you don’t have to. Then sew down the middle. I just sewed down once since I knew the yarn would be sewn in the mask. And lastly, Remove the mane from the Fringemaker!

LionMask-Step5-ImFeelinCrafty

Position the main on the back mask and pin it in place.

LionMask-Step6-ImFeelinCrafty

Place the front of the mask in place and the chin/cheeks piece and the middle piece on top and sew around the edges. This part isn’t super easy, so go slow so that everything stays aligned.

LionMask-Step7-ImFeelinCrafty

LionMask-Step7a-ImFeelinCrafty

Embellish! Add the inside of the ear and the nose. These pieces could be glued on, but I sewed mine on. And sew down the chin and the middle pieces. Then add the wiskers. Cut a little slit in the cheeks, insert the whiskers and then sew down on top of the whiskers.

LionMask-Step8-ImFeelinCrafty

Cut out the eyes and sew around the edges.

LionMask-Mask3-ImFeelinCrafty

And your done! Find a sweet kid for the mask!

LionMask-Mask2-ImFeelinCrafty

You’ve got a lion! What mask would you make with the My Own Fringemaker?

Don’t forget to register to win here!

I have been compensated with either payment or product for this post. All opinions are my own, honest opinions!


Wonder Woman Crown Tutorial

Remember back when I shared our Sculpey Crazy Crowns? When we made those crazy crowns, we also made a Wonder Woman crown!

WWCrown-Main-ImFeelinCrafty

Let me just give you a little background… I’ve always loved Wonder Woman! She was one of my favorites as a child. That little kid below is me, circa, maybe, 1978ish….

WWCrown-MeBefore-ImFeelinCrafty

I don’t feel so comfortable in a Wonder Woman costume (one day I will again…), so I thought a crown would be fun! Ok, honestly, I was just playing with the gold Sculpey and all I could see was a Wonder Woman crown! It’s ingrained in me, what can I say. When I think crown, I think gold Wonder Woman crown….

WWCrown-Me2-ImFeelinCrafty

Here’s how I made it.

WWCrown-Step1-ImFeelinCrafty

Step 1- This was made with one (1 oz) block of gold Sculpey and a little bit of red. Roll out the gold!

WWCrown-Step2-ImFeelinCrafty

Step 2: Flatten the gold. I made mine about 1/8″ thick.

WWCrown-Step3-ImFeelinCrafty

Step 3: Cut out the shape. I don’t have a template, but I have faith in you that you can wing it! The sides are about an inch wide and the whole thing is about 8 inches long.

WWCrown-Step4-ImFeelinCrafty

Step 4: Flatten your red to the same thickness of the gold and cut out a star.

WWCrown-Step5-ImFeelinCrafty

Step 5: Set the red star on top of the crown and trace the shape of the star. Then cut out the star outline from the crown.

WWCrown-Step6-ImFeelinCrafty

Step 6: Insert the red star into the crown. I know it looks a little rough, huh?

WWCrown-Step7a-ImFeelinCrafty

WWCrown-Step7b-ImFeelinCrafty

Step 7: Roll out the crown with just a bit of slight pressure. Eventually it will be nice and smooth!

WWCrown-Step8-ImFeelinCrafty

Step 8: Make a hole in each side.

WWCrown-Step9-ImFeelinCrafty

Step 9: Hold up the crown to your head to get the right curve. And try your best to hold the curve as you set it on the pan for cooking. It will move slightly, but I was able to keep the curve pretty close to the right one for my head. Then cook per directions.

WWCrown-Step10-ImFeelinCrafty

Step 10: Add elastic and you’re on your way to being Wonder Woman!

WWCrown-Me1-ImFeelinCrafty

You can wear it around the house just to remind your family of who you really are….  Oh, yeah! Now I just need to fit into my Wonder Woman suit and find that invisible plane I misplaced and I’m outta here!

Who’s your favorite Super Woman???

I have been compensated with either payment or product for this post. All opinions are my own, honest opinions!

It’s a Kid! In a T-shirt! No! It’s a Super Hero! In a Cape!

Does this look familiar? This is a tutorial I did for Go To Sew and I’m bringing it home today!

Every time we go to the Gap outlet my son begs for one of those t-shirts with the capes Velcro-ed to the back. And it’s not just the Gap, they have them other places too. It doesn’t matter where he sees them, but he BEGS for one wherever we are. And I always same the same thing, ‘I can make that for a lot less than 30 bucks!’ We’re kinda like a broken record. Please, I can make that, Please, I can make that, Please… Get the idea?

Cape-Title-I'mFeelin'Crafty

So I finally sat down and made him one and he wore it all over town!

Cape-Jump-I'mFeelin'Crafty

OK, this is super simple and can be done with old t-shirts you have around the house! My son decided he wanted Bat Man with a black t-shirt and yellow symbol and blue cape. Honestly, I didn’t know Bat Man’s cape was actually blue. Yes, my then 4 four-year old son convinced me that he knew what he was talking about. I think he loved saying, ‘See, I told you so!’ when we googled images of Bat Man online!

This tutorial is a two part-er. First we did a freezer paper stencil and then we made the cape.

Materials:

Cape-Materials-I'mFeelin'Crafty

A blank t-shirt, color corresponding to your super hero of choice.

Fabric for the cape. About a 1/2 yard, or another adult t-shirt.

Freezer Paper

Your Super Hero Icon

Fabric Paint

Spongy Paint brush

Xacto Knife

Paper for making a pattern.

Velcro

Part 1: The Freezer Paper Stencil. I’m going to go over this quick, since it’s easy and I’ve already done a tutorials here

Step 1: Cut your image out of the freezer paper.

Cape-Stencil-1-I'mFeelin'Crafty

Step 2: Iron it on the shirt with the shiny side down (touching the t-shirt)

Cape-Stencil-2-I'mFeelin'Crafty

Step 3: Paint! Mine took a few (or more) coats of paint.

Cape-Stencil-3-I'mFeelin'Crafty

Step 4: Remove the freezer paper!

Cape-Stencil-4-I'mFeelin'Crafty
Part 2: Make the cape!

Step 1: Make the pattern. Trace the neck and shoulders. The cape will sit up along the neck of the shirt, so we want this shape along the top. Then you decide the length and width! The t-shirts I ‘knocked off’ keep the cape the same length as the t-shirt. We decided to make ours about 3 inches longer. And about 5 inches wider than the back of the shirt.  After a few patterns, I ended up going straight from the shoulder to the edge of the shirt. As in no curves!

Cape-Pattern-1-I'mFeelin'Crafty

Cape-Pattern-2-I'mFeelin'Crafty

Step 2: Cut the cape.

Step 3: Hem each side of the cape.

Cape-Hem-I'mFeelin'Crafty
Step 4: Cut your Velcro. I just happened to have color coordinated Velcro! How cool is that??? You don’t need it, but they do have all sorts of colored Velcro out there! Can you tell how excited I was when I found the blue? I already had the black. Ok, OK, OK! Back to the superheroes! Cut your Velcro in 1 1/2″ pieces. Position the Velcro and sew it on both the t-shirt and the cape.

Cape-Velcro-I'mFeelin'Crafty

Cape-Velcro-2-I'mFeelin'Crafty

Step 5: Turn your kid into a Super Hero! Or you, if it’s for you!

Cape-Photo-1-I'mFeelin'Crafty

So remember how I said I knew I could do it for less than 30 bucks? Well, the t-shirt was 4, the paint was 1 and the blue Velcro was 1 and I had everything else on hand. So it ended up being 6 bucks! Oh, yeah!

Cape-Photo-2-I'mFeelin'Crafty

Which Super Hero would you be??

Cape-Photo-3-I'mFeelin'Crafty


Shared with these Link Parties!

Yo Ho Ho Are you Ready for KCW?

You’ll never believe it, but I have made another costume for the kiddo! Do your kids like costumes as much as mine does?

PIrateCostume-Main-ImFeelinCrafty

The year before last my family was a silly band of pirates for Halloween. My son’s uncle had given him a pirate costume the Christmas before that. It was just a fun store bought costume. My son loved it! It was a hit at his birthday party. The problem with is was that it couldn’t be washed. If the red striped shirt got wet, it bled. And you can only imagine after a year of play, a birthday party costume and a Halloween costume, it needed a wash. So it had to go away. That was over a year ago.

PIrateCostume-Whole-ImFeelinCrafty

The kid kept asking for a new one, just like his old one!

PIrateCostume-Shirt-ImFeelinCrafty

So I finally got down to it and it took all of two hours! Um. Hello?? WHy do I put off these things?

PIrateCostume-YoHoHo-ImFeelinCrafty

I used the Flashback Tee pattern. Lately, I haven’t’ been using a lot of patterns, but sometimes it’s easier to just pull it out and cut. No thinking…. I used a red and white striped tee from my recycle stash. I was going to make the arms red, but it just wasn’t working for me. Instead I raided my husband’s ‘t-shirt to turn into rags’ recycle pile for a plain ole white shirt.

PIrateCostume-Last-ImFeelinCrafty

The vest was actually the one his Dad wore for Halloween, just cut down smaller! And then pants are just comfy pants I made with fleece!

And the pirate hat and other pirate party accessories are available at my etsy shop!

what are you making for KWC?


Shared with these Link Parties!

The Arctic Fox Mask! A Project for You!

Dont’ forget to Vote (for me (hint hint)) now (please), click here! I’m in last place and kinda depressed about it… Trying to stay optimistic! If you haven’t voted for me, please do!

Mask-PRP-WW-ImFeelinCrafty

I don’t know if you remember, but what looks like ages ago (the kiddo looks so little in the pictures), I made a fox mask.

mask2

So of course, I used this as a base for my arctic fox mask!

I’m not going to redo the tutorial that you can find here, but I did update the mask pattern. You can download the pattern here (And vote while it’s downloading here). Print the pattern and then follow the tutorial for your very own arctic fox mask!

I used grey stitching around the eyes for a little accent! Enjoy!

Mask--1-PRP-WW-ImFeelinCrafty

Happy New Year!

I hope yall all had a wonderful New Years Eve! We have a tradition of always going to Tacoma’s zoo and seeing the zoolights, so that’s what we did! Do you have a favorite NYE tradition???

2013Favorites-ImFeelinCrafty

I thought I’d welcome in 2014 with a look back at my favorite projects from 2013! I’ve been reading a lot of other blogs and it seems like I’m not the only one that gets into a mood thinking that I didn’t create too much… But once you sit and look at your whole blog from the past year, I’m reminded that I made A LOT! Yeah!

And my favorites are….

The crazy colorful outfit the kiddo and I made in January for the Project Run and Play Sew Along.

The I Love You Jacket I made for the kiddo in February.

The Super Hero Cape t-shirt tutorial (you’ll see a superhero theme throughout this year!) I made for the kiddo and Go To Sew in March!

One of my all time favorite projects was the Fox Skirt in April (for my friend April’s daughter!).

The wonky star quilt I made, with the help of my Nurture Circle, in May.

The low volume, ‘Lone Star’ pillowcase I made for a swap partner in June.

The little overalls I designed for a friend’s son adoption in July.

I really loved how this needle book turned out that I made for another swap in August.

The Flash costume in September! I didn’t blog about it until October, but technically I made it in September….

And the Hulk Costume in October!

The kiddo and I really loved our melted bead necklaces we made in November.

And last but not least, I loved our Jack and Jill pj’s I made in December!

What was your favorite project that you made last year??? Or do you have a favorite that I made? I’d love to hear about it!!