Community + Family Day at the Frye Museum

If you’re in Seattle this weekend, this is for you! Well, should I say if you’re in Seattle this weekend with kids (or even a kid at heart maybe), this is for you! This weekend, August 2nd,  is the Frye Museum’s  Community + Family Day. It looks like a ton of fun!

Frye

This event is FREE and will be attended by the artists involved in our current exhibitions, Your Feast Has Ended and The Unicorn Incorporated. Perfect for getting to show meet the artists and exposing the kiddos to so much fantastic art!

frye_fd2013_©STro_034

The museum is working to make sure that kids have access to arts and crafts through multiple points of entry. Throughout the day there will be live music, mural making, planting, fort building, breakdancing, storytelling, and more. I wish we were in town, because I know the kiddo would love the break dancing part!

frye_fd2013_©STro_013

Be sure to check out the rest of the Frye’s SUMMER 2014 FOR KIDS + FAMILIES
Fridays, August 1 and September 5, 11:15 am
Small Frye: Storytelling in the Galleries
Small Frye for the summer! Classic and contemporary children’s stories are brought to life in the Frye galleries for children three-to-five years old. FREE

Sunday, August 2, 11 am–4 pm
Community + Family Day
Build a fort, plant a garden, learn to breakdance, take an improv class, and more! A day full of educational and fun activities celebrating the work of artists Curtis R. Barnes, Maikoiyo Alley-Barnes, Nicholas Galanin, and Nep Sidhu. FREE

Friday, August 22, 11:15 am
Snap! Shows for Kids
Back by popular demand! Show Brazil is an interactive live performance of bossa nova, Brazilian pop tunes, and original compositions written and performed by Eduardo Mendonça.

Have fun!!

fort-animation_final

All images provided by Frye Art Museum.

My 1st T-shirt Quilt!

So last week was Kids Clothes Week over at Elsie Marley. Did you make anything? I usually make clothes at least once if not the whole week. But I was super busy finishing a quilt top! And it was made from a friend’s childhood t-shirts. So I was working with kids clothes…. Does that count?

TshirtQuilt-Main-ImFeelingCrafty

A teacher from the kiddo’s school asked if I could turn her old t-shirt pieces into a quilt top. And of course, you know what I said…. Yes! I had them for way too long and I finally started my plan of finishing projects that are piling up under my ironing board…. Since hers was just the top, I figured it was an easy one to cross off the list!

TshirtQuilt-Whole-ImFeelingCrafty

Have you ever made a t-shirt quilt? Well, neither had I. I have started one! HA! That’s no surprise is it! Anyway… I got the pieces from her and she had already fused a feather weight interfacing to the piecing! That made my life easier, for sure. When I started mine, I didn’t use interfacing… Luckily I only finished one block. But the fusible interfacing really helps with the shirts stretching and also with combining different types of knits and if you are introducing other fabrics like we did on this one. The black is a cotton.

TshirtQuilt-Top-ImFeelingCrafty

She had also started a little bit of it, so I knew the look she was going for. She had started two rows. So I continued with that, making 4 separate rows, then sewing the rows together. I like how that gave it a bit of an organic layout. I also like the black borders between the pieces being different sizes. A bit impromptu if you will!

TshirtQuilt-Bottom-ImFeelingCrafty

It’s such a small world too. As I was making her quilt I knew I had heard of her high school, but couldn’t place where. Ends up, my co-worker went to high school with this teacher and was friends with her older sister! Funny!

So I handed off the quilt top to her and she’s having it finished by her mother, I believe! I really enjoyed working on it and it totally inspired me to get back to the one I was making for my family!

TshirtQuilt-Last-ImFeelingCrafty

Have you ever made a t-shirt quilt?

Healthy Lighting Workspace Makeover Giveaway from Verilux

I have been working on lighting in my craft room/sewing room with Heather, my new friend at Verilux for the last few months! And have we got a great giveaway for you today!!

Verilux - The Healthy Lighting Company

We redid our basement about 6 years ago and I think we might have put in the wrong size can lights, because they warm the upstairs floor. The basement, or what we call the 1st Floor, is where we spend a lot of our time because it’s our room, my son’s play room and it’s our craft room! And the lights that seem to be a problem are the ones in the craft/sewing room. So my husband and I were talking about how to fix it. And I’m not kidding, literally, a couple of days later I get this email from Heather asking if I could try out some of her lights!!! Would I like to revive the lighting in my craft and sewing room??? It was like she heard us talking…. So of course I said yes!

Verilux-Bulbs-ImFeelinCrafty

Next step… Happy Mail! Yea!!

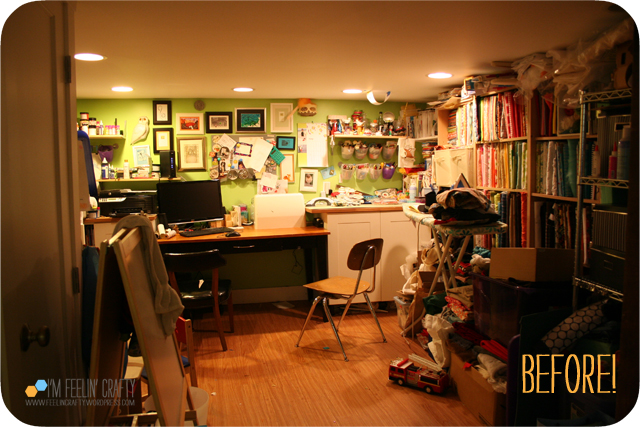
Verilux-SewingRoomBefore-ImFeelinCrafty

So this is my room before the lighting revision. And yes, I have a bunch of stuff. Trying ot work on that… Remember my finish along.. We’re just talking lighting here! heheh!

Verilux-SewingRoomAfter-ImFeelinCrafty

And then after…. Can you see the difference? I didn’t edit my pictures at all, so I’m hoping you can see it. I can totally feel it! And see it! the colors are more real. And I don’t know exactly what it is, but it feels better to me.

Verilux-SewingRoomLED-ImFeelinCrafty

Originally we tried the LED lights in the work room… Not so much. I have to say though, at first I was in love. the color for everything was right on. I didn’t feel like I got that yellowy color. But after a day or two, we all realized they just weren’t bright enough. My son even asked me to turn up the lights! So then Heather and I started chatting and realized yes, the LED are fantastic, but not what we needed in the craft room.

natural spectrum vs. conventional light

Have you ever used special lighting to enhance your creative endeavors?  When working on a project, it can be a frustrating to find that colors appear differently indoors and outdoors, as well as even under different lamps.  Verilux lighting products emit a broader spectrum of wavelengths, so colors appear truer.   So much so, museums have used their lighting to better illuminate works of art. Verilux fixtures and bulbs emit spectrally enhanced natural spectrum light, which research shows helps  us see better, reduces eye strain and fatigue, as well as improves our ability to process information, which is great for crafting, sewing and for the family work space! The graphic shows the Verilux difference compared to conventional lighting in the eye.

Moreover, just as we feel can feel better on a day full of sunshine, consumers often use Verilux lighting products to increase energy levels and elevate mood.  If you’ve ever heard of light therapy for seasonal affective disorder or the “winter blues,” you know that light can make a huge difference for people.

Verilux-FabricBefore-ImFeelinCrafty

Verilux-FabricAfter-ImFeelinCrafty

You can see the different between the fabric colors. The before on top, the fabrics have that yellowy look where in the after picture below, the colors are more real.

And remember about how I was saying the LED lights didn’t work in the craft room? Well check them out in my bathroom!

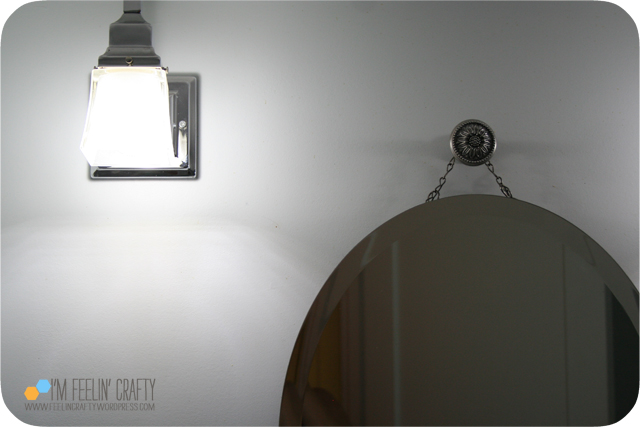
Verilux-BathroomBefore-ImFeelinCrafty

Here’s the lighting before!

Verilux-BathroomAfter-ImFeelinCrafty

And after! My bathroom is a very light blueish grey color. Not a taupey yellow…. The after is right on! It’s not as bright as before, but it makes the room the right color! I love it! I remember growing up, my mom had a make-up mirror with the right color bulbs for putting on her ‘face’ as she calls it. Now my whole bathroom is that way!

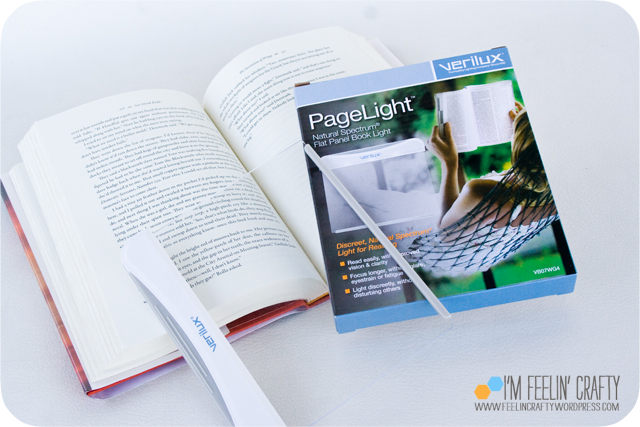
Verilux-Pagelight-ImFeelinCrafty

One more goodie to tell you about before I share the giveway! As a little bonus, I got this fantastic PageLight! I love it! In my house, I usually stay up later than everyone else crafting and blogging and such. But then when I go to bed, yes I do sleep, I like to read a little. I’m tried so many flashlights, etc. I had been using my iphone flashlight, but it was so bright and lit up the whole room almost. This is perfect. The light levels are adjustable and it only lights the book! Did I mention I love it????

And now what your really waiting to hear about is the giveaway and discount code, right???? Verilux has graciously agreed for one reader to make their very own Healthy Lighting Workspace Makeover! One lucky reader will get to enjoy the benefits of healthy lighting in your workspace with a Brookfield Desk Lamp or your choice of up to 6 bulbs to convert current lighting fixtures or lamps!!!

And every reader can start thier own  make0vers with 25% off Brookfield desk lamp!! Use Promo code: BROOK25, for your 25% off Brookfield desk lamp. (Promo Code valid until 8/15).

Ready to WIN? You have Three ways to enter! And come back and leave a separate comment on this post for each entry!

1. Visit Verilux and let us know your favorite product! Leave one comment. (one entry)

2. My blog followers get an extra entry. Click on the links to the right to follow. Leave one comment. (one entry)

3. Share the giveaway on your own social media, like FB, Instagram, your blog, twitter…. Leave one comment. (one entry)

That’s 3 possible entries! You must comment on this post to win. Open to both US and Canadian readers only. The giveaway will close on August 3rd at 11 p.m. PST, and we’ll choose one winner using Random.org.

Thank you Verilux!! I love everything and I know my readers will too!!! Yea!!!


I have been compensated with either payment or product for this post. All opinions are my own, honest opinions!

Fabric Bunting Tutorial

Today I am working hard on projects to get done before we head out on a spur of the moment vacation, so I thought I’d bring home another tutorial I did last year for Go To Sew! I know it’s a repeat, but I’ve got some other fun things in the works to share so just bear with me!  A fabric bunting! Quick and easy! A sweet thing to hang in the house or give as a baby gift (or any sort of gift for that matter)!

Bunting-Main-ImFeelinCrafty

I made a bunting a LONG time ago and I made it too big! But this version is a smaller one with a little something extra. Quilting! Recently a colleague asked me to make one, so I did! And I thought I’d tell ya how I made it so you can make your own!

Bunting-Materials-ImFeelinCrafty

The materials you need… You’ll need fabrics for the bunting pieces and fabric for the binding, a cutting tool, pinking shears, and batting. And if you’re wanting to add letters you’ll also need something like heat and bond (two sided fusible adhesive) and your letters. The pattern for the triangles is here.

Bunting-Step1-ImFeelinCrafty

step 1- Cut and cut and cut! Your fabric and your batting into triangles.

Bunting-Step2-ImFeelinCrafty

step 2- Stack your bunting pieces. Lay the back side right side down, then your batting and then your front side right side up.

Bunting-Step3-ImFeelinCrafty

step 3- Sew the three pieces together on the two long sides. You don’t need to sew the top side.

Bunting-Step4-ImFeelinCrafty

step 4- Trim the two sewn sides with pinking shears.

Bunting-Step5-ImFeelinCrafty

step 5- If you’d like to add letters you can here. Iron on the interfacing to the back of the fabric you want the letters cut out of. Then trim the fabric to the right size of the letter. remove the backing from the interfacing. Then iron on the letter. Depending on the interfacing you use, you can stop here if it’s a no sew interfacing.  If it’s a sew on interfacing, topstitch now.

Bunting-Step6-ImFeelinCrafty

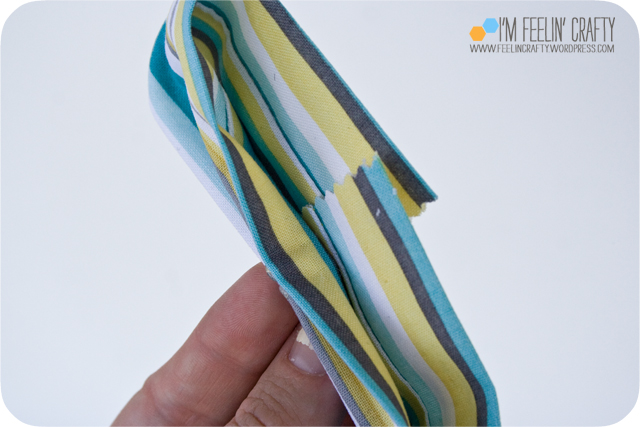
step 6- Now for the binding. You could use premade binding if you’d like. Or you can make your own. I cut two inch strips, sew-ed them together at an angle and then folded it in half and ironed. Then folded the sides in again and iron again. And lastly, sew it to the flags.

Bunting--End-ImFeelinCrafty

And you’re done! See? Simple! What fabrics would you use? What occasion would you make one for? Enjoy!

A Fundraiser for Enchanted Makeovers!

What did you do when you turned 40?? I’m not sure what I’m going to when it happens (which is way sooner than it seems like it will be). Do you follow my friend Jenny’s blog, The Southern Institute? Well, she just turned 40 and is using her milestone as motivation to help others! 
Help me reach my goal of raising $1000 for Enchanted Makeovers this month at http://bit.ly/enchantedmakeovers.
If you could help a battered, abused woman get back the hope that was stolen from her, you would do it, right?  Guess what?  YOU CAN help by donating to the Enchanted Makeovers fundraiser with me. Jenny just turned 40 years old this month and created a fundraiser to give back to women who are hurting and need our help.  Most of us are so fortunate, aren’t we?  We have families who love us, homes to take care of, food on the table, jobs to go to, or we choose to stay home with our children because we can.  Can you imagine not having those gifts in your life?  I remind myself daily not to take them for granted.  There are so many women out there who have been hurt and have no choice but to depend on the kindness and generosity of strangers for their needs.  We can help! 
banda

‘Since 2007, Enchanted Makeovers’ mission has been to transform homeless shelters for women and children into places that inspire behavioral and psychological change. Through our various projects, mentoring programs and makeovers of the physical space, women and children are introduced to a way of thinking that helps to shift their outlook about their lives and possibilities for the future. The shelter is transformed into a “beacon of hope”. Mentoring programs such as the“Sacred Sewing Room”, “Stepping into the Dream”and “Capes for Kids” develop important life and coping skills.’- via Enchanted Makeovers


photo8

 
There are only ten days left in Jenny’s fundraiser, and she’s far from her goal of raising $1000 dollars.  Please consider giving whatever amount you can.  It would mean so much to the women AND children who benefit from the services that  Enchanted Makeovers provides.  And I don’t mind begging… because it’s not for me, it’s for someone much less fortunate who needs our help.  PLEASE give today and think of the hope that you will be bringing to another woman who needs it desperately.
Let’s make Jenny’s goal happen! Thanks for your help!


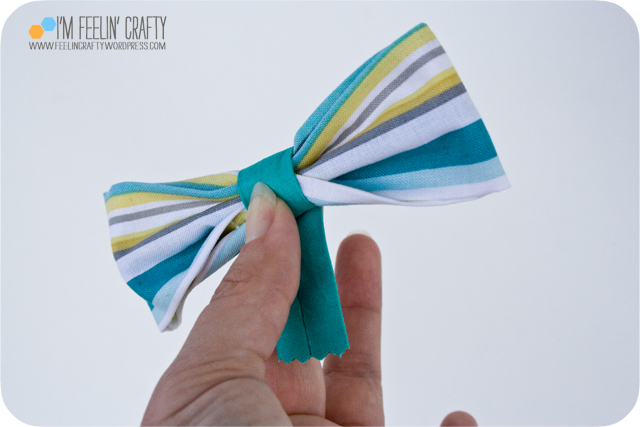
The 10 Minute Bow Tie- A Tutorial

I loved the bow tie I made the kiddo back at Easter and I said I’d show you how I did it! So now I will!

BowTie-Title-ImFeelinCrafty

The kiddo loved his, but was playing with the first one I made him. And lost it at church that morning. So he asked if I could make another one. Of course I could! He needed it! That’s when I realized it really only took me about 10 minutes!

BowTie-Step1-ImFeelinCrafty

First, You’ll need hair clips, fabric, hot glue, pinking shears and cutting supplies.

BowTie-Step2-ImFeelinCrafty

Secondly, cut the pieces. You’ll need one piece for the bow that’s  10.5 x 4 inches. And another piece that’s  5 x 2 inches for the middle, tie, part.

BowTie-Step3-ImFeelinCrafty

Step 3, sew both pieces together, right sides together, along the long side.

BowTie-Step4-ImFeelinCrafty

Step 4, Turn the pieces right side out and iron with the seam centered on the back.

BowTie-Step5-ImFeelinCrafty

BowTie-Step5a-ImFeelinCrafty

Step 5, Pinch the bow fabric together in the front and I like to put a little hot glue here to hold the folds together.

BowTie-Step6-ImFeelinCrafty

Step 6, Fold the bow fabric together with the ends overlapping about 1/4 inch or so.

BowTie-Step9-ImFeelinCrafty

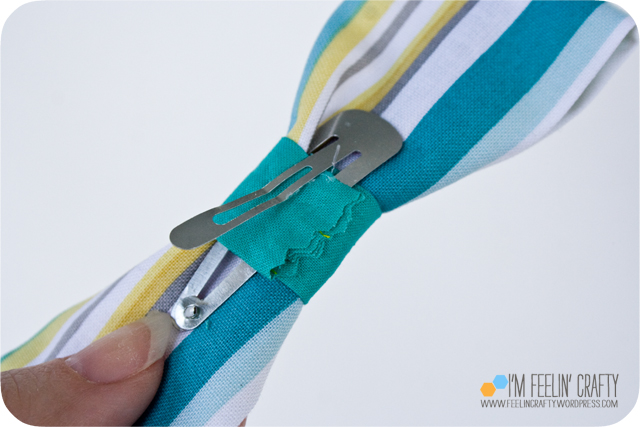
Step 7, Hot glue the hair clip and one end of the tie fabric together on the back.

BowTie-Step8-ImFeelinCrafty

Step 8, Pull the tie fabric tight around the front. Make sure the tie is situated how you want it to be.

BowTie-Step10-ImFeelinCrafty

Step 9, Add another spot of hot glue on or right past the hair clip. Pull the tie fabric through and secure it.

BowTie-Step12-ImFeelinCrafty

Step 10, Trim the extra fabric with the pinking shears. And you’re ready to go!

BowTie-Last-ImFeelinCrafty

Ok… Me and my red hair that’s turning white WAY to early didn’t really wear the bow tie… But it could be a hair bow too!

Easter-Closeup-ImFeelinCrafty

Kids Clothes week is coming up, so be sure to add a bow tie to your list!


Preschool Auction! I Love a Party!

Last year, I had a great time decorating our preschool’s auction! Don’t be too surprised, but they asked me to do it again this year!

Auction-1-ImFeelinCrafty

The tree and the green above is our school’s logo. That is without the heart. The heart was added for the auction. I didn’t come up with the color scheme or the theme, but I love it! Bright green, dark green, hot pink and brown. Love it!

Auction-FlowersDtl-ImFeelinCrafty

Auction-SIgn-ImFeelinCrafty

We decorated a little bit upstairs, around the stairs, in the silent auction room… But most of the decorating went into the live auction and dinner room!  We used a LOT of fans! Perfect! I love fans… We used them last year, too. I wonder if they will use them next year when we’re not around….

Auction-Before-ImFeelinCrafty

This is the room we started with….

Auction-After-ImFeelinCrafty

And this is the room we ended with… And notice, I keep saying we… This was not all me by any means. I was the head of the committee, but we had a great, creative team that helped with the design and implementing the designs!

Auction-Process-ImFeelinCrafty

I took some process shots to see it coming together!

I admit, I’m kinda a control freak when it comes to designing and throwing parties. So doing this type of party by committee is a real lesson in patience that I need! And going with the flow is fantastic! There were a few things that didn’t go as planned, but turned out beautifully!

Auction-VaseStart-ImFeelinCrafty

Like the enterpieces, for instance…. The original plan was to fill vases with limes. Great idea when limes aren’t at the highest prices EVER! Did you notice the prices of limes were insane this spring? Sooooo… What do you do? You take the tulle that was planned for the stairs, and fill the vases with limes and tulle!

Auction-Flowers-ImFeelinCrafty

And then I had cut all these strips of paper that were intended to stand up and add height to the centerpieces. Well that did’nt work… But curled, they worked perfectly as table scatter!

Auction-Hearts-ImFeelinCrafty

And if you’ve read about any of my parties, you know I love party favors! So I came up with this little felt flower that incorporates the heart of the auction and the tree leaves in the logo for a little table decoration and everyone’s party favor.

Auction-Favors-ImFeelinCrafty

We made a BUNCH!

Auction-Process6-ImFeelinCrafty


Auction-After-ImFeelinCrafty

I think we pulled it all together quite nicely! What do you think?


Third Quarter Finish-Along

ok, I’m doing it too. I’m joining the Finish-a-Long. I make lists. Do you make lists? I like making lists so I can scratch things off the lists when I finish something! And this is kinda like a list… (trust me, everything I”m showing you here is on my list!)

FAL-2014-Button

So, I’ve been seeing a lot of my quilting buddies post about this Finish-Along thing… At first I didn’t know what they were talking about. Then I realized what was going on! You show everyone what you’re working on, but what isn’t finished. And try to commit to finishing it by the end of the quarter! SO I’m in!

MMChallenge-Process-ImFeelinCrafty

The project I’m going to finish first is the Modern Quilt Guild’s Michael Miller Challenge! I don’t have much left!

doGoodMay-Process-ImFeelinCrafty

Then I’ve got to get my do.Good Stitches bee quilt finished for our Nurture Circle.

ModernMetallic-Process-ImFeelinCrafty

And I totally missed the deadline on the Seattle Modern Quilt Guild’s Modern Metallic challenge, but I still want to do it!

Gnomes-Process-ImFeelinCrafty

I did start this gnome quilt right before my machine took it’s nosedive.

WIP-Dads2-ImFeelinCrafty

I really want to finish my husbands quilt….

And trust me… I have a much longer list, should I keep going???

There’s the BOM of the month neon quilt I want to do… There’s a friend’s t-shirt quilt top… There’s my t-shirt quilt… There’s the tree quilt I started about 4 years ago… There’s the memory quilt… There’s the teacher totes…

I could keep going, but I’m going ot stop now…. What are you working on?

Designing with the Kiddo

We’re at it again! The kiddo and I designed another fabric design for the Spoonflower weekly Design Contest! We had a great start and some fun feedback on our surf design (which is now available for sale here….) So we did it again!

Parade of Rhinos-ImFeelinCrafty

This week’s challenge is Rhino’s! The design didn’t come out quite like I had planned, but we like it! I drew the rhino, then photocopied it over and over and over. Next we ‘decorated’ the rhinos. Lastly, I scanned them all back into Photoshop and set up the design. Actually the whole family designed this one. Dad even got in on it and designed a few. We call it ‘Parade of Rhinos’!

farm-ImFeelinCrafty

I did sneak in another design between the surf and rhino challenges. I submitted one for the farm challenge. This one I wasn’t too excited about… I’m not sure exactly what it is, but it seems boring to me.

Print

Our local Architecture Without Borders group and the local Architecture for Humanity are sponsoring a design competition that I think the kiddo and I are going to do too! The competition is to design a Free Little Library. The kiddo has wanted one for a while, so when I saw this design competition, I knew it was right up our alley! I’ll have to keep you posted on our progress!

Of our three designs, which one is your favorite? I’m thinking maybe pj’s made out of the rhinos… What do you think?


April’s do.Good Stitches Quilt from the Nurture Circle

And here’s another one! This one is kinda funny to me, because it almost seems like the opposite of March’s quilt!

doGood-April1-ImFeelinCrafty

I don’t really know why it seems this way to me, but it does. The blocks are totally different, but similar! I guess in the March quilt, more people used a darker center, then it went out to a lighter ring. There this one, everyone’s center is white and then the bright ring!

14281048428_933be3a812_k copy

This quilt was made by one of our new group members, Brianwa of Purple Poppy Designs. Who actually lives quite close to me and I’m hoping will come to our Modern Quilt Guild Meeting this month… (tomorrow…)

doGood-April3-ImFeelinCrafty

I love how scrappy it looks! I love blocks were I can get almost all the pieces from my scraps! I think all the pieces for this one came from the scrap box!

doGood-April2-ImFeelinCrafty

The quilt pattern is called Patchwork Wheel and is a free pattern from Craftsy designer, Don’t Call Me Betsy.

14487783393_fcab612c46_k copy

I also love the back of the quilt! Great job Briawna! The May quilt is up to me… I better get going!