Quick and Easy Cord Tacos- a Super Simple Tutorial

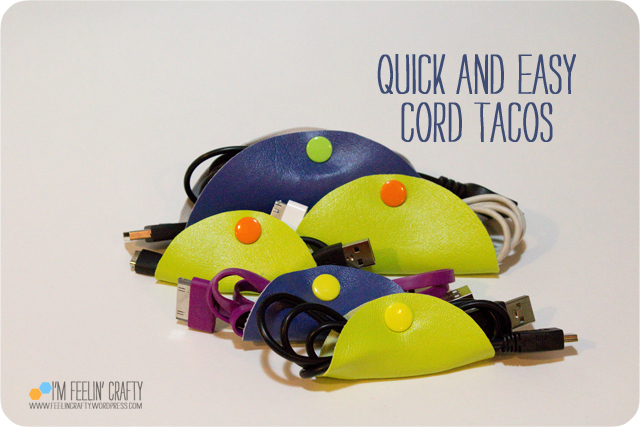
Have you seen these cord tacos?? I’ve been seeing them in magazines and catalogs. And of course, I pull the ‘I can make that’ routine!

CordTacos-Main-ImFeelinCrafty

Everywhere I have seen them, they are about 5 dollars a piece. Granted, a lot of them are leather, but still…. If you’re like me, you have scraps of vinyl and or leather around from other projects and you have a pile of snaps. So it’s going to be way cheaper then what they are selling them for! And I don’t need mine to be leather anyway!

CordTacos-BasketBefore-ImFeelinCrafty

I do a lot of my blogging on my laptop in the living room with a table next to my chair. And on my table is this cool basket full of cords. It drives me nuts, because I go to grab a cord and they all come rolling out!

CordTacos-BasketAfter-ImFeelinCrafty

The fix? Cord Tacos! And I love that the ends stick out, so I can see exactly what I am looking for!

CordTacos-1-ImFeelinCrafty

CordTacos-Materials-ImFeelinCrafty

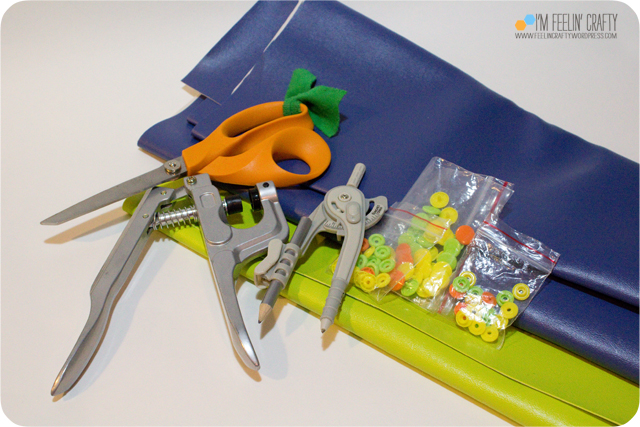
Seriously, these are SO easy to make. It took me about a half hour to make all 5. If that! You need a little bit of vinyl or leather. Scissors. Something to draw a circle with. I used my dollar store compass. And a snap set.

I used the marine grade vinyl because it doesn’t have the flannel backing on it.

CordTacos-Step1-ImFeelinCrafty

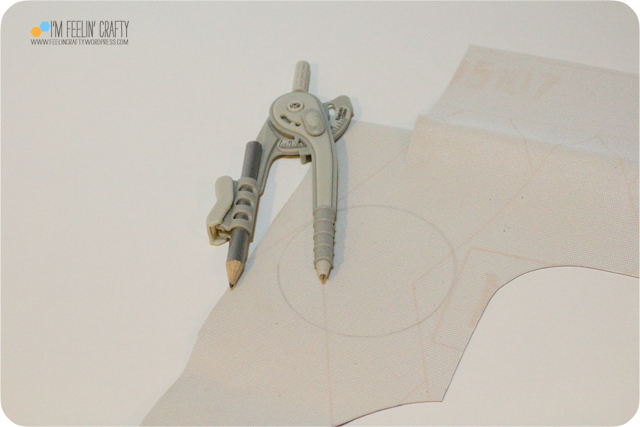
Draw your circles. I made mine 3 and 5 inches in diameter. The smaller size is probably going ot get the most use. It’s perfect for the cell phone chargers, etc. I did make one smaller for my fitbit charger, about 2.5 inch diameter.

CordTacos-Step2-ImFeelinCrafty

Cut out the circle.

CordTacos-Step3-ImFeelinCrafty

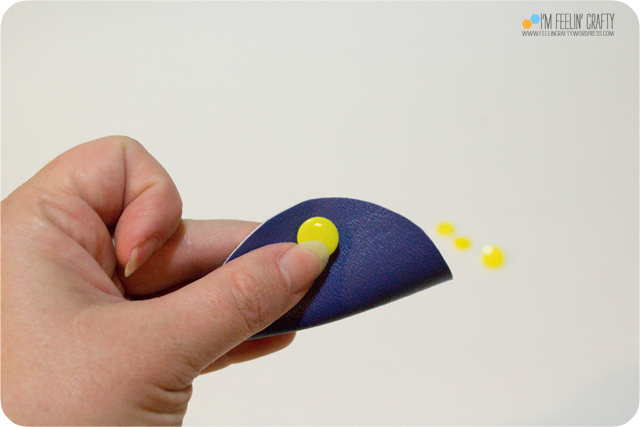
Locate where you want the snap and mark it.

CordTacos-Step4-ImFeelinCrafty

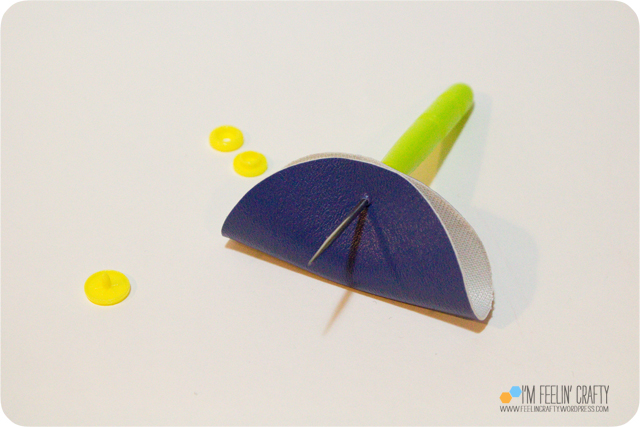
Punch a hole through both sides.

CordTacos-Step5-ImFeelinCrafty

Install snaps.

CordTacos-Step6-ImFeelinCrafty

And that’s it! You’re done! See why I didn’t want to pay 35 buckaroos?

CordTacos-Set-ImFeelinCrafty

I’m so excited that I finally sat down and made these. I tore the page out of the catalog and it’s been sitting on my sewing table since Christmas. And speaking of Christmas, wouldn’t these be perfect stocking stuffers? Um, YES! You can do them in leather for a more sophisticated look and vinyl for a more colorful, fun look!


Mermaids!

I did it again…. I submitted a design to the Spoonflower Weekly contest again! It’s been a while since I’ve done it, but I did…

Mermaid-FatQuater=ImFeelinCrafty2

So be sure to vote (hopefully for me!)!

I know I talk a lot about the parties I design, and I don’t seem to show them very often. I’m getting them ready to show, I promise…. I have a huge backlog! BUT… In the meantime, I’m headed home to Bama to the beach next month, so I thought, maybe I’ll design a beachy party that I can photograph while I’m there. So of course the mermaid theme came to life. Then I saw the weekly contest posted! So it was great motivation to get some of the graphics done!

I’m not sure if it’s the final design or not. What do you think? What’s it missing? Would your little girl be interested in a mermaid party like this?

MermaidPanelsm

I’m thinking more of a watercolor look for the actual party graphics….

I can’t wait to get the party going!


Sewing Room Updates!

I don’t have a beautiful bright, airy, white sewing room like I see all over the internet… But I have a great space despite not having windows!! And now it’s even better!

IroningBoard-Main-ImFeelinCrafty

A couple of weeks ago a friend posted her ironing board set-up on IG. I knew immediately that I had to copy her idea! So as genius as this is, I can’t take credit for it!

When I saw it I knew it was the perfect Mother’s Day present for me! So I asked my husband if he had gotten me anything…. Luckily, he hadn’t! So I told him what I wanted. He was fine with it until it registered that what I wanted came from Ikea! That’s part of the present, I told him! Taking me to Ikea! hehehe! And he must love me, becuase he went there with me. First time I’ve ever seen him even drive near an Ikea, much less venture in the front door!

IroningBoard-Before-ImFeelinCrafty

I hated my ironing board and all the stuff that would pile up on it and under it! And then to get to my shelves behind it, I had to move everything, then slide the ironing board and hope the iron didn’t fall on my head. I guess I could have moved the iron, but hey, we all need a little risk, right?

And the bookshelf we used is basically the same size as the ironing board! A few inches longer, but not much! So it doesn’t take up much more space at all!

kallax-shelving-unit-white__0371268_PE551209_S4

It all starts with an Ikea book shelf…. I’m in love with this one, becuase I like all the different sized holes. We have 2 others for the playroom already! My friend used the one with 8 holes. The other thing about this one, is that it’s a little wider, or taller once you turn it on it’s side. I like a tall ironing board!

IroningBoard-HowTo-ImFeelinCrafty

Then the dear husband made a trip to the hardware store for a piece of wood. We got a shelf that was the exact same depth of the bookshelf. He cut it to the right length. I got the ironing board cover fabric and cut it down to size. and a piece of fabric. This fabric is actually a lovely sheet fabric that I happened to be hoarding! Then he helped me staple the ironing board fabric and the cover fabric around the board.

IroningBoard-Wheels-ImFeelinCrafty

We added locking wheels. 6. Maybe could have used 8, but I think the six work fine.

IroningBoard-Top-ImFeelinCrafty

I just dropped the top right on top. So far I haven’t secured the top to the shelf. But it’s pretty heavy that I don’t think it will move around too much. I haven’t had a problem yet. I was also thinking that I might add cutting boards under the ironing board for a really long cutting surface…. But I haven’t done that yet!

IroningBoard-Sewing-ImFeelinCrafty

And it’s just an inch or two higher than the counter, but it’s at a height that I can actually sew standing up. That will be really nice when I’m doing a lot of little pieces that need sewing, ironing, sewing, ironing, sewing, ironing….

IroningBoard-Open-ImFeelinCrafty

Now, I don’t have all the piles under the ironing board. I have a spot for all the stuff that used to sit on top of the ironing board, so I have a full length ironing board again. I can easily roll it out to get to the fabric behind it. I can roll it out to let the large fabrics slide over each side as I iron! And when it’s in it’s spot, the room actually feels much bigger! Nice!

Thank you very much, golddogmom, for the inspiration! And to the family for helping get it and put it all together!


Technicolor Galaxy- Update!

Ok. Can I just say I’m in love with this project? ok, thanks! I’m in love!

Technicolor02-Main-ImFeelinCrafty

This is the Technicolor Galaxy BOM that I started a while back. I’m a bit behind, since I’m only just finishing the March blocks…. But oh, well. I’m hoping to catch up this month! ANYWAY…

Technicolor02-Whole1-ImFeelinCrafty

Yep, it’s pretty cool! I liked the center. The design is intended for a rainbow quilt and I decided not to do that, but then I started really liking everyone’s rainbows… But once I got the star points done, I am back in love with my own fabric choices!

Technicolor02-Stack-ImFeelinCrafty

March’s block was very time consuming! There are 12 quilted blocks!

Technicolor02-Front-ImFeelinCrafty

Technicolor02-Blocks-ImFeelinCrafty

We paper pieced 3 sections, 12 times. Then sewed those 3 sections together, 12 times. Then quilted each section. It seemed like for ever, but when you make a whole quilt you do all this way more than 12 times. Maybe since I did it all at once, it seemed like forever?? Huh!

Technicolor02-Back-ImFeelinCrafty

For the back of this set, I used the neon blue and quilted in white thread. Does anyone else see a Wonder Woman logo in the quilting??? That’s kinda all I see…

Technicolor02-Points-ImFeelinCrafty

As everyone was showing off thier finished star points thier lines didn’t line up. For the life of me I couldn’t figure out why all these people were ok with the fact that the blocks don’t line up. (you can see it with the blue and white striped fabric corners not lining up on mine in the top two photos.) But no one was saying anything about it… Then I realized… Seam Allowances. Hello! Once they get trimmed and sewn together, they will be fine and align quite nicely!

Technicolor02-Last-ImFeelinCrafty

Right now the quilt measures about 36 inches across, for a sense of scale. I forget how big the final quilt will be. I’m so glad these blocks are done and I’m totally inspired to continue on with the last two months blocks! Yea!!


Paint Chip Challenge

We seem to like challenges in our Modern Quilt Guild! This time we decided to tackle a paint ship challenge. You are given a paint chip and all your fabric has to match the colors on the paint chip.

PaintChip-Main-ImFeelinCrafty

The ones in charge of the challenge picked grey, teal, light blue and dark blue. Some lucky ducks got a yellow chip too, which meant they got to add in accent pieces of yellow. I stood in line for my envelope hoping ‘not grey, not grey, not grey…’

PaintChip-Fabrics1-ImFeelinCrafty

I got grey….

PaintChip-Fabrics2-ImFeelinCrafty

And it wasn’t easy to find the grey’s either. Everytime I’d go to a fabric store I’d pull out my chip and nope… Or I’d buy grey thinking it had to be right and I’d get home and it wasn’t. Then I finally raided my stash and found just the right pieces!

PaintChip-WIthSketch-ImFeelinCrafty

I’ve been really wanting to do one of these triangulated pieces. First I used a triangulation app on my phone. Then I just assumed I’d make it into a paper piecing pattern. But, um, no. My assumption was wrong! Paper piecing a triangulated piece, didn’t work so well for me! I ended up just piecing as I went.

PaintChip-Main2-ImFeelinCrafty

I just couldn’t get snow out of my head when it came to this paint chip. So a snowy mountain top it is. I considered a white bunny in a snowstorm, but…..

PaintChip-Back-ImFeelinCrafty

I did get some yellow in the back! I’m loving that almost all of this was actually from my stash in the end.

PaintChip-Tag-ImFeelinCrafty

How do you do labels? I just use a sharpie and make a had written label. Maybe I should a more professional looking label…

PaintChip-Last-ImFeelinCrafty

So, I am totally over my wanting to quilt a triangulated anything! It was a good exercise in inside corners… Not a big fan, I learned! But I’m happy with it. Glad it’s done.

If you want to see them all, check back in the first part of June. Or come out to the show at Drygoods Design on June 4th! That’s opening night, but the show will be up for a month. And they are for sale!! Yea! We’ve never done a for sale show before!

And I can mark this off as 1 of my Q2 Finish Along finishes!
2015 FAL at On the Windy Side


Who needs Super Man when there’s Tiger Man???

We have great friends that moved across the world, but they come back to visit every now and then! And last month they came home and we all got to celebrate their kiddos birthday together!

TigerMan-Main-ImFeelinCrafty

I got to make a Party Animal Birthday Party theme for him, which I’ll show off soon! But his parents also asked if I could make him a Tiger Man costume! Of course I can!

TigerMan-serious-ImFeelinCrafty

Wait…. Who’s Tiger Man?

TigerMan-Cape-ImFeelinCrafty

Tiger Man is a made up super hero, made up by my friend and his son! Ok, sure I can do it, but what does he look like? They didn’t know. They tell stories about Tiger Man, but he’s never been seen before!

TigerMan-Mask-ImFeelinCrafty

I used the same basic mask design that I used for the arctic fox and the fox. I obviously changed the colors. And of course, I had to add some tiger stripes. Since he is Tiger Man, of course!

TigerMan-Jump-ImFeelinCrafty

TigerMan-Cuffs-ImFeelinCrafty

I decided Tiger Man totally needed some super hero cuffs. And I’m glad I did, I heard that the real Tiger Man (my son was just modeling) uses the cuffs for all his adventures and they’ve become a very integral part of Tiger Man!

TigerMan-OuttaHere-ImFeelinCrafty

And before he runs off to protect us, Tiger Man’s cape includes tiger stripes and the special letter T!

Have you and your family made up special super heroes?


And the Giveaway Day Winner is…..

Thanks to everyone for your interest in the West Seattle Fabric Company  and Beach Bum Fabrics giveaway! I love working with Monica and choosing such fun fabrics for the giveaways from her shops  West Seattle Fabric Company and Beach Bum Fabrics. Please remember to check out her shop next time you are fabric shopping!


GiveawayDay-Main-ImFeelinCrafty

Now to what you’re waiting for… The Winner is….

drumrollplease1 copy

And here’s my traditional drum rolllllllll……

Comment #265!

Capture1

via Random.org

Yea! Yana! You’re the Winner!

Capture3

And thanks again to West Seattle Fabric Company and Beach Bum Fabrics for the awesome giveaway! Thank you!

Giveaway Day with West Seattle Fabrics!

It’s that time again!! It’s Giveaway Day AGAIN over on Sew Mama Sew. And yep! We’re partying with The West Seattle Fabric Company once again!

Today we have another hand picked collection from West Seattle Fabric’s Beach Bum shop!

GiveawayDay-Main-ImFeelinCrafty

Recently, West Seattle Fabrics has undergone quite a change! They closed the adorable little shop, which made myself and other locals quite sad. BUT!!! They moved to a beach location for classes and long arm quilting and machine repairs. AND!!! They still have their awesome fabric selections, just online and available during pop up shop hours. They are having Pop Up Shop hours this weekend at the new location and I am so excited to check out the new space. It looks like a great spot!

GiveawayDay-Group1-ImFeelinCrafty

I had no idea narwhals were real! I’ve been intrigued with them since I learned about them. Which I have to admit was only about 10 years ago! Then I found out that they are actually real. They just don’t seem real to me for some reason! So when I saw them in the shop, I knew I’d love to have them in the bundle!

GiveawayDay-Fabrics-ImFeelinCrafty

 This giveaway is a fat quarter bundle of six different fabrics!

And if you just can’t wait to see if you have won, head on over to the West Seattle Fabric Company shop and snatch up yours today!

GiveawayDay-Group2-ImFeelinCrafty

Ready to WIN? You have FIVE ways to enter! And come back and leave a separate comment on this post for each entry!

1. Visit the West Seattle Fabric Company’s website and let us know which is your favorite fabric! Leave one comment. (one entry)

2. Like the West Seattle Fabric Company on Facebook. Leave one comment. (one entry)

3. My blog followers get an extra entry. Leave one comment. (one entry)

4. Follow I’m Feelin’ Crafty on Instagram. Leave one comment. (one entry)

5. Share the giveaway on your blog, FB page, or tweet about. Leave one comment. (one entry)

That’s 5 possible entries! You must comment on this post to win. Open to both US and International readers. The giveaway will close on May 10th at 11 p.m. PST, and we’ll choose one winner using Random.org.

Be sure to check out the Sew Mama Sew blog for more giveaways!

WSF

And a Special Thank you to West Seattle Fabric Company!

Tote-Ally Awesome Teacher Gift! A Tutorial and a Printable!

I think Teacher Appreciation Week might be this week…. I’ve been seeing a lot about it in the blogosphere, but our school doesn’t celebrate for a couple more weeks!

TeacherTote-Main-ImFeelinCrafty

So since most people seem to be doing it earlier than we do, I thought I’d post my tote bag project. We made a bunch for preschool teachers last year. Actually, my plan is to give these as end of year thank you’s, but I know some of you out there do more for Teacher Appreciation week.

TeacherTote-Pocket-ImFeelinCrafty

I think my favorite part is the tote bag pocket! I made these and debated on how to print them. Iron-on? Directly on to the fabric? Or Spoonflower? Spoonflower won! It’s sized to print quite a few pockets at once! And in different colors. You are welcome to go and buy it on the Spoonflower site for your own projects!

We are still fans of superheros, and in my book, teachers are pretty  much superheros! I know I could not do what they do! Even though my kiddo just says he plays all day, I am amazed at what his teachers do! And how they have him tricked to thinking he’s playing all day when he’s actually reading! That is some super powers at work!

TeacherTote-KiddoBags-ImFeelinCrafty

The kiddo helped me pick out the fabric for each of the bags. I used pretty much all fabrics from my stash! Oh, yeah! Loving using the stash! He even went so far as to pick each fabric for each teacher!

TeacherTote-Bags3-ImFeelinCrafty

And since the fabrics were all from the stash, the sizes of the bags vary a little here and there!

TeacherTote-Tag-ImFeelinCrafty

TeacherTote-Printable-ImFeelinCrafty

And we made the tags, too! And we’re sharing the love with ya! You can download the PDF for the tote-ally awesome tags here.

TeacherTote-Bags1-ImFeelinCrafty

Would you like to make your own tote? You can make it for yourself too, if you’d like!

TeacherTote-Materials-ImFeelinCrafty

For materials, it doesn’t take too much. I used a home decorating weight fabric for the totes. More cotton from the stash was used for the lining. The spoonflower fabric for the pockets. And webbing for the straps.

TeacherTote-Step01-ImFeelinCrafty

Of course, the first thing is to cut all the pieces! For the top of the bag my pieces were approximately 12×16 inches. The bottom piece is approximately 7×16 inches. You’ll need 2 of each of these. The lining is approximately 18×16 inches and you’ll need 2 pieces. The pocket is 5.5×11 inches. The webbing is 45 inches on each side.

TeacherTote-Step02-ImFeelinCrafty

Fold the pocket in half and center it on the front of the bag. Pin it in place. Pin the webbing over the sides of the pockets. Align both the pocket and the webbing with the bottom of the front piece.

TeacherTote-Step02a-ImFeelinCrafty

Sew on the webbing, stopping an inch from the top of the bag. Do this on the front and back.

TeacherTote-Step03a-ImFeelinCrafty

TeacherTote-Step03b-ImFeelinCrafty

Sew the bottom of the bag and the top together, right sides together. And topstitch. Do this for both the front and back.

TeacherTote-Step04-ImFeelinCrafty

Now sew the front and back together along both sides and the bottom. Do this for the lining, too. Leave a 3 to 4 inch hole in the lining stitching.

TeacherTote-Step05-ImFeelinCrafty

TeacherTote-Step05a-ImFeelinCrafty

Sew the bottom corners of both the outside and the lining together. Align the seams to create a triangle at the corners. I sewed a 3.5 inch corner. Then cut the corners.

TeacherTote-Step06-ImFeelinCrafty

Put the lining inside the bag, right sides together, and sew along the top edge.

TeacherTote-Step07-ImFeelinCrafty

TeacherTote-Step08a-ImFeelinCrafty

Pull the bag out through the hole in the lining. And sew together the hole.

TeacherTote-Step08b-ImFeelinCrafty

Then topstitch!

TeacherTote-Step09-ImFeelinCrafty

And you’ve got a tote! Pretty easy!

TeacherTote-KiddoBags2-ImFeelinCrafty

And if you make a lot at once, you might just get a little silly!

TeacherTote-BunchofBags-ImFeelinCrafty

TeacherTote-Bags5-ImFeelinCrafty

TeacherTote-Bags2-ImFeelinCrafty

TeacherTote-Bags4-ImFeelinCrafty

I might just have to make more!!! Do you think you’d make some?