Another New Purse!

I said I was closing up shop, but I had a special order request from a friend months ago (like maybe even last year….) oops… Man, I’m lame when it comes to getting things done on time… But hey, once it’s done, it’s pretty cool right???

Check out this version of my typical da-a tis purse!

It’s pretty much the same as the others I was making. Same size, one of my typical images on the front, inside pocket. But I added the rings to the straps, I oriented the fabrics a bit differently. And I changed the bottom. I combined my typical purse pattern and tote bag pattern and then through in a different fabric for the bottom.  I love how the bottom turned out! Oh, and check out the little ‘Made by da-a tis’ tag! I got them through a great deal on Pick Your Plum ( a fun deal of the day site).

As I was finishing this one, I totally came up with a plan for a new one for me. I’m sooo in the midst of birthday party obsession right now, so as soon as that’s over, I’ll try out my new design!! Why did I make this one in the midst of birthday party planning??? No clue!

Have you made yourself a bag lately?? Any tips on great patterns out there? I’ll have some of my favorites tomorrow, but would love to hear of yours as well!

Sorry We’re Closed! and a Giveaway

Yep, I’ve Closed  the Shop, Shut the Doors and have moved on.

If you’ve followed along for a while, you might have noticed that I used to have a link to an etsy shop. Yes, right over there on the right. (under the picture of that adorable baby…) But wait, it’s gone! Where did it go???  It has mysteriously disappeared…..

You caught me. As my son says, ‘You were jus jokin’.’ It didn’t actually just disappear. I hit the delete button! I had an etsy shop a LONG time ago, but never really did anything with it. But what I did do was sew and sell things locally in about 7 or 8 shops. Then with the economy headed in the wrong direction a few of the shops closed. I had a baby…. Blah blah…. And man, sewing for wholesale and consignment is a lot of work!! But then I thought I’d go with it again….So last year I re-opened my etsy shop thinking, I can do the etsy shop, blog, work full-time, be an awesome  Momma, sew for the kiddo, make fun random stuff and do my photography business. i know what you’re thinking…. She’s insane… Yep, I kinda am! My husband just rolls his eyes, smiles and tries to come up with ideas on how to make things easier for me!

Wondering what is it that I make???

Well, I talked about how I started here with my I’m scared of really big cushions story when I re-opened my shop. Although I make all sorts of things, I sell a few particular pieces…

Purses

 Totes

Wallets

Baby Blankets and Ghostie Dolls.

When I started I also did pillows, but rarely do those anymore.

All my pieces are made from post-industrial recycled materials (scraps from an upholsterer that I reuse rather than sending them to the junkyard). So therefore each piece is different. And on top of that I freehand stitch images of birds and flowers and rocket ships and all sorts of things onto the pieces!

Why am I closing the doors on da-a tis, you ask?

First off it was getting a bit stressful trying to keep up. Secondly, I fell in love with blogging and making a wider assortment of things. Thirdly, I discovered quilting! And lastly and probably most importantly, I love seeing my son’s face light up when I make him something. I know that isn’t going to last forever, so I decided I wanted to spend my sewing and crafting time making him things while he enjoys it!

Are you still reading to figure out what the giveaway is?

I’m giving away one of my pieces to one lucky winner. I have a stash of pieces that I never sold nor took to the shops. Purses, wallets, totes, and Ghostie Dolls. You choose!

Ready to WIN? You have FOUR ways to enter!

Don’t forget to leave a separate comment for each entry!

1) Leave a comment telling me what your favorite things to sew are.

2) Become a fan of Feelin’ Crafty on Facebook.

3) Subscribe to Feelin’ Crafty.  

4) Share the Giveaway on your blog/FB or tweet about it or just somewhere out there in the internet world.

That’s 4 possible entries! You must comment on this post to win. The giveaway will close on Thursday, September 29th at 11:59 p.m. PST, and I’ll choose one winner using Random.org who will be announced on Friday.

Sew Ready to Play Link Love

I haven’t done a link love in ages! Ok, maybe it hasn’t been quite that long, but it feels like a loooonnnggg time! I hope you’ve enjoyed the Sew Ready to Play series. What were your favorites? A big thanks to all the awesome bloggers who joined me with fun projects over the last couple of weeks! Did you miss the series? Well, you did miss out! But don’t worry! Click here for links to all the tutorials!

And now, some fun things based on games I found via Pinterest

1. How cool is this Hopscotch quilt by gen X quilters? It’s really big!

2. And if you’re playing hopscotch, you need an adorable little skirt like this one by Probably Actually. The skirt is pattern by Oliver + S called the Hopscotch Skirt. Not sure why, but I’m thinking the adorable pockets would be perfect for the rocks and chalk needed for a quick game!

3. Yep, another quilt by gen x quilters! Remember twister??? I love quilts with circles! I was never a big fan of Twister because I wasn’t very good at it! A little personal note… I get very competitive when I play games… But I might give it another try if I had this quilt…

4. I also love tutu’s… Maybe it’s the photographer in me and I love all those baby pics with the big tutu’s. Maybe it’s fun memories of ballet lessons as a kid. Who knows! But I do know that I love this Candyland tutu from LadyBugsDragonflies.

5. Do you detect a theme here? Yes, it’s an overload on Hopscotch… Check out this hopscotch mat by Cool Spaces for Kids. I’m not sure how she made it, but it looks like ribbon… Love it!

6. Now, this doesn’t technically go with the whole ‘sew something inspired by a favorite game’, but I love it and wanted to share it. It’s a cute little handmade memory game by dandee. Check out the cute tutorial!

7. And I also loved this checker board by i heart linen. Love the grey and yellow and the fact that it’s a mini quilt!

Thanks for playing along and hopefully we’ll have another Sew Ready to Play series next year!

Sew Ready to Play Continues On

Well….. Yes, the series was supposed to end last Friday… But the fun continues! Come on, let’s keep playing!

Have you ever played Mr. Fox? Well, I had never heard of it until a playdate this summer. Maybe our friends made it up, I don’t know… But either way it’s fun and my son loves it.

Here’s how it goes. Someone is Mr. Fox. Everyone else lines up away from, but facing Mr. Fox. Then someone from the line calls out, ‘What time is it Mr. Fox?’ Mr. Fox replies back with a time, ‘It’s 2 o’clock.’ The line takes 2 steps towards Mr. Fox. This goes on until the answer from Mr. Fox is, ‘It’s LUNCHTIME!!!’ Then Mr. Fox chases everyone and the first one he tags becomes the new Mr. Fox!

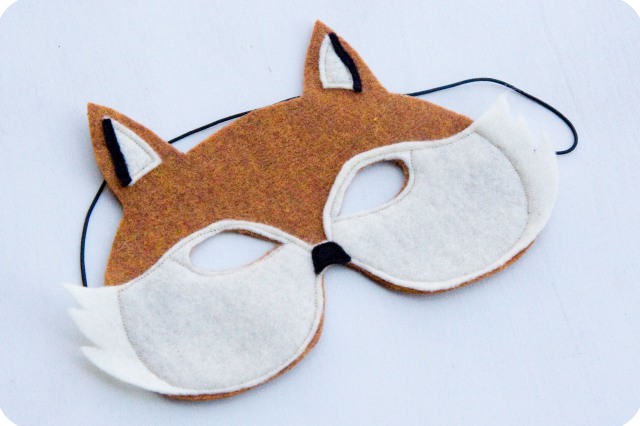
When I was figuring out what my project would be it was between making something related to Hullabaloo or Mr. Fox. I went with the Hullabaloo project. But then realized that the twins who taught us this game have a birthday coming up this week. Soooo, I decided to continue with my plan for the Mr. Fox inspired project, a fox mask!

And here’s how I made it. Pretty simple!

Step 1 Materials:

3 colors of felt, brownish red, cream and black. I bought a quarter yard of each, but you don’t even need that much, a fraction of that! I bought the felt on a bolt versus the craft felt.

Thin elastic, about 12″

Scissors

Exacto Knife

Thread, cream and black

Pattern, click here for the pattern

Fabric Glue, optional. I didn’t use it, but I prefer to sew. If you don’t want to sew, use the glue.

Step 2:

Cut the pieces out of each color. Careful around the eyes, I had to cut mine twice!

Step 3:

Poke holes in the brown piece for the elastic to thread through.

Step 4:

Cut the elastic, 12″.

Step 5:

Thread the elastic through the holes.

Step 6:

Sew down the elastic. I did a line of stiching through the elastic and then I went over it with a zigzag stitch for a cleaner finished look on the back

Step 7:

Sew on the cream pieces.

Step 8:

Sew on the black pieces.

Step 9:

Watch out for foxes lurking about the house…. They’re sly ya know!

Sew Ready to Play with Sew Stylish Boutique

When I first posted the schedule for the Sew Ready to Play series, I was supposed to be the last post of the series… But… Honestly, I think it was the Saturday, maaaybe it was the Sunday, after I posted the schedule that I ran across this totally great post that fit perfectly into the series! As soon as I saw this project, I knew it needed to be a part of the series! I emailed Heather and Rose from Sew Stylish Boutique and asked if they’d like to join us and they did!! Yea!!

So let’s welcome Sew Stylish Boutique to I’m Feelin’ Crafty!

Monkeys in a barrel toys are classic. I loved them when I was a kid, my parents played with them and now my kids do too. One night I was thinking about making something for a friend who just had a baby boy and the idea came to me. I made this cute monkey toy for him. I took pictures of it to show you.
You can get the PDF pattern for the monkey here . (note; This is my first PDF ever and the paper got wrinkled because my baby grabbed it from me before putting it in the scanner.)

Eye balling a monkey, I drew a pattern and traced it on the wrong side of some flannel fabric. (Remember to flip the monkey pattern over to the other side each time you trace one, so that you can place the fabric cut outs right sides together.
Cut out your pattern and leave at least 1/4 in seam allowance. When you sew, sew along the traced lines.
Pin and sew leaving the space between the legs open for turning
I went over it again with a zig-zag stitch to reinforce the seam. You will be filling it with a lot of stuffing so you want the seams to hold.
Trim off the excess seam allowance.

To turn the monkey right side out is tricky and so I show how I did it.

First take and turn the hands into the arms and push them down as far as you can.

Next turn the head in word.
Push it till you see it coming out of the space you left open.
Pull it through, then you will find the hands waiting to greet you, all have to so is pull them out too.
Last turn the feet out.
Now we stuff. There is a lot of stuffing that goes into one of these monkeys, you will be surprised. Stuff the arms first. Take a little at a time and push it all the way up the arm till you get to the ends. keep filling. The arm needs to have enough to hold its shape.
Finish filling the monkey and hand sew the opening closed.
Repeat till you have all the monkeys you want. I sewed a patch of velcro in the hooks of the arms so they will cling to each other a bit better. That is it. Have fun.

I’m Sew Ready to Play!

Welcome back to Sew Ready To Play!! Today it’s me and my project! A Mini Hullabaloo Messenger Bag!

(yes, that’s our dead grass in the backyard… Although it may appear to be a yard full of straw, it’s our grassy backyard… Please don’t judge on our lack of watering…)

Have you played Hullabaloo???  It’s a great game that teaches colors, shapes and words on little pads that the kids (and adults) move around to based on the where the ‘voice in the box’ tells you to go! It’s a Cranium game… We LOVE Cranium games, but this post is just about Hullabaloo.

We were first introduced to it at a friend’s birthday party. My son just hung back and watched, so I didn’t think he was interested AT ALL. That was until one day, not too long after the party, we were scanning the toy aisle at Goodwill. He eyed it and got really excited! I decided, for a whooping $2.50 we could give  it a try. It was well worth the $2.50! He loves that game and takes it with us to almost all of our playdates, camping and has even wanted to take it to school. But since it came from Goodwill, it didn’t have a box. I found a little bag for the pieces, but to fit, they had to be folded, which ended up not being a good thing. Then we’d throw that bag and the voice box into a grocery bag and hit the road, headed out to be the life of the party with our Hullabaloo game. Here’s a little before and after…

Well, I had a few ideas for the series, but nothing seemed just right… Then it hit me, a bag that our game would actually fit it and my son could carry it with him all over the place, wherever he wants to take it!

So, my project for the Sew Ready to Play series, A Hullabaloo Messenger Bag!

Step 1: Materials:


Fabrics, the outside fabric, the lining fabric and the pocket fabric.

An extra Hullabaloo set of game pieces (optional)

(Here’s the optional part… I was first going to scan the Hullabaloo pieces and print them on printable fabric. So that is one option. The second option would be any other fabric that you might have. And the third option, which is what I used, is using Hullabaloo pieces. Cut up a perfectly good game you ask?? Well, the day after I decided to make the bag I found myself back in the toy aisle at Goodwill and what do you know??? There just happened to be another Hullabaloo game sitting on the shelf. Only this time, it was only 99 cents! 99 cents!! That’s way cheaper than buying the printable fabric…)

Interfacing

Thread

Scissors

Step 2: Cut the fabric

1. Flap Pieces: 2 pieces of fabric 9 3/4″ x 12 1/2″, 1 with the outside fabric and 1 with the lining.

2. Pocket Pieces: The pocket fabric is 9 1/2″ x 18″. The interfacing is 9 1/2″ x 9″. And for the pocket flap, I used a square Hullabaloo piece and cut it 4″ long

3. Lining Pieces: Cut two pieces of lining fabric, 13 1/4″ x 12″.

4. Strap Pieces: One piece of the outside fabric and one piece of the lining fabric. Each one is 3″ x 24″.

5. Front and Back of the Bag: 2 of the outside fabric and 2 of the interfacing. Each piece is 10″ x 10″.

6. Sides and Bottom of the Bag: For this piece I again used Hullabaloo pieces. I cut 5 pieces into 4″ strips. Then stitched these pieces together, so that it makes a 4″ x 31″. This will be too long, but I like for it to be a little long nad then trim it once it’s sewn together.

Step 3: Make the Flap.

1. Cut out an applique from a Hullaballoo piece..

2. Sew the applique on to the outside of flap fabric.

3. Put the lining and outside fabric right sides together and cut rounded edges at the two lower corners.

4. Clip corners at the rounded edges. Stitch together the sides and bottom of the flap.

5. Turn right side out, iron flat and topstitch.

Step 4: Pocket

1. Fold pocket fabric over, right sides together. Place the interfacing on top.

2. Sew side and clip top corners

3. Iron seams flat. Turn right side out.

4. Iron flat and iron the bottom edge over.

5. Pin the pocket onto one side of the lining. Center the pocket and locate it about 1 1/2″ from the top of the lining piece.

6. Sew on pocket flap.

7. Center the pocket flap on the pocket and stitch about 3/4″ above the top of the pocket.

Step 5: Sew lining together.

1. Stack the lining pieces right side together and cut 1″ squares from the bottom two corners.

2. Sew together the three sides. Leave a hole on one side.

3. Sew the bottom corners together. Fold the bottom against the side and align the seams and stitch the corners together.

Step 6: Make the strap.

1. Place the pieces right sides together and stitch together the long sides.

2. Pull it through so the right sides are out.

3. Iron flat and topstitch. (forgot the picture for this one, but I have faith in you that you can do it without a picture!)

Step 7: Sew together the body of the bag.

1. Cut another applique for the back, if you so desire! Then sew it on.

2. Sew the Hullabaloo pieces together. I also topstitched the seam allowance down at each piece.

3.Stack the pieces, interfacing to wrong side of outside fabric and outside fabric to the side and bottom strip, this time with right side facing . Pin and sew.

4. Sew on the back side the same way as you did the front.

5. Turn right side out.

Step 8: Sew it all together.

1. Pin the flap to the bag, with outside fabric to outside fabric.

2. Pin on the strap. Again, with outside fabric to outside fabric.

3. Put the bag, flap and strap inside the lining and pin.

4. Sew together along the top edge.

5. Pull it all through that hole in the lining.

6. Sew the hole in the lining closed.

7. Push the lining inside the bag.

8. And topstitch the bag along the top edge.

Step 9:

Load ‘er up! You’re done! Now you just have to find a party to take the game to!!

Enjoy! What’s your favorite game? Which one would you carry in your Mini Messenger Bag?

shared with:

Sew Ready To Play with Shwin & Shwin

And today, let’s have a warm welcome for Shauna from Shwin&Shwin!!  Man, I have to say Shwin&Shwin is amazing to me. Every day I get my updates and it seems like there is always a new tutorial each day! Wow! You don’t know how to sew?? Well, all you have to do is read the Sewing 101 Series and she covers about all of it! Such talent! I’m floored with the amount of information you can learn from this blog. The other day there was a tutorial for sewing with rib knit. The crazy thing is that just the night before I had found some old fabric and thought to myself, ‘I want to make my son some pj’s with this, but I don’t know how to the knit edge part.’ It was like she heard my thoughts. The next morning, there it was, the directions to do exactly what I was wondering about the night before…. OK, Enough from me…

Welcome Shauna!

Hi I’m Feelin’ Crafty readers! I am Shauna from Shwin&Shwin and we LOVE games! All games, our day is spent playing games. You name it we have played it. So when I was asked to play along with this fun game series I just had to say yes! Then came the fun part… which game inspired me the most? Hours of candy land? Jenga block piling? Twister with the bright circles? Then I realized the game that inspired all other game playing in our house was Ring around the rosies. Granted I have made a pocket full of posies top once before…but it was ready for a re-mix. There is something so inspiring about watching kids faces light up as they spin around in a circle and then flop down to the ground. The smiles…the laughter…the desire to do it again and again. So do you want to make your own pocket full of posies top?

The pieces of the top are all pretty basic. I drafted a basic top and cut it into two pieces (a bodice and skirt piece) If you need help with drafting you can check out this post HERE. You will also want a neck facing with is a strip that when stretched it can fit over the head. Then for the sleeve I did a bubble sleeve so to do that you will cut one sleeve larger and one sleeve smaller.

The skirt pieces will be front and back. Also cut out two pockets.

Now for the sewing. We will start with the pockets. Press all the edges under and then sew the top of the pocket to secure the fold.

Next pin the pockets to the skirt front. Sew along the sides and bottom.

Next I added some embroidery detailing to the skirt front. I added the words “ring around the rosies” along the bottom of the skirt.

Next sew the bodice pieces together at the shoulder.

Next sew the front skirt piece to the front bodice piece, and the back to the back.

Next for the sleeves. You will sew the smaller sleeve to the larger sleeve. To do this stretch the smaller sleeve to fit the larger one as you sew.

Then you should have a sleeve that looks a bit like this.

next with the sleeve folded together. and the large sleeve towards the right side of the top. Pin the sleeve in the sleeve opening, gather in the middle, so the sleeve fits the opening.

Next with the right sides together sew the sleeves and sides together.

Then for the neck facing, sew the ends together to create a tube.

Then fold the neck ribbing in half and sew it along the right side of the neck.

Then flip the ribbing upward and topstitch along the edge.

Lastly, I did added some embroidered flower stems.

Topped with flowers made from folded circles. (4 makes a circle)

And that’s all there is to it for a ring around the rosies inspired top.

Perfect for lots and lots of rounds of the game…

Thanks again for having us! Come stop by Shwin&Shwin anytime!

Sew Ready to Play with The Southern Institute

Introducing once again, the fabulous Jenny from The Southern Institute! If you’ve been following this blog for a little while now, you know that  Jenny and I have become pretty good pals and have enjoyed sharing on each other’s blogs. We met over comments about washing detergents and the rest is history! She shared her Indoor Herb Garden here and I’ve shared my Magnetic Bookmark tutorial there.

And I’m honored to have her here again! Welcome Jenny!

Red Rover Tote Bag
from The Southern Institute


Hi everyone, Jenny here from The Southern Institute!  I was so excited when Louise asked me to be a part of this series.  What a fun idea!  I had a hard time choosing a game to go with.  It came down to Heads Up 7Up or Red Rover for me.  I loved both of those games as a kid, but when I mentioned Heads Up 7Up to friends, there were a few who looked at me with blank stares.  Everyone seems to be familiar with Red Rover, however, and so was born the idea for the Red Rover Tote Bag!  Here’s a little tutorial for you.

Supplies needed:

  • tote bag (you can buy one or make one using this tutorial)
  • freezer paper
  • exacto knife
  • cutting mat
  • fabric paint
  • fabric paint brush
  • brown paper shopping bag
  • a large scrap of fabric, about 14″ x 7″
  • Pellon Wonder-Under (found with the interfacing at Joann’s and other fabric stores), cut to the same size as the fabric.
  • iron
  • scissors
First a little freezer paper stenciling.Using the freezer paper stenciling technique, paint “RED ROVER” onto the top half of the front of the tote bag. (Detailed Freezer Paper Stencil Tutorial found here).

Print out your stencil onto the dull side of the freezer paper (you can download it here).
Cut it out with the exacto knife.
Iron it on to the tote bag, shiny side down…
Apply two coats of paint, allowing about 10 minutes between coats, and peel the stencil away when it’s dry.

Now for the applique.

Press your fabric nice and smooth.  
In retrospect, madras was not the ideal fabric choice, but I love the way it looks.
Following the directions (they come with the Wonder-Under), attach the fabric to the Wonder-Under.
I cut out a paper people chain by drawing a little man (find him here) and drawing him over and over.  
Trace around the template onto the back side of the fabric.  
It doesn’t have to be perfect, as you can see.  
Cut the little guys out!
Attach the Madras Men to the front of the tote bag, according to the Wonder-Under directions.
This is going to be a book bag for our library trips.  It would also make a great gift!
Thanks so much for having me at I’m Feelin’ Crafty!  
It was “SEW” much fun!
See you all at The Southern Institute!

Sew Ready to Play with Cook Clean Craft

I’m very excited to have Narelle from Cook Clean Craft joining us today!  I remember exactly how I met Narelle. I had found her Men’s Jeans to Toddler Pants tutorial a while back.  During my first stab at Elsie Marley’s Kids Clothes Week Challenge I made them and of course posted them on the KCWC Flickr page. She saw them and commented on what  lovely job I had done with them.  I was relatively new to blogging at the time, so was super excited to have her respond! Now this doesn’t really go with the sewing theme we’re working on this week, but the other thing I will always remember about her blog is the amazing Quick Pesto BBQ Chicken Mini Quiche recipe. I read it and part of me thought it sounded horrible, but the other part of me said, let’s give it a try. And it’s amazing!!!! Absolutely amazing, you have to try it!

Let’s welcome Narelle!

Childhood games: oh, the memories. Having a brother 4 years older than me meant games were not evenly matched and most ended up with me like this:

image
(Note: that’s not me, she’s my daughter.)

But there was one game that we played happily together (and with any number of other people of all ages). While some skill was required, the youngest to the oldest had a good chance of winning, and everyone had fun:

image
UNO!

While Little Man is too young to play, I thought some UNO shorts to romp around in this summer would be fun.

image

The shorts were made using a simple, flat-front shorts pattern in black drill fabric. Felt appliques and white bias tape made up the UNO card details.

image

The applique designs were based on the original UNO cards (Why do they need to modernise these things?). The right-hand side for each leg is curved to match the old-school card design, giving a great retro feel to the shorts.

image
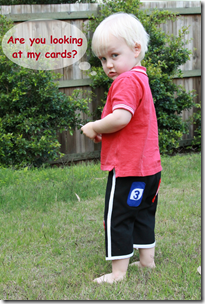
A wild card on the front (because most 2.5 year old boys are a little wild), and reverse (pun intended) and three (since they’re size 3) cards on the back.
image
A fun addition to a boy’s summer wardrobe!
image

For more details, head over to Cook Clean Craft. Thanks for having me Louise and inspiring me to create such cute shorts for Little Man!

Sew Ready to Play with She Wears Flowers

Today we’re welcoming Tammy from She Wears Flowers! I forget exactly how I found her blog, but the first time I was there, I signed up to be a subscriber. She has tons of fantastic projects, both sewing and crafting projects. I’m so in love with her felt cakes. I’ve got to get on that felt food making, I’ve been planning! But I’m not sure if I can pull off her fantastic cakes.

Thanks for playing along, Tammy! Welcome to Sew Ready to Play!!Yahtzee 20

I am so excited to be a part of the Sew Ready to Play series at I’m Feelin’ Crafty!
I am Tammy from she wears flowers
tammy 9
I have a creative streak that is pretty simple so you can find lots of fun and easy projects on my blog. I’ve been sewing since I was a little girl and that was a long, long time ago, so this series is perfect for me.
One of our favorite family games is Yahtzee. Kind of geeky, isn’t it? We love it and even my little one loves it although for her it is all about rolling the dice!

Yahtzee 27Wikipedia explains the game: Yahtzee is a dice game where the object of the game is to score the most points by rolling five dice to make certain combinations.

One thing I like about Yahtzee is the contrast between the rigid structure of only certain combinations working to earn the maximum points and the randomness of just rolling the dice. I like to think that this skirt has a little of the same contrast – the black and white “formal” look with the pop of color and the tiered, casual look without being very full.

So dig through your fabric stash and let’s get sewing!

Yahtzee 26

Materials
3 different black and white fabrics (yardage varies with size)
hot pink jumbo ric rac
1/2 inch elastic
thread

Instructions
STEP 1
Yahtzee 1
Get the waist measurement and determine how long you want the skirt to be from the top of the waistband to the finished length. You can divide the length into 3 for each tier or you can make the top tier the narrowest and the others progressively larger if you would like.

TOP TIER: The length of the first tier should be 1.5 times the waist measurement and the width is the desired width plus 2 inches for the waistband casing and one seam allowance.
MIDDLE TIER: The length of the middle tier should be 1.625 times the waist measurement and the width is the desired width plus 1.25 inches for seam allowances.
LOWER TIER: The length of the lower tier should be 2 times the waist measurement and the width is the desired width of the tier plus 1 inch.
Because my daughter is little, I cut each tier from the the selvedge end to the selvedge end of the fabric and had enough for each tier in one strip. For larger sizes you can cut two strips (selvedge end to selvedge end) the correct width and then cut them each down to 1/2 of the length plus 1/4 inch. With right sides together, sew short sides to make one long strip the needed length. This is a pretty flexible project so don’t stress too much about precise measurements.
Here’s an example:
Waist measurement is 22 inches and finished skirt length is 13 inches.
Top tier: 33 inches long and 5 inches wide.
Middle tier: 35.75 inches long and 5.5 inches wide.
Lower tier: 44 inches long and 6 inches wide. (My fabric was 43 inches and I just went with it, but I could have cut 2 strips that were each 22 1/4 inches long and 6 inches wide and then sewn them together with a 1/4 inch seam to make a 44 x 6 inch strip.)
STEP 2Yahtzee 4
Sew each strip with right sides together along the short edges with a 1/4 inch seam allowance. I like to iron in my waistband casing and hem before this step so that I can do it while the fabric is flat. This isn’t necessary, but it is nice.
STEP 3
Yahtzee 5Yahtzee 10
Make the hem in the lower tier by turning fabric up 1/4 inch and pressing in place then turning another 1/4 inch, ironing and then sewing in place. Press again.
STEP 4
Yahtzee 7Yahtzee 8
Make the waistband casing on the top tier by folding under 1/4 inch and pressing then turning under another 5/8 of an inch, pressing, then sewing in place. Be sure to leave an opening at the center back to insert the elastic. Do not insert elastic at this point.

STEP 5
Yahtzee 11
Gather the top of the middle tier by sewing 2 rows of stitching using the longest thread length. One row will be sewn at 5/8 of an inch and the next at about 1/4 of an inch seam allowance. Gather the fabric very slightly.
STEP 6
Yahtzee 13
With right sides together, pin the middle tier to the top tier, adjusting the gathering stiches as you go so the tiers are the same size. Sew in place with a 5/8 inch seam allowance using the regular stitch length.
STEP 7
Yahtzee 14
Press seam allowance towards top tier and top stitch.
STEP 8
Yahtzee 17
Repeat STEPS 5-7 for the middle and lower tiers.
STEP 9
 Yahtzee 9Yahtzee 15Yahtzee 16
Use a safety pin to help insert elastic (about 4 inches less than the waist measurement) into casing. Pull both ends of the elastic out to sew elastic together securely. Sew opening closed along the edge. Insert a tag or a ribbon to mark the center back.
STEP 10
Yahtzee 18
Sew jumbo ric rac along the bottom edge of the lower tier. Used my stitching line from the hem as a guide.
There you go! Your Yahtzee Skirt is ready to go!
Yahtzee 21
I hope you enjoying making a skirt with fun combinations of fabrics and some contrasts in the style. My little one could hardly wait to wear her new skirt!
Yahtzee 22Yahtzee 24Yahtzee 25
Thanks, Louise, for having me on your blog today!