A Walk Down Memory Lane!

This weekend was totally sunny and felt like summer here in Seattle. The rain has come back, but in the meantime I was reminiscing about some of the fun summer projects the kiddo and I have done together! I thought I’d re-share some of my favorites that I want to do again this summer!

the water blob- I'm Feelin' Crafty

I really can’t believe we haven’t made another water blob! It was so much fun! Totally on the list for this summer!

ice cube paints- I'm Feelin' Crafty

We made the ice paint at the same time as the blob! I’d love to see what kind of paintings the kiddo would come up with this time!

GlueShirts-Main-ImFeelinCrafty


OK, I think might be one of my most favorite projects! The glue shirts were super cool! We’re so doing this again this summer!

TdayTurkey-Turkeys-Last-ImFeelinCrafty

Yes, this is a little fall like, but we love the salad spinner art. I think it would be fun to come up with a whole zoo of salad spinner animals. I wonder what other animals this would work with? What about a parrot? Or a peacock? hmmmm….What else???

Melted Bead Sun Catchers-I'm Feelin' Crafty- Windchime

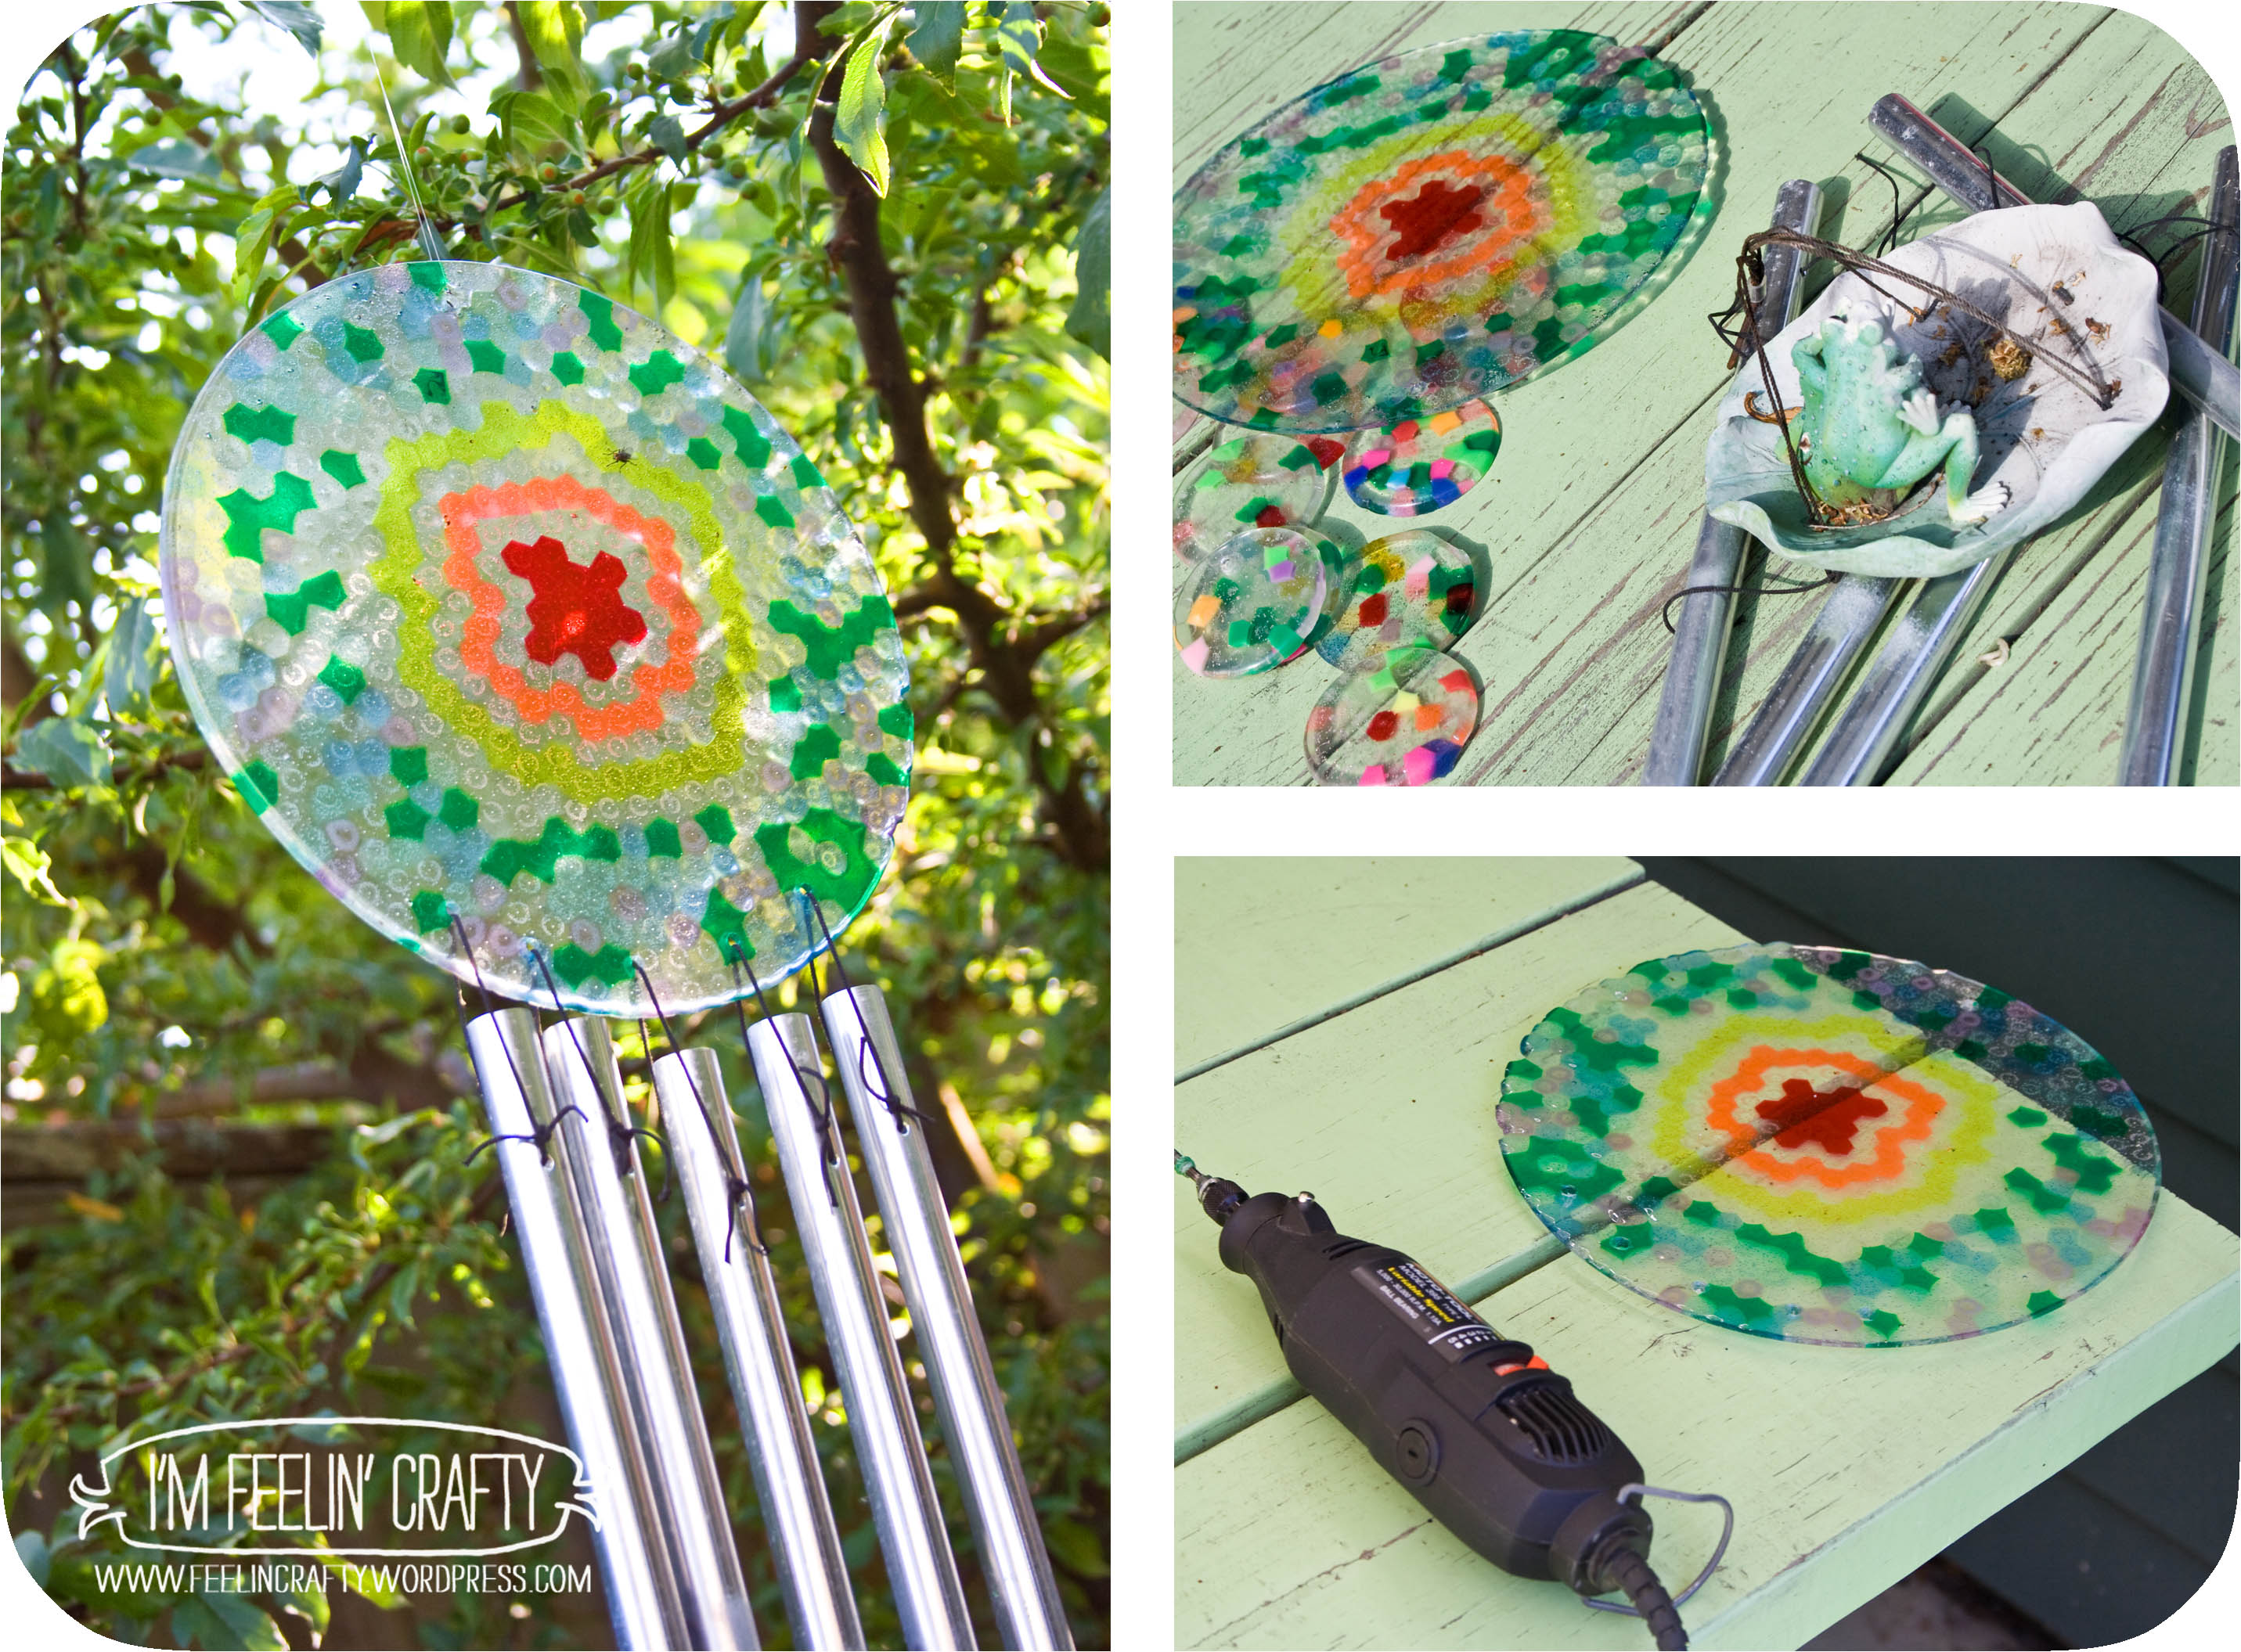
And lastly, the melted bead projects. A great summer project, since I use my stove I need to open the house and send the kid outside while they melt. It’s a pretty popular post on the ‘ole blog, too. If you want to do it, read all the comments too, there’s a lot of questions answered and tips from other readers!

What projects do you have on the list for the summer?

More T’s for KCW

Like I said on Monday, we’re fixing the things in my mending bag this week! I don’t think I’ll be featured on any of the KCW features, but it needs to get done!

KCW-MonsterTeeMain-ImFeelinCrafty

Here’s another one you might remember! About a year ago I made the monster tee! I was so proud of myself for sewing with knits! I loved this shirt. I was kinda rigging my machine to use the double needle and it was a pain! the thread kept getting twisted and breaking….

KCW-MonsterTeeHemOut-ImFeelinCrafty

Then the hem came out. I threw it in the mending bag and forgot about it!

KCW-MonsterTeeHemIn-ImFeelinCrafty

But it’s back! And I figured out how to set my machine up properly to do the double needle and it went so smoothly! And the hem is fixed.

KCW-MonsterTeeDone-ImFeelinCrafty

And the kiddo is excited to have him monster shirt back!

KCW-TaxiShirtBefore-ImFeelinCrafty

So then I moved on to the taxi shirt! I wish I could find a picture of the kiddo wearing this when they were pj’s. We bought this in NYC about 3 years ago. The pj’s fit then. It was kinda like a onesie with legs.

KCW-TaxiShirtBeforeSleeve-ImFeelinCrafty

It fit, but it was kinda funny, because it was so wide! The legs and the sleeves were the right size for a 2T. But the width wasn’t. It was super wide! And three years later, the sleeves are a bit short for a 5T.

KCW-TaxiShirtAfter-ImFeelinCrafty

So I cut off the legs and it still fits! 3 years later! I hemmed the bottom. I was going to take off the sleeves and add red ones, but then decided that since the arms still fit, I just made it a short sleeved t-shirt instead!

KCW-TaxiShirtCrazy-ImFeelinCrafty

More KCW done. You?

Our Mending Bag

I’m baaaaacccckkkkk! I wasn’t planning on taking a blogging break last week, but I obviously did! I was cramming and cramming to get my LEED professional credentials updated and some other projects, a swap and some etsy orders, before we went out of town for the weekend. And I got it all done! Yeah!!! So now I’m back!

Mending-Projects-ImFeelinCrafty

What do you do with all the clothes and toys that need fixing? We have a ‘mending bag’ as we call it. Unfortunately it’s kinda overflowing! But not too long ago, we were able to get come things out of the bag and fixed! These are just a few of the things in the bag!

Mending-Bear-ImFeelinCrafty

Do you watch Doc McStuffins? The cartoon about the little girl doctor who fixes all the neighborhood kids toys? She always make up names for her patients problems! I totally feel like her when I’m fixing the toys! This one here had ‘shoulder outplacisha’, brought on my out dog ‘cousins’.

Mending-Fixed-ImFeelinCrafty

But we got it fixed. Along with Blue Bears ‘crackia skull-itis’, the sponge camera’s ‘lens teariosis’, and the plane’s ‘rear wing fracture.’ It’s tough work, but as Doc Mcstuffins says, ‘The Doc is in!’

Mending-Lion-ImFeelinCrafty

Then a lady on our parents email group asked if any one could sew and restuff a beloved lion stuffy. So I had to tell her that I could help. We’re in the same boat with our beloved stuffie, but I haven’t restuffed him yet. So I took on the lion’s ‘tough love anorexia’ and restuffed him back to a healthy weight!

Mending-Lion2-ImFeelinCrafty

This guy is ready to get back to his pals! The kiddo was pretty adamant that I needed to do something about the Lion’s mane, but I didn’t!

The toys and stuffies are my favorite to mend for two reasons. First, I have this weird thing in that I give inanimate objects a bit more personality than they have (as in I kinda think Toy Story is a true story…..) and I know they are super excited to be fixed and out of the mending bag. And secondly, the kiddo is always so excited to get his toys back! But I do need to get in there and get the clothes done too! Have you done any mending lately?


Shared with these Link Parties!

Makin’ Glue Shirts

I have a little problem with magazines! I kinda hoard them… And then end up with piles of them around the house. Luckily, the house isn’t laid out as a magazine stack maze, quite yet… But every now and then I zoom through the piles. I saw this glue project in one of my Better Homes and Gardens magazines  (but I can’t find it online) not too long ago! It looked like a perfect summer time project to do with the kiddo!

GlueShirts-Main-ImFeelinCrafty

We thought we’d make the shirts, but weren’t sure what designs to make. We decided to use some of my son’s drawings to copy on the shirts.

GlueShirts-Materials-ImFeelinCrafty

So we got our t-shirts, glue (excuse my sad looking bottle of glue! The lid broke and it was the only bottle of glue we had! I used plain ‘ole Elmer’s washable glue), cardboard to put inside the shirt, fabric paint and paintbrushes!

GlueShirts-Glueing1-ImFeelinCrafty

And off we went to start gluing. If you try this, keep in mind the glue will probably run together…

GlueShirts-Glueing2-ImFeelinCrafty

GlueShirts-Glueing3-ImFeelinCrafty

It started off not running, but after a while, some parts of the glue ran into each other.

GlueShirts-Waiting-ImFeelinCrafty

We got it going and then realized we needed to wait for the glue to dry… hmmm… We walked the dog… We cleaned the house… We ate dinner… Then we couldn’t wait any longer and got to painting even though the glue wasn’t completely dry, but it was pretty dry around the edges!

GlueShirts-Painting1-ImFeelinCrafty

We watered down the fabric paint until it was almost like watercolors. Not sure if we needed to water it down as much as we did. When we went back to do a second coat, it ran a little past the glue.

GlueShirts-Paint-ImFeelinCrafty

GlueShirts-Painting3-ImFeelinCrafty

Since they were watered down, the paints blended pretty cool!

Then we played the waiting game again…. The paints say to wait 72 hours before washing! 72 hours??? Do you know how long 72 hours is to a 4 year old? It’s like 100 years! After the kiddo asked, every hour, has it been 72 hours yet, we decided to pick one shirt as our washing guinea pig. And of course, the kiddo chose mine, not his, to use to see if it worked! And it worked!

GlueShirts-Mine-ImFeelinCrafty

gif creator at gickr.com
gif maker

And then we washed the kiddos shirt!
make a gif
make a gif

Now my son wasn’t quite as happy with his shirt as I was with mine. So our lesson learned was to not use a very complicated design.

GlueShirts-Maxs-ImFeelinCrafty

Originally, my son’s drawing was off a monster on a skateboard. But he decided his shirt need a little more and we got out the fabric markers and he added more to the glue design to look more like his picture. And of course, what monster doesn’t love lightening? So lightening was added!

What would your design be? do you think we copied our designs pretty well? I think they look pretty much like the original design drawings!


Shared with these Link Parties!

Pet Rock Carrier Guest Post

Hey everyone!! I’m guest posting today over at Hugs, Kisses and Snot!

What’s every kid need for the summer?? A Pet Rock Carrier of course! Check me out over at Hugs, Kisses and Snot for the tutorial to make your own carrier!

Bear and His Best Friend Pear

Have you heard of a story or anything about a Bear with a best friend named Pear? Neither have I! I don’t know if my son was just rhyming or had read a book about these characters or just made them up.

Either way, The story starts way back in December when we were writing my son’s Christmas List. He was naming off what he wanted Santa to bring him and the last thing on his list was Bear and his best friend Pear! I had no idea what he was talking about, but I put it on the list…

I was about to make the pear, when we had a dinner conversation about Pear. Glad I didn’t make him before dinner… As we were talking my son told us that Bear and Pear go on walks together. But how does a pear walk? My son, ‘ He has legs.’ Imagine that said with the tone of voice of a three-year old thinking, ‘Hello! How else would he walk if he didn’t have legs!’ Then it came out they liked to talk with each other. And Pear can do that, of course, because he has a mouth! Again, come on grown-ups, don’t you know this stuff already????

The pear was made with the template from UK Lass in US. I added the face and legs and arms of course, because what pear doesn’t have these things….

The Bear is actually made from the Mikey Monkey pattern that I won a while back from mmmcrafts.  I changed the face to more of a bear face and of course, the tail had to be changed! I guess in hindsight, maybe the legs and arms should have been shorten a bit as well, but I like them long. and it’s cute to see the kiddo wander around with the long-legged bear!

And yes, I know I keep talking about how great it is to sew on the front porch of the beach house… Well it is! And that’s the place… Right up there in the picture behind Bear and his best friend Pear.

So back to the story… Santa didn’t quite get them made in time, so he asked the Easter Bunny to bring them for him. My son was very excited that the Easter Bunny did that favor for Santa!

I was in the kitchen showing them to someone and they remarked on my handy work. My son came running in, ‘No, the Easter Bunny made them for Santa!’

Bear and Pear are best friends. They enjoy taking walks, rocking in rockin’ chairs and watching the waves roll in!

Shared with these link parties!

A Pillow for the Plane!

I my latest quilting project was a pillow for a plane ride. Some of our best friends are moving to Tasmania this week and she was looking for a comfy pillow for the little ones plane ride.

My friend asked me if I could make a quick little pillow case for a pillow she had. She wanted to take it on the long plane trip to Tasmania as a little bit of entertainment. She wanted to use this particular fabric, fabric we’d used in her baby shower quilt that I had done. But it wasn’t big enough to cover the whole front of the pillow. She also had this bright red fabric… As soon as I saw the scraps left over from the quilt and the red, I knew exactly what I was going to do!

First I was just going to have the little giraffe head on the side. I mean, you can resist that funny face poking out from the bushes. But then I noticed the poor, poor monkey….. He was the only on e in the big picture to get cut. He actually had his head cut off….  Poor thing… And this little guy loved monkeys! So the monkey had to be included somewhere! (and hopefully he won’t notice the other headless monkey.)

The other little detail I added was the quilting of the big leaves!

When I gave it to her, she was very excited, but surprised! She said she didn’t mean for me to do all this, just a simple pillow case was all she meant for me to do. Um, I don’t seem to do simple to well! It was well worth it for such good friends! And I think it’s just adorable!

I’m so excited for next year (fingers crossed) when we can take our own flight to Tasmania to visit!!!

Shared with these Link Parties!

Visit thecsiproject.com

Baby Gifts!

A while back I made a friend of mine some baby gifts for her new little guy! She really liked them and asked for me to make some for a friend of her’s… I couldn’t say no to sewing baby gifts!

I finally got them done! The blanket was the same as before, a pattern from Amy Butler’s book Little Stitches for Little Ones. It’s called the snuggie blanket and is a hooded blanket with a wrap piece. It’s a great pattern and super simple to make!

I had decided that I would use a color pallet of teal, red and white (loving that, maybe from left over from my Dr. Seuss Party???)

So I get to the store, thinking, ‘This won’t take long! I know just what I want!’ Um…. Well, let’s just say I had to reinvent the project color scheme. The store didn’t have anything I wanted. And I don’t know the friend of a friend, so I was hesitant on what to pick out! I finally ended up with these browns, greens and oranges. I loved it, but was still a bit unsure if anyone else would… So I emailed my friend and told her, crossing my fingers that she’d be ok with it. Ends up the nursery for this new little one coming along is green and brown!!! Can I tell you how relived that made me??? MAN!!!

I haven’t made one of my Ghostie dolls in ages! I used to love to make them, because they always make me laugh when I turn them right side out. And this one didn’t let me down! He popped right side out and it was like he was saying, ‘Hey, where have you been? What have you been making? It hasn’t been Ghosties and look how cute we are!’ Warning: You might be seeing more Ghosties in the near future….


Shared with these link parties!

Mmmmm…. Cookies…. a mini tutorial

mmmmm… Me likes Cookies!! And my son seems to loves cookies and Cookie Monster!

I’m not exactly sure where this obsession originated. And actually it’s just an obsession with Cookie Monster hats! A few weeks ago my son went to Target with his Dad and came home with a Cookie Monster baseball cap!

Then we were at the store the other day (Wal-mart… shhh…) and he found a Cookie Monster t-shirt and beanie cap combo that was way to big for him… And it was 10 bucks. And here’s the part where I’ve turned into my mother. I told my son, ‘No, I can make that.’ And thought to myself, ‘I can make it and I can make it for less than 10 bucks.’ And what do we find but a little blue beanie just dying for Cookie Monster eyes!

We got the blue beanie for $1.27 and I had the rest of the supplies (yes, all two pieces of felt) at home! And this is what I did…

1. Materials:

Blue beanie hat

Black and White felt (just a little bit, at the most 4″ squares of each)

Thread

and Scissors

2. Cut the pieces, the sizes can be whatever you happen to have nearby that’s a circle shape! My white circles are about 1 1/2″.

3. Sew the white to the large black circles.

4. Sew the little black eyeball to the whites of the eyes.

5. Sew the eyes onto the hat.

And Wahla! About 20 minutes later you have your very own Cookie Monster hat!

Which character would you make??

Have a good weekend!

Shared with these parties!

It’s a Dragon Halloween!

I’m so glad that so many people are attempting the dragon wing tutorial that posted last year!

I thought I’d share some reader dragons today!

These dragon wings were made by Make Jane Make and I love love love the sweatshirt she made to go with them!  I might just have to attempt this to go with my son’s wings.

And this little blue number is by Just Plumb Good.

I love how both of these use different colored fabrics.

I also just made another pair for a reader in Virginia. So beware… There’s a black dragon lurking on the east coast!

And a few more people have commented that they have made some wings, including a pair for a puppy. I’d love to see them! Please send pictures, upload them to the I’m Feelin’ Crafty flicker page or send me a link to your photos!

Gotta get on that Halloween costume. So behind schedule somehow!