Spooky Lollipop Puppets Tutorial

I can’t believe that Halloween is almost here! Ahhhh! We started decorating a few weeks ago, but just got the finishing touches done today! How about you? Still working on it? Here’s a fun little craft to do to give to your favorite trick or treaters!

LollipopPuppets-Main-ImFeelinCrafty

We just happened to have a bunch of lollipops that we didn’t know what to do with and decided to dress them up for Halloween! I can’t wait to show you how easy they are!

LollipopPuppets-Materials-ImFeelinCrafty

The materials we used are felt, embroidery thread and needles, scissors, googly eyes and glue and, of course, lollipops! And an erasable or disappearing pen is optional.

LollipopPuppets-Step1a-ImFeelinCrafty

LollipopPuppets-Step1b-ImFeelinCrafty

First we made the patterns, but you can skip that step and download our patterns here. Our patterns are for a 2″ lollipop. We traced pretty close the pop and then secondly, we made the pattern about a quarter inch larger than the pop.

LollipopPuppets-Step2a-ImFeelinCrafty

LollipopPuppets-Step2b-ImFeelinCrafty

Secondly, we cut! First the pattern. Then the felt. Cut out the shapes, two of each for each pop. And if you want eye holes, this is the time to cut them out.

LollipopPuppets-Step3a-ImFeelinCrafty

LollipopPuppets-Step3b-ImFeelinCrafty

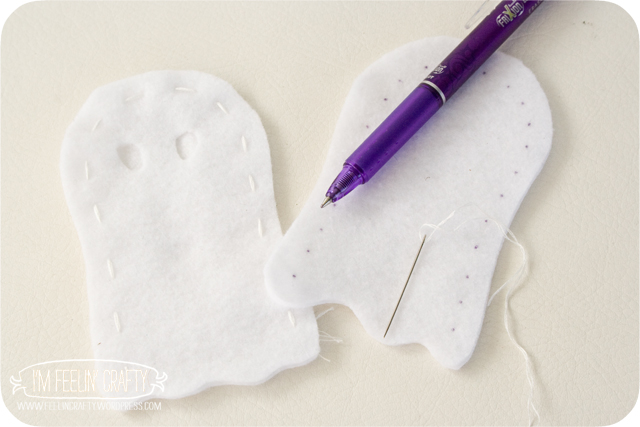
Next, the fun part! Well, this is debatable… I think my son’s favorite would be the next step. But the sewing part is mine! If you’re making these with little ones, two things. First,  be careful with the needles. The bigger the needles, the easier it is for the little fingers to use without being poked. And secondly, you can mark the spots to put the needle along the edge of the puppet pieces. I used a Frixion pen and the dots can be ironed out.

LollipopPuppets-Step4a-ImFeelinCrafty

LollipopPuppets-Step4b-ImFeelinCrafty

The favorite part for the kiddos! Adding the googly eyes! Just glue them on!

LollipopPuppets-Step5-ImFeelinCrafty

And lastly, insert the lollipop!

LollipopPuppets-ghost-ImFeelinCrafty

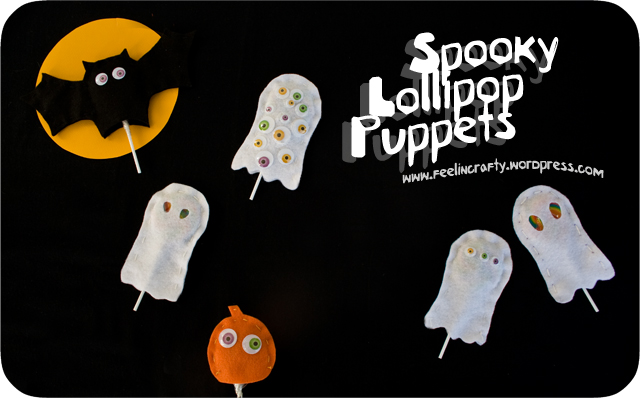
And a spooky lollipop ghost puppet is what you have! My son went a bit overboard with the googly eyes, huh!?!?! He was loving it!

LollipopPuppets-Group-ImFeelinCrafty

We made a bat, a pumpkin and several ghosts!

LollipopPuppets-Bat-ImFeelinCrafty

I think the bat is my favorite! Which is your favorite? What other fun spooky lollipop puppet can you think of?


Shared with these Link Parties!

Smash! It’s the Incredible Hulk!

Rrrrrr…. Smash… Hulk Smash…

HulkMuscles-Main-ImFeelinCrafty

In case you are still wondering why I made purple fleece shorts… It was the first step in the Incredible Hulk costume the kiddo was wanting!

HulkMuscles-Hulk-2-ImFeelinCrafty

I knew I was going to make a hulk costume, but I originally just started out with the idea of making green pj’s and the purple shorts. Remember? The kiddo needs pj’s. Then last weekend I was at a fifth birthday party and was talking about it to this other mother about Halloween costumes. When I told her we were thinking the Hulk, she asked how I was going to do the muscles. I was like, ‘nah… I’m not doing muscles!’ And explained the whole need for new pj’s thing to her. Then she gave me this disgusted look, like, ‘You’re not doing muscles?’ I don’t even know this woman, but, oh yeah, the challenge is ON.

HulkMuscles-PJs-ImFeelinCrafty

The challenge is on and I’m making muscles, but I’m also stubborn and I’m sticking to my PJ’s plan! I started the whole costume using the Alex and Anna Winter PJ’s pattern (affiliate link) from Peek a Boo Patterns (affiliate link). Super easy pattern! Without muscles you could put this together in a flash! (Ha! I used the same pattern for our flash costume! Get it! I crack myself up!)

HulkMuscles-Muscles-ImFeelinCrafty

You want to know how I’m going to do muscles, lady??? I’ll show you exactly how I’m going to do muscles!

HulkMuscles-Step1-ImFeelinCrafty

I started with one of the kiddos Spider Man costume full of muscles and traced/enlarged the muscles. Easy! The original costume was a size 3ish and I needed to enlarge the muscles to about a 5ish. You can print my patterns here.

HulkMuscles-Step2-ImFeelinCrafty

Next I cut them out. On the fold. You’ll need 2 of the 6 pack abs and 4 of the shoulder muscles.

HulkMuscles-Step3-ImFeelinCrafty

Start sewing! I put a straight stitch along the bottom line of the mucsles. Then I did my edge stitch (technically a stretch stitch) around the edge, leaving a hole in the top for stuffing. I’m only showing the shoulder, but I did the saem tthing for the abs.

HulkMuscles-Step4-ImFeelinCrafty

Stuff!

HulkMuscles-Step5-ImFeelinCrafty

Now I don’t know what this tool is technically called, but I call it a roller marker. I rolled it over the muscle shapes on the sleeves (and abs) to know where to sew.

HulkMuscles-Step5a-ImFeelinCrafty

Now it’s hard to see this, but I followed up my roller markings with an erasable pen.

HulkMuscles-Step6-ImFeelinCrafty

Then pin in the mucles and align with the edge of the sleves and chest.

HulkMuscles-Step7-ImFeelinCrafty

Sew the muscle shapes. (yes, I forgot to take a picture of the muscles before I put it all together.) And then put the pieces all together following the pattern (affiliate link) directions!

HulkMuscles-Hulk-ImFeelinCrafty

Not long ago I found this Hulk mask for a super steal and knowing how much the kiddo likes super heros, I grabbed it even though he’s never said all that much about the Hulk. But as soon as he got it, he told us he needed the costume to go with it! It’s actually kinda creepy, because the eyes are clear and light up, so you totally see his eyes, but with the face of the Hulk!

HulkMuscles-Smash-ImFeelinCrafty

Hulk Smash! The costume has already been well loved! We’re still a little on the edge of our seats waiting to see if The Flash or the Hulk visit us on Halloween!

Are you making costumes this year?

Shared with these Link Parties!

KCW- Purple Shorts

Ok, it’s not much today, but I did make something!

KCW-PurpleShorts1-ImFeelinCrafty

I had to finish up my last pair of dragon wings for the Halloween season, then I turned to some Kids Clothes Week! Some purple shorts! I started with the pattern for the Kickin Back Sweats from Sewing for Boys. I thought, that since I had the pattern, I should use it. Right? It’s super simple. But they are HUGE! This is the size 2/3 on my 5 year old! And I even sized it down a little from the 2/3! Either way, they fit great!

KCW-PurpleShorts2-ImFeelinCrafty

And I cut out the green pj’s to go with the purple shorts… Know where I’m going with this????

The Flash Costume

This post may contain affiliate links for your convenience and to assist in the maintenance of this site!

Like I said yesterday, we need costumes and pj’s!

Flash-Main-ImFeelinCrafty

Or what about pj’s turned into costumes? OK, I have to admit that this one was made earlier than KCW, but I haven’t shared it yet, so…. Just pretend that I made this last night! hehehe…

Flash-Flash-ImFeelinCrafty

The kiddo is super into superheros! (more about that to be coming soon!) And he loves The Flash because he says they share the same super powers! SPEED! I promised I’d make him a flash costume and kept putting it off and off. Then he birthday party was coming up and he ‘NEEDED’ it for his party! So the night before the party I whipped up this little costume!

Capture

I used the Winter PJ’s pattern (affiliate link) from Peek a boo Patterns  (affiliate link) for the outfit. With a couple of adjustments…

Flash-Sleeves-ImFeelinCrafty

The first, and simplest, adjustment I made was lengthening the arms (and legs). I didn’t want to use the cuffs, so I just made the arms and legs longer. Simple!

Flash-Top-ImFeelinCrafty

The second adjustment I made was for the top. I cut the back wider than the pattern. About two inches. I cut the back on the fold as directed in the pattern, I just cut it wider. Then I cut it in half along the fold line.

Flash-Back-ImFeelinCrafty

The kiddo loves costumes and has a growing collection! Most of his superhero costumes are one piece that close in the back. That’s what he likes and that’s what he got. I added Velcro pieces down the back and the extra width overlaps and closes just right!

Flash-Front-ImFeelinCrafty

To make the pj’s a one piece, I pinned them together at the waist and then sewed them together! I cut a lightening bolt belt out of fleece and sewed that together hiding the seam at the waist.

I’ve been told that a few things are missing… and he’s right, but… I didn’t have the lightening bolts along the wrists. So I made cuffs. Not exactly correct, but he accepted the improvement. And we’re missing the lightening bolts on the calves or boots. Still working on that!

Flash-Last-ImFeelinCrafty
He loves it! It’s comfy! And it’s been worn quite a bit! There will be more about the arm bands and mask coming soon!


Shared with these Link Parties!

It’s Kids Clothes Week Again!

I can’t believe it’s Kids Clothes Week again!

kid's clothes week

And I’ve been swamped with etsy orders so I wasn’t able to prep until now! And we’re going out of town this weekend, so I don’t know if I’m in for the whole week or not… But either way, I’m going to try!

KCW-prep-ImFeelinCrafty

But don’t get too excited, I’m not going crazy with anything too exciting! My kiddo wants costumes and needs pj’s. So that’s what he’s getting!

What are you making?

A Ghostly Garland DIY

Boooooooooo! Today I wanted to share a project we did for Halloween! We made a Ghostly Garland!

GhostlyGarland-Main-ImFeelinCrafty

We started to doing this project with the idea of making large ghosts, but as we were going along the idea popped up to make little ones for a garland! So we finished up are big ones and moved on to the garland!

One thing to keep in mind, if you live anywhere with moisture (like the PNW) you will want to keep these guys inside. I learned the hard way by putting our big ghosts outside and the starch didn’t hold up against Mother Nature’s moisture!

First we gathered our materials: shear fabric, wax paper, scissors, balloons, tape, starch, ribbon (or a thin rope or bakers twine)

GhostlyGarland-Step1-ImFeelinCrafty

For the little ones you’ll want to raid your recycling! We used a varaiety of sizes of recycled items. So barely blow up your balloons nad tape them to the tops of your recycled items. Set these pieces around on top of a piece of wax paper.

GhostlyGarland-Step2-ImFeelinCrafty

Next you’ll need to cut your fabric. Fold the fabric in half and then in half again. Cut a curved edge along the not folded over edges. Make the folded sides about the same as the height of your balloon and recycled item. For these you don’t want the fabric to touch the table.

GhostlyGarland-Step3-ImFeelinCrafty

The third step is to soak the fabric in the startch.

GhostlyGarland-Step4-ImFeelinCrafty

Fourth, drape the fabric over the balloons. And leave them here until the starch dries. I set them up on wax paper, so as it drips, you can also clean it up to save the for the next ghost! The little garland ghosts fabric shouldn’t touch the paper below, remember!

I don’t know what happened to my picture for step 4, so even those these are the big ones, you can see how we draped the fabric over the balloon! (In this picture I forgot the wax paper and my ghosts stuck to it.)

GhostlyGarland-Step5-ImFeelinCrafty

For Step 5, once all the ghosts are dry, draw on the eyes!

GhostlyGarland-Step6a-ImFeelinCrafty

GhostlyGarland-Step6b-ImFeelinCrafty

Next you’ll want to poke a hole in the side of the ghosts head and pull the bakers twine through all the ghosts.

GhostlyGarland-Step7-ImFeelinCrafty

And lastly, Hang the garland up! Yea!

GhostlyGarland-2-ImFeelinCrafty

A little secret is that we made these last year, so in the picture, the kiddo looks so little! But so happy! We had a great time putting this together and hope you do too!

GhostlyGarland-Smiles-ImFeelinCrafty

Ardin’s Monster! Another Kid Designed, Momma Made Project

Since it’s Halloween and all, I thought another Monster project was in order!

ArdinsMonster-Main-ImFeelinCrafty

This one is another one of my Kid Designed, Momma Made projects. My son has a friend who loves to draw! And he loves to draw monsters! Maybe I should say LOVES to draw MONSTERS! Then it was his birthday and we debated and debated what to get him. Finally we (the kiddo and I) decided to make him a monster from one of his drawings.

ArdinsMonster-picture-ImFeelinCrafty

I asked his mom to send me a picture of one of his favorite monster drawings and this is what she sent!

ArdinsMonster-2-ImFeelinCrafty

And this is what I made! It took me a while to really think about how I was going to get all the pieces to come together. But I finally got it!

ArdinsMonster-Buttons-ImFeelinCrafty

One of our trips to the fabric store I found this remnant of this fur. It was perfect! The right color and the right size! I cut out the body pieces first. For the yellow circles on his back I used buttons. I don’t know if this was the best option or not. I debate if I should have used a felt or not. But I like the change in texture… And then I did an applique stitch for the blue lines on his back.

ArdinsMonster-Toes-ImFeelinCrafty

I loved the toe details in the drawing, so I knew I couldn’t leave that out! I made the body, the tail and the legs and sew-ed all those pieces together.

ArdinsMonster-Antlers-ImFeelinCrafty

Then I made the antlers! I tired to do them a couple of different ways. I sewed fabric together, but then couldn’t really stuff it very well since the pieces were pretty small. So I threw that away… Finally I realized I just happened to have felt, and in the perfect color, I might add…. And I had pipe cleaners! I cut out the antlers, situated all the pipe cleaners and pinned. Then I just sewed around the edge. Lovely!

ArdinsMonster-1-ImFeelinCrafty

The face was pretty simple, a little applique here and a little reverse applique for the mouth.

ArdinsMonster-Last-ImFeelinCrafty

My son loved him and was super excited to give him to his buddy! I always get a little nervous when we give kids handmade gifts. Sometimes it’s hard to complete with all the fancy toys they are also getting. But when Ardin opened this one, he jumped up and down and even let out a little squeal! While he was showing it to his mom he was so excited and said, ‘Mom!! Mom!! It’s the monster I drew! The monster in my room!’ To see his face light up and for him to recognize right away where the design came from….. Awesome!

Another Nurture Circle Quilt!

Speaking of, I just finished another Nurture Circle quilt this weekend! But in the meantime, while I photograph that one, let’s check out this one…

doGood-Aug-Finished-1-KatCatQuilts

image via Kat’s flickr page

This one was designed by our circle member Kat from Kat and Cat Quilts. She picked the pattern and the colors!

doGood-Aug-ImFeelinCrafty

The pattern is a string block that Kat designed and wrote a tutorial for us. And of course, for you too, if you’d like to make one like ours! It was super simple and quit quick actually! I think I was able to use all scraps for this one! Perfect!

doGood-Aug-2-ImFeelinCrafty

doGood-Aug-1-ImFeelinCrafty

The colors were just up my alley! A little low volume, mixed with greys and yellows and blues! I loved it!

doGood-Aug-Finished-2-KatCatQuilts

image via Kat’s flickr page

And thanks to her speedy quilting, the quilt is ready (has been) and just lovely!

FrankenZombie Treat Bag Tutorial

Is it Frankenstein? Is it a zombie? No, It’s both! It’s FrankenZombie!!!!

Frankenzombie-ImFeelinCrafty-Title1It’s the FrankenZombie Treat Bag! The kiddo has a treat bag that he loves and doesn’t want to replace. We use it every year. And then I remembered the zombie birthday party invitation that he brought home the other day! So why not make a zombie gift bag that can then be used as a treat bag??? Oh yeah! So that’s what we did! Check out the tutorial over at Go To Sew!

Frankenzombie-ImFeelinCrafty-Lookin

Join Me at Little Kids Grow!

Today I’m joining my lovely friend Shannon on her blog Little Kids Grow for her Moms Know Moms Series!


Be sure to hop over and check it out. And not just my post! This is a month long event with some fantastic mother bloggers! I’m truly enjoying reading how so many other mom’s handle crafting, sewing, blogging, family and business all at the same time!


She’s also started a FB group, Moms Know Moms, so let her know if you want to join!