Lullaby- A Baby Quilt

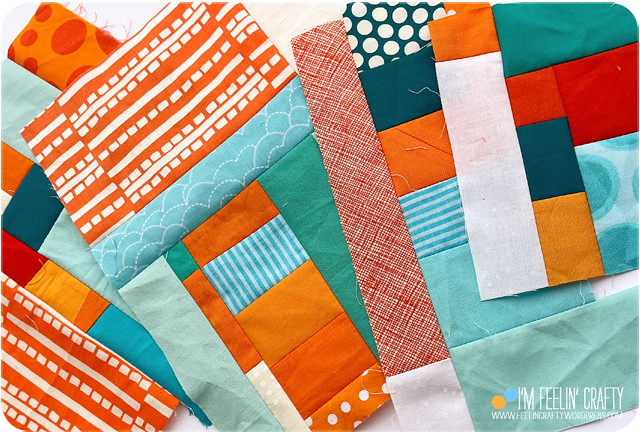
I wanted to make a baby quilt for my co-worker, so I snooped around for her nursery style and colors. She showed me her picks that were mostly green and grey. I remembered I had a bag of left over scraps in this color scheme, so I pulled them out!

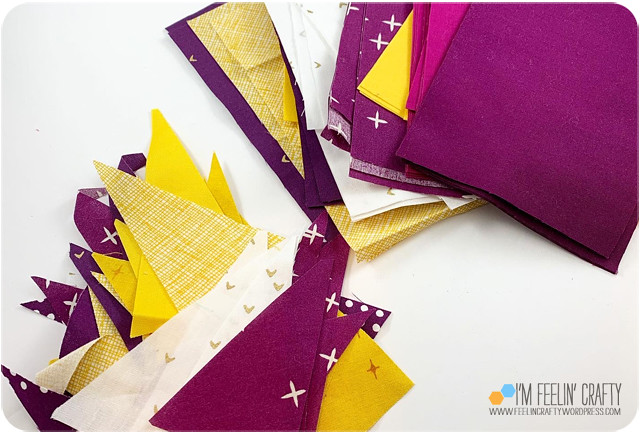
My ‘starter’ set, I’ll call it, didn’t have the darker green that she was using. I added in a dark green and it just fell a little flat for me. I took those out and added in a more greeny green and it worked.

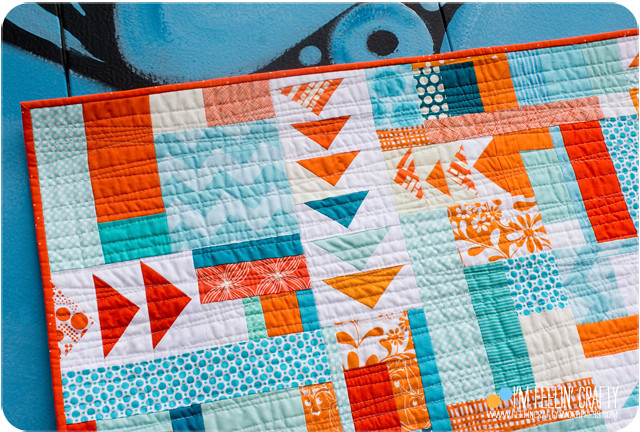
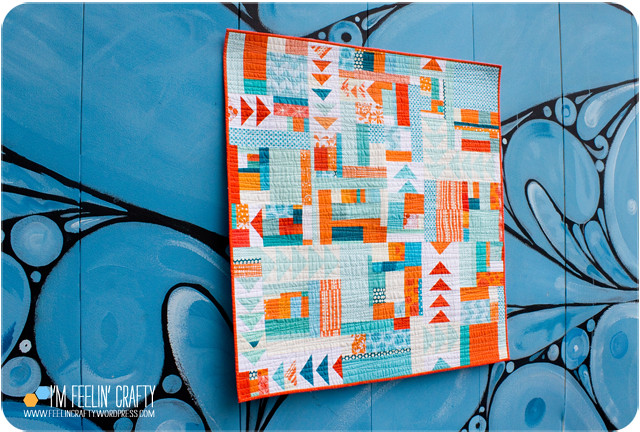
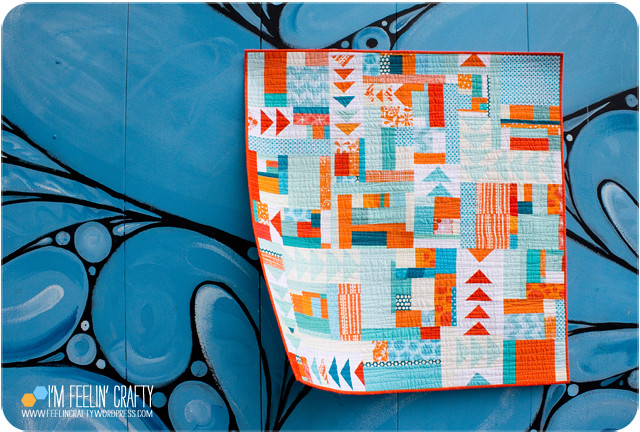
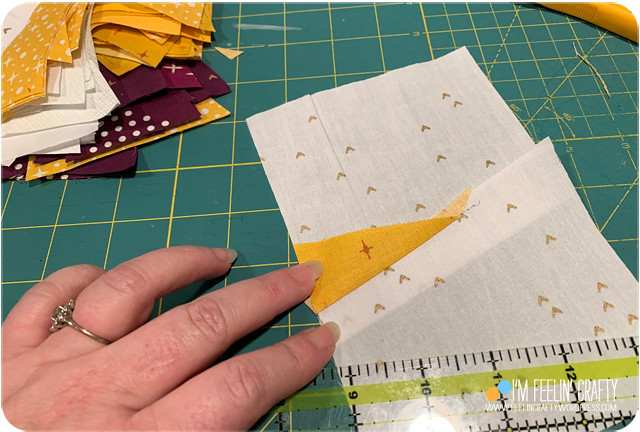
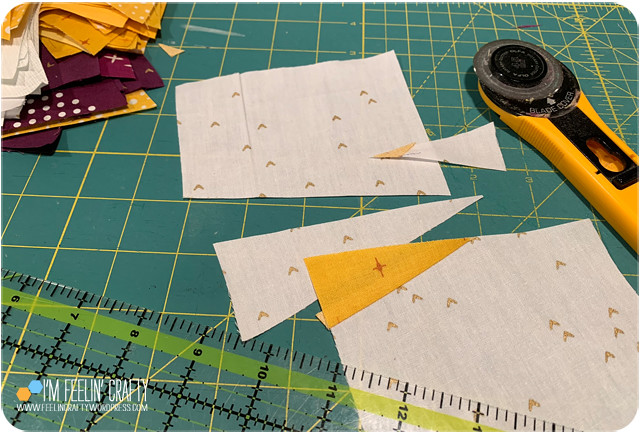
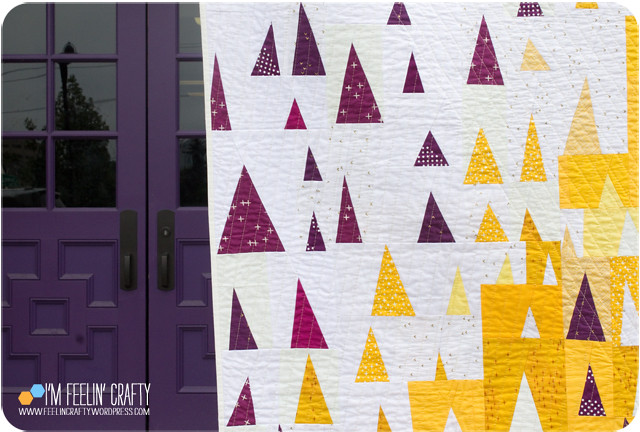
You can see the process I took. I started with most of the original scrap bag, but to get to the baby quilt size I wanted, I had to keep adding to it. I kept with the same colors and shapes, mostly HST. Eventually, I got it where I needed it. When I do improv, often I have to figure out how to piece the different sized blocks. On my phone, I draw out how to group the blocks to piece them together.

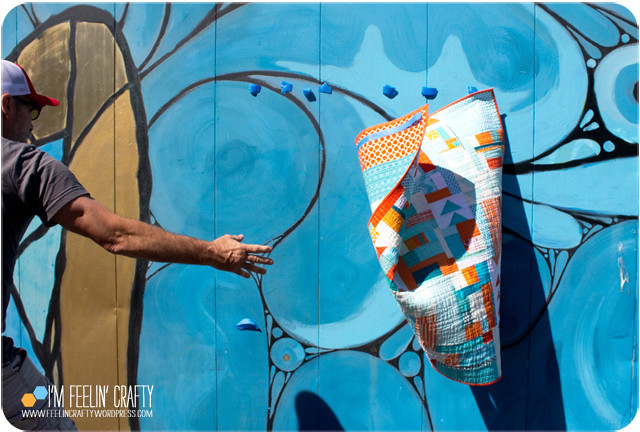
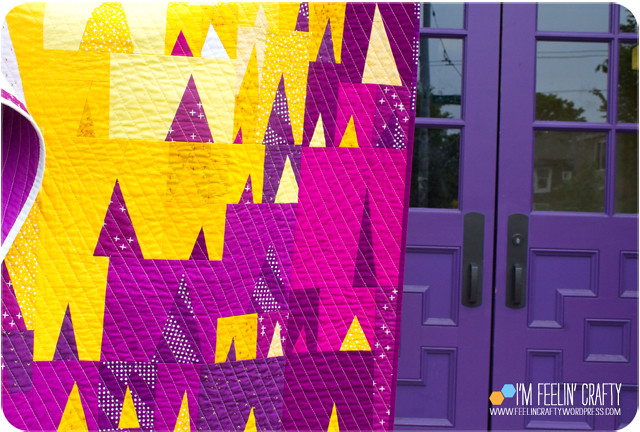
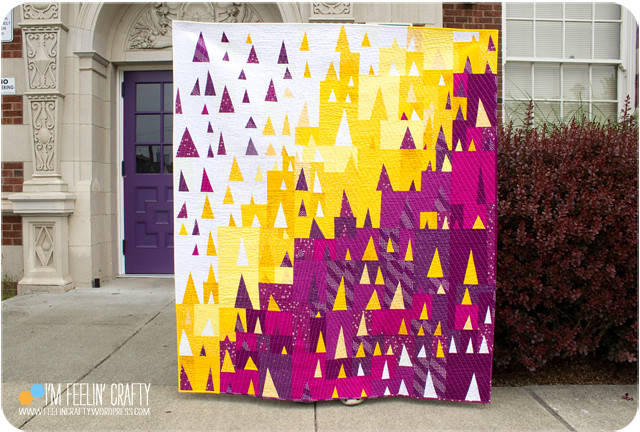
I ended up at about 32×34 inches and I really enjoy the balance of the different blocks and colors!

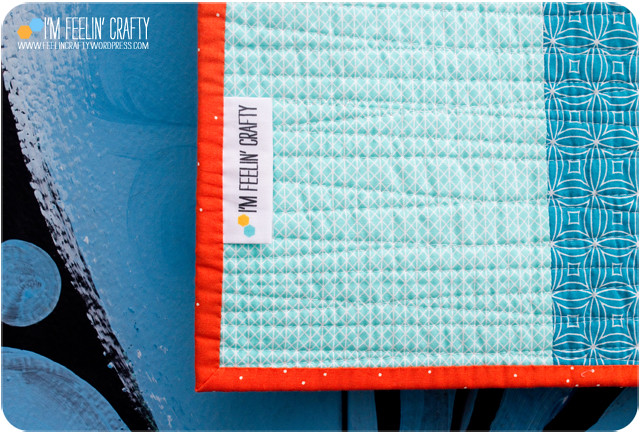
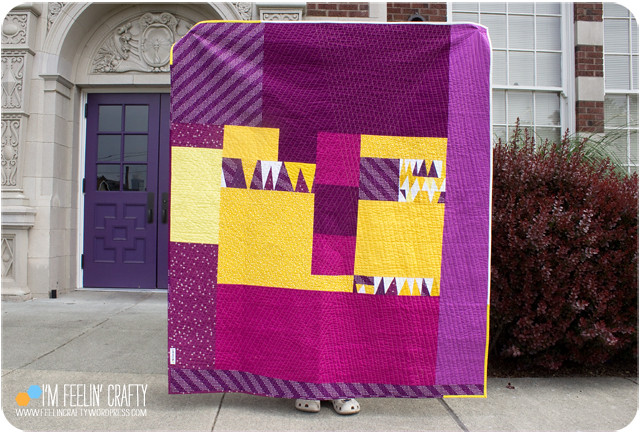
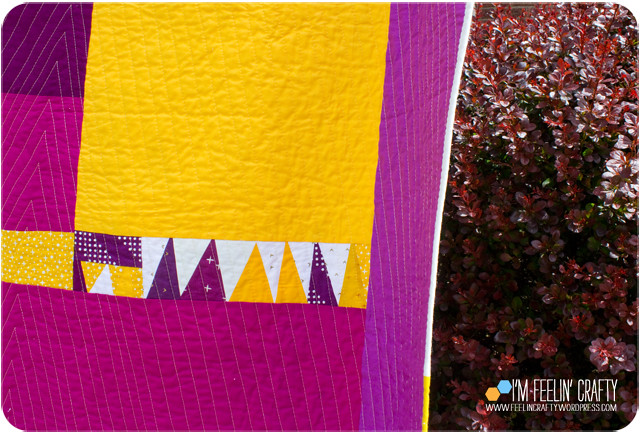
Usually, I piece the back of my quilts. This time I was really excited about using the Charley Harper Bookends fabric, so I did a whole cloth back.

The cutest little baby was born in December, and I finished the quilt in January. A little late getting to her, but it was well received, and I love sharing my quilts with others!

Log Cabin Play

Log Cabin Play! One of my all time favorite quilts!

Back in 2021, I took a zoom class with Cheryl Arkison via our Seattle Modern Quilting Guild. The class was called Traditional Variations. The class was to take some familiar or traditional blocks to shake them up! We ‘played’ with improvisation, scale, and color to create fun and funky takes on the traditional block.

I obviously chose the log cabin block and pulled pink, yellow, red and orange scraps from my scrap bins and set to work! I tried to make each block different. Every one of them was a log cabin, but each one was slightly different. Each one did have white between the color pieces, that was my one real rule.

Once I had all the blocks I needed, I started piecing them together. The problem I had was that I had no idea how to quilt it! I knew I wanted to focus on the log cabin, but how??? I couldn’t quite figure it out, but I knew who could! I decided to send it to my friend, Dionne, to quilt it for me. This was my first quilt I ever sent out to someone else to quilt! I knew it was in good hands!

Together we decided to only quilt the white fabric. We agreed on three things, pop the log cabins, only quilt the white fabric and no feathers! Those were the only guidelines I left with Dionne!

And WOW! With Dionne’s help, this quilt turned out fantastic!

Look how cool the quilting is. Each area is quilted a little bit different, just like each log cabin is slightly different, too! My very favorite part of the quilt is this piece of the 4 quarter log cabins. When I pieced the quilt, I looked at pulling the quarter cabins apart, but I decided I really liked them left together!

Remember how I said the top was all from my scrap bags? Well, I then raided my stash for the back. I gathered up small pieces of yardage I had that fit the color scheme to make one really big log cabin!

I love how cheery the back is!

I started this before I knew that there would be a log cabin challenge at Quilt Con 2023. I was honored that this quilt was selected to show in that challenge exhibit!

And a shout out to the mural artist for the mural that served as a perfect backdrop for this quilt, Craig Cundiff.

The Hocus Pocus Quilt

I’ll say it right out. I’m apparently not the best photographer on crutches! Both of the these Halloween quilts have deserved better photos, but it is what it is!

Isn’t this a cute one! It is the Hocus Pocus Quilt by Corinne Sovey. I love the graphic nature of her patterns! I also made her Santa’s Helpers quilt.

One thing I really like about her patterns is that the blocks use different techniques. Most of the blocks are tradition HST and cut pieces of fabric sewn together. Others are paper pieced, like the broom and the witch’s boots. And the monster eyeball and cat had some hand applique.

I did do one little cheat… The pattern calls for piecing the striped blocks. I just happened to still have this striped fabric from way back when I made a quilt only out of the striped fabric, the Row by Row QAYG quilt in 2016.

On both of her quilts, there has been one block that I just decided to do my own way! On this one it was the Star block. The pattern has a english paper piecing method for the star, but I decided to make it a foundation paper pieced block. You can still download the block here.

ok… I love the back! I really love the back….

I had a bunch of triangular pieces and squares from the striped fabric on the front, so I started sewing those together with other solid scraps. Rather than squaring them off, I started sewing them together just how they turned out. I filled in the little angle pieces with green fabric and added a panel form one of my Halloween panels I have stashed not knowing what to do with! ha!
And if you hadn’t noticed yet, I had it quilted with bats! Can you see how cute they are??? I had Jana Royal quilt it and am super happy with how it turned out! I asked to just have straight lines, but then figured if I’m handing it over to someone, why don’t I get something fun that I could never do on my own???

This was a fun one and I’m really excited that I got it done in time to cuddle up watching silly Halloween movies! And maybe waiting for some trick or treaters! Happy Halloween!

Mini Series Mini Halloween Quilt

I made all these blocks last fall and was able to finish the quilt prior to Halloween this year! Giucy Guice and Alison Glass had a sew along to make their mini series paper piecing mini blocks and I decided to play along. I tried to play along on past sew alongs, but never succeeded in finishing all the blocks. This time I did and I even made some more than once!

I was inspired by a fabric pull I saw on Fabricbubb’s website. I love the fabric pull! A very bright Halloween pull to me.

The first two blocks we worked on were the Log Cabin Block and the Triangle Cabin block.

The Triangle Cabin block I didn’t use in the quilt, but in the Halloween Banner Garland I shared last week.

When I first started out, I knew I wanted the blocks to be Halloweeny, but I wasn’t sure what I was going to do with them. I knew pretty soon it was going to be a quilt! For the Log Cabin block, I decided to add in some other spooky elements! I started playing with the Spooky FPP Patterns by @spunstraw.

The next two blocks were the Courthouse Steps and Diamond Sidestep blocks.

I added the cat from the spooky FPP patterns to the Courthouse Steps block. I like showing the block itself with the candy for scale! These are tiny piecing patterns! Did I mention that?? Very tiny! But the blocks are made so that you can have tiny blocks or make them larger. I made this larger so I could add the cat in the middle!

Then I made the Diamond Sidestep block. When I made it all I could picture was an eye, in particular a cat eye! Warning, you may never see this block as not a cat eye again if you continue to read!

So I made two of these blocks!

Then sketched out the cat to go with these eyes!

The cat fits in the quilt just right if you ask me!

Next up were the Pineapple and Hexagon Steps blocks.

The Pineapple block plus the witches hat spooky block!

And the Hexagon Step block. This is one of only two blocks that I added in black into the halloween rainbow of fabric and I like it!

Next up Triangle Geese and Bloom blocks.

The Triangle Geese block also looked like an eye to me! So I made two to make another eyeball!

The Bloom block is probably one of my favorite of the series!

Next up was the Stretched Geese and Criss Cross blocks.

I added the ghost to the middle of the Criss Cross block!

And lastly, we made the Curved Cabin and Rainbow blocks.

I really did love the Curved Cabin block, but it got a little wonky when I quilted the quilt! I do love the little skulls in the corners. they fit perfectly!

At this point you can probably imagine what I thought about this Rainbow block! Yep, another eye ball! This one is a Cyclops Eye, though! But again, to get the eyeball, you need to make the block twice…. And there seemed to be an extra million pieces in this block!
Then came the paper removal… Luckily, it didn’t take as long as I had anticipated that it would.
For all the piecing on the front, a solid back seemed just fine for this mini quilt! I love this fabric and I’ve been holding on to it for some time. the colors were perfect and the piece I had left was almost just the right size! I think I’m down to scraps only left of this fabric.
The label picture! 🙂
I got a little over the top on this sew along. I made duplicates of 4 of the 12 blocks. I think if I do this sew along again, I’m sticking to one of each! 🙂

We’re enjoying having this one hanging in the dining room for the holiday!

Magenta Crush- COTY Quilt 2023

For the last three or so years, I have always had the intention of playing along and making quilts out of both the Kona Color of the Year and the Pantone Color of the year fabrics. I’m good at buying the fabric, but not so good at following through! I did use the Kona COTY 2019 in my Begonia Quilt. It seems like there were others, but… The good news is that I followed through this year!

MagentaCrush-FabricPull-ImFeelinCrafty

This year I ordered both the Kona COTY, Crush, and what I ventured was going to be a good match for the Magenta Pantone COTY, Cotton Couture Fuchsia. I ordered them both from one of my favorite shops, Fabric Bubb. I didn’t have any intention of using them in the same quilt, but when I opened the package, I fell in love with the colors together. I considered adding in a third color, but in the end decided not to!

MagentaCrush-Sketch-ImFeelinCrafty
I grabbed my pile of quilt sketches to find the right one! (you may even notice the sketch that led to the last quilt I posted, Subtraction!)
MagentaCrush-QuarterCircles-ImFeelinCrafty
Then set to piecing the Quarter circles for the front and made the opposite quarter circle blocks for the back.
MagentaCrush-ContrastColor-ImFeelinCrafty
MagentaCrush-Contrast-ImFeelinCrafty
In all the good quilting design classes, they always tell you make sure you have the right amount of contrast in your blocks, to move blocks around to get the right amount of contrast to keep the eye moving across the quilt. One way to check this is to take a black and white photo of your quilt. I have barely any contrast in this quilt and I love it. For fun, I did the black and white test. Not so much contrast here!
MagentaCrush-Front-ImFeelinCrafty
And this is what I ended up with. Low contrast and all! I’m still totally struck by how much I loke the colors together!
MagentaCrush-Corner-ImFeelinCrafty
MagentaCrush-TopHalf-ImFeelinCrafty
My quilting plan started with two bends, one starting at then curving with the quarter circle out the side. The second bend coming in from the other side and curving down to the bottom. Then the four corners and lastly the space left over!
MagentaCrush-QuiltingDet-ImFeelinCrafty
MagentaCrush-BackMain-ImFeelinCrafty
And the back is the opposite color scheme. Using the left-over quarter circle shapes from the front, but played with in a different way. And with the Kona Crush as the main color.
MagentaCrush-BackDetail-ImFeelinCrafty
MagentaCrush-BackLast-ImFeelinCrafty
MagentaCrush-Label-ImFeelinCrafty
MagentaCrush-ChallengeWin-ImFeelinCrafty
I tried to enter the quilt into the Pantone Quilt Challenge on IG hosted by @Saroy and @elizabethkray . I got the top and back done and basted, but wasn’t able to finish it in time. Luckily for me, they had a ‘Just the Top Category!’ And I won first place! I was a bit shocked!
MagentaCrush-BattingPrize-ImFeelinCrafty
And I won three packages of batting from Quilters Dream Batting! Yea! Again, so excited!
MagentaCrush-Binding-ImFeelinCrafty

For this one, I tried the binding necklace technique that I had seen on IG. It looks super silly, but it really does work!! And helps keep the binding from falling on the floor and twisted.

MagentaCrush-Last-ImFeelinCrafty
MagentaCrush-Last2-ImFeelinCrafty

I had a great time breaking the quilting ‘rules’ on contrast and winning the Pantone Quilt Challenge award with this quilt! Are there quilt rules you like to break??

The STAR Block!

I had a fun response to my Star block that I posted on IG last week, so I decided that as a Christmas in July (last minutes of July) gift, I’d share it with you for free for the rest of the summer!

StarPattern-SolidsMain-ImFeelinCrafty

I’ve made the pattern quite a few times so far and it’s a quick and easy pattern for a foundation paper piecing pattern.

StarPattern-SolidsDetail-ImFeelinCrafty

You can see the sewing lines in the solid versions easier than in the improv pieced version! There are 3 main sections. The top and middle sections only have 3 pieces and the bottom section has 5 pieces.

StarQuilt-CloseUp-ImFeelinCrafty

Last winter I made this as a gift for a Holiday party. We play the White Elephant game and each year we have a theme. Last years theme was to look up. Stars were the first thing that came to mind, so I whipped this up! For this version, I improv pieced larger sections of stripes, then use those pieced sections as the background and star sections in the pattern. The pattern does not have the stripes included!

StarQuilt-back-ImFeelinCrafty
StarQuilt-Label-ImFeelinCrafty

For the back I mostly used left over scraps from the improv stripes on the front!

StarQuilt-Leather-ImFeelinCrafty
I finished this one off as a wall hanging, just like I did the heart Valentines I made last year! A little piece of leather, some metal cap rivets and a wooden dowel make for a fun wall hanging!

You can download the pattern here for free!

StarPattern-Solids2-ImFeelinCrafty
StarQuilt-CloseUp2-ImFeelinCrafty
There are so many options of how to make this block! And enjoy the Christmas in the last few minutes of July gift! And be sure to tag me if you make it and share on social media! Can’t wait to see what you create!

Scrap Play Baby Quilt

Back in January of 2022, I did an online class with Sherri Lynn Wood called Scrap Play. This year she offered a Scrap Play class with Curves that you can still watch the replay for. Maybe I should do that one, too!

ScrapPlay-Blocks-ImFeelinCrafty
I started out by making a few rules. One of which was NO CURVES! Which you know is hard for me! I do like some improv curves. Another rule was to keep the colors to teal, orange and cream. And the main rule was squares and rectangles only. And no triangles…
ScrapPlay-FlyingGeese-ImFeelinCrafty
I finished my square and rectangle blocks and wanted to add something else in. I just happened to have a stash of flying geese left over from this other baby quilt I finished in 2019. I decided to break my own rules and add flying geese. I couldn’t use the pink, but I could use the teal. I wasn’t breaking that rule! I decided to add rows of flying geese, also from my scrap stash to break up the square and rectangle blocks.
ScrapPlay-Detail03-ImFeelinCrafty
ScrapPlay-Detail02-ImFeelinCrafty
ScrapPlay-Detail01-ImFeelinCrafty

As I was finishing this quilt, my co-worker was getting the nursery ready for his new baby on the way. He was telling me about the wall colors being grey, but with a blueish, teal accent wall. At that point I knew exactly where this quilt was headed! So, it was fitting that I had used left over pieces from one baby quilt for another one.

ScrapPlay-Front-ImFeelinCrafty
I really like how the flying geese break up the field of rectangles! They move your eyes around the quilt.
ScrapPlay-Back-ImFeelinCrafty

For the back, I used more scraps, the larger scraps for the most part. And of course, I threw in a couple of flying geese.

ScrapPlay-BackDtl-ImFeelinCrafty

You can really see the quilting on the back images. I did straight line quilting across the whole quilt, but improved the lines so it’s not just a grid or stripes.

ScrapPlay-Label-ImFeelinCrafty
My label matches perfectly with the colors of this quilt! ha!
ScrapPlay-QuiltHolder-ImFeelinCrafty

How do you hang quilts for photo taking? I like to use painter’s tape. I put a stripe of it on my quilt and then smaller pieces on the wall. For the smaller ones, it usually works quite nicely. Unless the wind starts… Luckily, I usually have a quilt holder along for the ride to catch them!

ScrapPlay-Last-ImFeelinCrafty
I’m loving using my scraps! I have a few more to share and finish!

Teacher Pouches

Yes, most people have been out of school for a month or so by now… Not us! Our kids just got out of school about 2 weeks ago. Kinda crazy, but true. To say our thank you’s, I made pouches with my ‘I’m A Teacher, What’s Your Superpower?’ fabric.

TeacherPouch2023-Pouches-ImFeelinCrafty

I chose a ‘pattern’ or ‘tutorial’ from IG to make these. It was a reel, so no real pattern and not a real tutorial per se, but it worked. I used this reel from Jackie Gillies. It doesn’t have a loose lining, but you quilt the lining to the front. To avoid exposed seams there is a bit of binding on the interior.

TeacherPouch2023-ZipperOops-ImFeelinCrafty
These are not my best work. I’m just saying that up front! When I put the binding in the first couple, I didn’t cover the edge of the zipper. Yuck! At first, I was like this is a horrible detail of this project… Then I realized that it was actually my fault, not the project’s fault!
TeacherPouch2023-ZipperYes-ImFeelinCrafty

Then I remembered how to sew and was able to cover the zipper end by covering it with the folded over end of my binding! yes, I thought about taking the others apart and fixing them. But I decided it wasn’t quite worth it.

TeacherPouch2023-Pouches2-ImFeelinCrafty
TeacherPouch2023-Pouches3-ImFeelinCrafty
Following this reel, made for a fun easy pouch! You can’t see it in all these pictures, but I did quilt each one. I also didn’t take a picture of the cute turned up corner. Oops! I had to give them away!
TeacherPouch2023-Card-ImFeelinCrafty
While I was sewing away, the kiddo made the cards. We used the SVG file from SVGNation. He used our Cricket Maker to make a card for each teacher. Whether he likes it or not, we’re making him a crafty kid! 🙂
TeacherPouch2023-Last-ImFeelinCrafty

These were one of my favorite projects using this fabric! You can see other ideas for this fabric here (wall pockets), here (another pouch), here (flat pouch), here (one hour basket) and here (tote-ally Awesome Tote bag) How would you use this fabric?

I hope the teachers liked them!

Improv Triangle Quilt

This one I finally finished this year! No catchy name so far… Do you have a suggestion?

ImprovTriangleQuilt-FrontDetail02-ImFeelinCrafty
ImprovTriangleQuilt-FrontDetail03-ImFeelinCrafty
I started this one WAY back in 2019. I loved Nicholas Ball’s (@quiltsfromtheattic) improv triangle quilts and decided to sew along with one of his Improv Triangle Quilt Alongs. I got most of my blocks done during the quilt along, but I had so many more scraps to make more blocks, I decided to keep making blocks. the quilt along ended, but I kept making blocks. I ended up with a lot of blocks!

Then last year he hosted another quilt along… I said, ok, this time I’m going to finish it! Well, I pieced it, but didn’t get it quilted during the quilt along.

Finally, this spring, I sat down and quilted the crazy thing!

ImprovTriangleQuilt-CuttingFabric-ImFeelinCrafty
ImprovTriangleQuilt-CuttingFabricBlocks-ImFeelinCrafty
I had a bunch of triangles to start. Little did I know that almost each time I made a block, I ended up with a leftover triangle. So, in order to use all my triangles, I had to keep sewing and sewing!
ImprovTriangleQuilt-Piecing01-ImFeelinCrafty
ImprovTriangleQuilt-Piecing02-ImFeelinCrafty
I started with a triangle and a rectangle. Cut the rectangle in half and sewed on the triangle. Then I would trim the other half of the rectangle to fit.
ImprovTriangleQuilt-Piecing03-ImFeelinCrafty

And that’s where I ended up with a new triangle piece! My tip… If you don’t want to keep going and going, only cut a few triangles to start. You’ll make more as you go! 🙂

ImprovTriangleQuilt-Blocks-ImFeelinCrafty
ImprovTriangleQuilt-PIecing-ImFeelinCrafty

When I was done with my blocks my design wall wasn’t big enough for all my blocks. I started with one corner and as I sewed the pieces together, I’d end up with more room on the wall and I’d add in more blocks.

When I’m doing improv piecing and none of the blocks are the same size, I like to take a picture of the layout and then block out the sections and how I am going to put them together. It helps me keep moving, otherwise, sometimes I just sit and stare at it instead of piecing it!

ImprovTriangleQuilt-Front-ImFeelinCrafty
ImprovTriangleQuilt-FrontDetail04-ImFeelinCrafty
ImprovTriangleQuilt-FrontDetail01-ImFeelinCrafty

And this is what I ended up with! I really like it alot! It very much reminds me of schools though! These colors were my high school colors. These colors are an SEC college colors (a rival to the school I was brought up cheering for…). And they are also the colors for the University where I work… And where my son says he wants to go. I told him if that’s where he ends up, he can take this with him!

And it just so happens that there’s a local high school here with the same colors! How fitting for them to have purple doors and purple plants for me to use as a quilt backdrop!

ImprovTriangleQuilt-Back-ImFeelinCrafty
ImprovTriangleQuilt-BackDetail02-ImFeelinCrafty
ImprovTriangleQuilt-BackDetail01-ImFeelinCrafty

And the back! I had more triangles, so of course in my ‘use all the scraps’ mentality, sewed my extra triangles together and used them in the back! Along with all the other smaller pieces I had left over from the front!

ImprovTriangleQuilt-Label-ImFeelinCrafty

And the label picture tradition!

ImprovTriangleQuilt-Last-ImFeelinCrafty

And there we have it! 5 years in the making, another finished quilt! Yea!!

With all the high school and college images flashing through my mind, maybe I’ll call this one, Rah Rah Rah! Sis Boom Bah!

Ferris Wheel- A Mini Quilt

I’m currently trying to NOT start new quilts and only finish ones that I’ve started… I know. I know. Typical quilter comment… My rule is to not start anything new unless it’s a Quilt improv Studio challenge, a class, or a Curated Quilt Mini Challenge. This is one of those! This was for the Curated Quilts Mini Challenge from last fall. The theme was Paper Pieced.

CuratedQuiltsPaperPieced-QDAD-ImFeelinCrafty
I decided to go back to my stash of quilt designs from my Quilt Design a Day days. This one was from way back in 2016 I think!
CuratedQuiltsPaperPieced-Colors-ImFeelinCrafty
I took my original design and played around with a bunch of different color ways based on the mini challenge. Obviously, I ended up with the top left color scheme. Which one is your favorite?
CuratedQuiltsPaperPieced-Block-ImFeelinCrafty
CuratedQuiltsPaperPieced-Process-ImFeelinCrafty
I made a little mistake in piecing in the beginning. I had to go back and remove one of the corner pieces of each block. The way I had put pieced them they just sat together in a square, but I was looking for the Ferris wheel effect! No biggie! I just took that corner of and pieced them back together!
CuratedQuiltsPaperPieced-Detail02-ImFeelinCrafty
CuratedQuiltsPaperPieced-Detail01-ImFeelinCrafty
CuratedQuiltsPaperPieced-back-ImFeelinCrafty

I just used a solid piece on the back. It really shows the quilting. And this is how I hang my minis. I put triangles in the corners and use a wooden dowel for hanging. Super easy!

CuratedQuiltsPaperPieced-Last-ImFeelinCrafty

This one did not make the Mini Challenge cut to be featured in the magazine. My InsideOut Pineapple Quilt did make the cut for the full size quilt gallery, though!

CuratedQuiltsPaperPieced-Last02-ImFeelinCrafty

It was a fun little challenge. Will I make it again? I don’t know!