On Island Time- Kids Playmat Tutorial!

Yep, another Christmas present yet to be blogged about…

Wanna know the inspiration? Well, I’ve had a plan to make my son a fishing game with magnetic fish and a magnetic fishing pole. (Unfortunately, that part hasn’t happened.) Then I thought, a play mat to go with the fishing game would be cool. And then…. A friend of ours loves playing under this big palm-like tree they have in their living room. That’s where the island play mat was born…

Now there will be a series of three of these. 2 for playmates and 1 for my son.

So here’s what it is…. And a mini tutorial….

The play mat has a pier, as well. I was about to sew the pier in place, but decided not to. Thank goodness. Becuase when our buddy started playing with it, the pier was not a pier, but a surfboard. And surfboards are anything but stationary!

And when you’re done, you just pull the ribbon, sinch the play mat and hang it away! Lovely!

And the mini tutorial (sorry, no pictures, but I think it will work for ya. I’ll add pictures when I make mat #2)…

Materials:

Imagination

Fabric for front. Pieces and amounts vary by your design…

An old sheet for the middle.  1 1/2 yards square

Fabric for the back, I used fleece. 1 1/2 yards square

Thread

1/2″ Ribbon, about 6 yards (or a thin rope if you don’t want to use ribbon)

1″ Ribbon, about 2 yards

Step 1: Design your playmat! It can be anything. The other one I thought about making was a road map for the hot wheels collection….

Step 2: Cut the sheet into a 54″ circle. I did this by 1. Fold the fabric into quarters,  2. Tie a 27″ string to my disappearing ink pen, 3. Hold one end of the ribbon at the corner and pull the pen around the other side to make a quarter of the circle. Cut this out.

Step 4: Cut out the back fabric. Same technique as Step 3.

Step 5: Start designing the top playmat and cut the pieces.

Step 6: Sew the top pieces to the middle, sheet piece.

Step 7: Layout the top and bottom pieces, right sides together.

Step 8: Cut tabs about 3.5″ and fold. Insert tabs between the top and bottom with cut ends sticking out. I spaced mine about 12 inches apart.

Step 9: Sew all the pieces together leaving a 8″ hole to pull the mat through.

Step 10: Pull the mat through the hole so it’s right side out.

Step 11: Topstitch around the edge.

Step 12: Add the ribbon (or a thin rope) through the tabs. Leave enough ribbon so that the mat lays flat when open.

Step 13: Make any accessories that you want to.

Step 14: Cinch up the playmat and give it to your child for some big bright smiles!

Fabric Flower Link Love

I added another toddler dress to my To Do List (I’ll tell you about that later). I have the fabric, but I think it needs some fabric flowers. I did a little online research and found tons of fabric flowers. Here are some of my favorites:

1.  I love the look of these layered wool flowers on the headband by Delia Creates.

2. The bright colors and simplicity of these shown in Milky Supplies etsy shop totally caught my eye!

3. I loved the simplicity of this one from Prudent Baby.

4. How cute for the girlie girl! This pink flower by Simply Vintage Girl is so sweet.

5. Wow! Check out this one from Gone to Earth. Origami flower! A little more than I want to do for my dress, but very very cool!

6. Then I started thinking, maybe I’ll do a fabric yo-yo. I’ve seen them on quilts before and they can be pretty cool. I found a few tutorials for these, but this one by ZakkaLife was the easiest and most nicely done of all the ones I found.

7. And last but least. I love this one by spincushion! The tutorial is actually for a pin cushion, but I think it would be great as an embellishment to anything.

Oh, and did I mention that these are all tutorials?? A Fabric Flower Tutorial Link Love! After looking at all these, I have designed my own in my head…. I’ll give it a try and if it works, maybe, just maybe, I’ll add my own tutorial to the list!

Do you have any favorite fabric flower tutorials you use?

Monster Towel Tutorial

I said I was going to make the Towel tutorial ages ago… Thought I had actually. Then this weekend I realized that I had taken all the pictures, but never written the tutorial. So, here we go!

Materials

Old Towel

Old Sheet (or fabric)

Fleece , for eyes and back spikes

Flannel, for eye balls and teeth

Thread

Scissors

Straight edge

Step 1:   Cut all the pieces:

Towel   49 inches wide x 23 inches tall

Fabric side of towel    2 pieces 25 inches wide x 23 inches tall

Towel Side of Hood   2 pieces, 8.5 inches wide x 10 inches tall

Fabric Side of Hood    2 pieces, 8.5 inches wide x 10 inches tall

Teeth   10 pieces, 2 inches wide x 2.5 inches tall

Eyes   2 ovals about 6 inches x 4 inches

Eye balls   2 ovals about 2 inches x 1.5 inches

Back Spikes   14 triangles, 4 inches wide by 5 inches tall

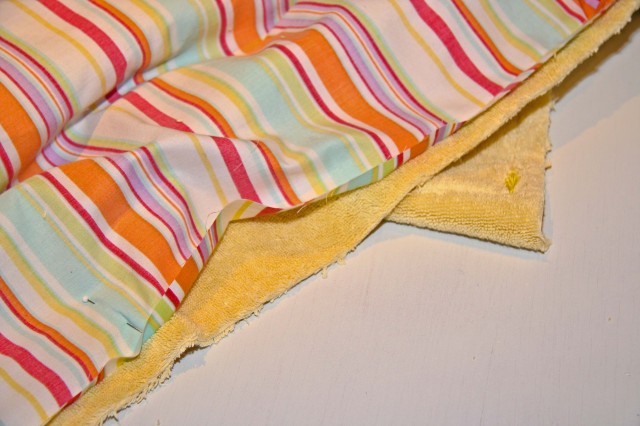
For the hood, round the edge. Stack the 4 hood pieces, and cut a curve. I used a plate to make the curve and came over 3″ from the corner at the top and back. See photo below!

Step 2: Sew together the teeth and back spikes. Right sides together. Trim edges around points and turn right side out. Top stitch back spikes.

Step 3: Sew the eyes. First sew the eyeball fabric to wrong side of eye fleece. Then topstitch the eyes onto the fabric side of hood.

Step 4: Put together fabric side of hood with the scales. Pin hood fabric together, right sides together. Place back spikes between the fabric, with points facing in between the hood fabric. Sew together.

Step 5: Sew the two towel hood pieces together, right sides together.

Step 6: Finish Hood. Pin together the fabric and towel hood pieces. Pin the right sides together and place teeth between with points facing inside.

Step 7: Turn hood right side out and topstitch front edge.

Step 8: Sew together pieces for the fabric side of towel. Pin fabric side, right sides together. Insert the rest of the back spikes, spaced equally and pin with points facing in between the fabric. Sew together.

Step 9: Pin front, back and hood together. Right side of fabric to right side towel. Insert hood. Align seam of fabric side of hood with seam of fabric side of towel. Right side of fabric hood to right side of fabric side of towel.

Step 10: Stitch together along outside of rectangle. Leave a hole about 6 to 8 inches. Trim corners.

Step 11: Pull towel through the hole, right side out.

Step 12: Topstitch.

Step 13: Bathe that little one and wrap him/her in the monster towel.

Tip… Don’t tell the little one that he’s a scary monster! My son loved his monster towel, but too many silly scary monster jokes and now he’s scared of it…. I’m trying to convince him that’s it’s a googly eyed silly nice monster towel….

This was actually the second tutorial I photographed and I obviously missed a couple photographs for some of the steps. I hope it’s easy to understand despite the lack of photos. Please let me know if anything is confusing! And do show pictures of your monster towels!

Another Yarn Wreath

Happy Monday! This week I have two goals. One is to start studying for my Structural ARE exam and the other is to get back on a regular blogging schedule! Oh, and maybe I should add sleep more to my goal list… And, I’m hoping that by the end of this month I will have blogged about all my Christmas presents that I made!!

 Did I mention I LOVE the yarn wreaths??? I made another one a while back for my mom with the University of Alabama theme.

Here’s another Christmas present I made… Yep, you guessed it, another yarn wreath. And again with the University of Alabama theme…

I have also had a distant relative and close friend’s wife on bed rest in the last few months. I didn’t know if either of them were really crafty, but I sent all the fixin’s for a yarn wreath to them… Hopefully they enjoyed making them as much as I do.

I’m going to try to make one for myself very soon. And as much as I like ‘The’ university, I think I’m going to branch out with a different theme!

Have you made a yarn wreath recently??? Any theme or occasion suggestions? Valentine’s Day maybe????

The Sketchbook Project- Done!

Well, this week there hasn’t been much bloggin’ goin’ on here this week. And I miss it. But that doesn’t mean I haven’t been busy busy… Let’s see…

Finish The Sketchbook Project. Check

Finish Ghostie Order. Check

Made Baby Presents for one of my best friends preemie. Check

Patched husband’s jeans. Check

Finished Winter Photo Swap Project. Check

Get Featured in Another Etsy Treasury. Check

Oh, yeah, and worked all week and played with my family. Wow, honestly I didn’t realize how much I had done in a week. I’ll cut myself some slack on not blogging….

OK, all those projects will be posted (well, except the jeans. they look pretty good, but not very exciting.), but this one is the finished Sketchbook.

Come On, Bow Wow, Let's Go Campin'

Some pages are just ‘Happy Thoughts’ (the theme of the book), while others are ‘sketches’ of projects I have planned. Fish for a fishing game. Dreams of the beach while I’m working on a play mat. Upcoming quilts.

One Day I'll Fly Too

Rain Rain Go Away

Spring Is Here, I Wish

Not The Sun, Mercury

Climbing On Dragon Hill

So that’s mine… My favorite? I think the very first one I did, my son and his dog Bow Wow. Daddy used to tell Max stories, this is one he came up with, an adorable one about our son going camping with his stuffed animal Bow Wow. They packed their bags, headed out, pitched their tent, made a fire, and laid out under the stars before packing up and heading home for the snacks they forgot!

Which one is your favorite? Please tell!

This will be a traveling exhibit. If it comes to a city near you, check it out, scan my library card while perusing mine and the other 28,000…

February 19-27    Brooklyn   Brooklyn Art Library

March 12    Austin   Austin Museum of Art

March 30- April 2   Portland, ME    SPACE Gallery

April 8-9   Atlanta    The Granite Room

April 11-31   Washington, DC    Transformer Gallery

June 10-12     Seattle    Form/Space Atelier

June 18    San Francisco    111 Mina Gallery

July 14-17    Chicago    Hyde Park Arts Center

July 29-31   Winter Park    Full Sail University


Silhouettes, I’m loving them right now!

Yep, loving them.

There seems to be a resurgence of silhouette art these days! But that’s ok with me. A while back I saw an art piece in a magazine of all sorts of silhouettes and it inspired me to want to do a shadow box piece of a bunch of silhouettes from our trip to NY, the kiddos playing ball, my son staring out the train window, looking at dinosaurs… You get my point..

Well, that project hasn’t happened, so I can’t show you that! Were you thinking I was leading up to that?? 🙂 sorry. But not to be disappointed, I have a link love and a mini tutorial for ya today! 

First, the link love….


1. I was lookin’ around and fell for the dog silhouette done by Living with Lindsay. I love the white accents around the dog’s ear. She has a tutorial for doing this using paper, what I think of as the traditional way….

2. I’m in love with Circles and Squares work. I got this print for my son’s new playroom we’re working on. I also got my husband an awesome shirt from these guys. And on a side note, I bought a kids sweatshirt from them 3 years ago or so and it’s held up to 2 toddlers for this whole time. Very impressed…

3. Another tutorial for silhouettes on fabric. Inhabitots shows you how to make one with a freezer stencil. I’ve never done a freezer paper stencil, but want to try. Very cool.

4. And another piece from Pumpkin and Butterfly! (I showed you her Fly to the Moon print a few weeks ago.) I realized I had bookmarked this print ages ago, before I was featured with her in the Etsy treasury. ANYWAY…. The bright colors of this one are awesome for a more modern appeal! 

5. After our trip to the zoo today, this watercolor silhouette tutorial from Prudent Baby caught my eye! So many ways for silhouettes!

6. And last but not least, how adorable is the hippo and the toothbrush by Karl Johnson?? I should get this and hang it in my bathroom in hopes that it will help with the 2 year old’s nightly tooth brushing ritual!

And for Part 2 of my post today….

Mixed Media Fabric Silhouettes Tutorial

Materials

Camera

Computer (sorry it’s not in the picture, but I wasn’t going to move my whole computer over to the photography board!)

Paper

Fabric

Fusible Adhesive, like Steam to Seam or Heat’n Bond (Seems to be one of my favorite tools these days. For this project I used Heat’n Bond Lite for sewing)

Scissors

Iron

Thread

Sewing Machine

Step 1: Pick your picture. You can just print it and go from there. I wanted to have a real image before I got started, so I did a little Photoshop action. I’m not going to add the Photoshop part to the tutorial (but if you have questions, just ask).

Step 2: Print the image the right size for your project. You will be transferring it to the back side of your fabric and fusible adhesive, so be sure that you don’t need to mirror your image.

Step 3: Iron the fusible adhesive to the fabric. Here, I’m using the traditional black, but as you can see above the fabric can be anything!

Step 4: Trace your image onto the fusible adhesive. You either need to cut it out and trace it or hold it up to a light source and trace. I typically to option 2, but with the black I had to turn to option 1.

Step 5: Cut out the silhouette.

Step 6: Iron the silhouette to you paper. Quickly, some paper will show the iron marks, so careful.

Step 7: Stitch the silhouette. Here I did the kids with the machine and the sleeping dragon hill by hand.

Step 8: Ta-Da! You now have a fantastic mixed media art piece! (which is also a page from the Sketchbook Project I am working on…)


Climbing Sleeping Dragon Hill

I’ve Got My Eyes on You…

sweet little fabric from Ikea!

I braved Ikea during the pre-Christmas shopping extraganza. Late at night to avoid the crowds… But I went a little too late and by the time we got to The fabric it was time to start checking out, so we had to move….

I know the faux bois trend is passing, but I’ve had a renewed interest in it lately. I need some for a quilt backing and a ‘wood’ castle door for a playhouse. I had decided to make my own until low and behold I found these…..

And being an architect, I’m drawn to anything with buildings… But I said, what would I ever make with this??

Um, the lining on this very cute pattern I got for my son! Of course, figured it out too late, after we left… The pattern is from Dear My Kids. Cute Things!

And my anything beachy loving Mom loved this awesome crab fabric!

I see another trip to Ikea in my near future…

Animal Hoodies

Yet another Christmas present that I haven’t written about yet! And I think there is one more to come…

A monkey and a dragonfly walked into a bar… I mean flew to Pensacola…. Sorry, as I was writing I reminded myself of one of those silly jokes….

I’m loving making cool things for my two new ‘nieces’ in Pensacola. (‘nieces’, as in best friends kids) Since I have a son and don’t have a need to make dresses for him, I now have two little ladies in Florida that I get to sew for! So much fun! (These aren’t dresses, but they are for them….)

I also have  a stash of fleece baby hoodies… A few years back I bought a bunch when I was on an embrodiery kick and never did anything with them, until NOW! I got them out again and made a pink monkey and a green dragonfly.

For the dragonly, I used scrap fleece for the wings, body and big bug eyes on top!

For the pink monkey, I again used scrap fleece for the ears and tummy and made a long pink tail. Unfortunately, the monkey looks a bit like a mouse. I think the ears are a little high. If they were lower it would look more monkey like!

Luckily the banana helps say, ‘I’m no mouse, I’m a monkey!’

Oh, Christmas Card, Oh, Christmas Card

Whatever am I to do with you???

Well, typically I’ve fallen into a Friday link love schedule, but this week I’m changing things a bit. Last weekend we cleaned and put away Christmas. Well, except for my Christmas Card scrapbook and my new pile of Christmas cards. I knew that there are cool projects out there to do with the old cards, so this week, I thought a project link love was in order today (hopefully before you have thrown away all your cards).

Last year I emailed all my friends about the St. Jude card recycling program, but then never mailed mine in… It’s a great idea, especially if you aren’t interested in making anything with your old cards…

But if you’re looking for another crafty project, I found some good ones to use with those cards you can’t bear to throw into that recycling can….

1. Holiday Card Gift Boxes from Martha Stewart. I’d like to get a package wrapped like these. And could be a good idea for an advent calendar!

2. I’m loving this garland by Bobbi from Bobbi’s Art

3. How cool is this star ornament from Jennifer Priest???

4. I’ve always loved blocks. But I never thought about making Christmas blocks….These, from Recaptured Charm, are great and you could substitute Christmas cards for scrapbooking paper…

5. And last but not least. My absolutely favorite idea!!! I am totally in love with these houses. Last year, Michelle, from Michelle Made Me, hosted a Tissue Box Challenge Project inspired by her tiny houses. If only I had found this then… But in addition to tissue boxes, these could also be made from…. yep, Christmas Cards!

I also mentioned my Christmas Card Scrapbook… I’ve always hated to throw away photo cards! So I had this pile that I’d ben saving. Then about three years ago I had another ah, ha moment and started a scrapbook of all my friends and family photo cards. This has been so much fun pulling it out each year and then looking back over the years of how my family has grown and my friends kids have grown. I have to start a new book for next year…

And off the subject, but on the same subject of photos…. I joined another group project! Azzari, of The Sweet Light, started a winter photo swap – an exchange beautiful images of winter. I discovered it late, or else I would have shared earlier so more could join in. I also signed up late…. Luckily she needed one more person! I am pretty sure I got my image to share already… More about this later!