Low Volume, Bright Contrast Crosses Postage Stamp Quilt Block Tutorial

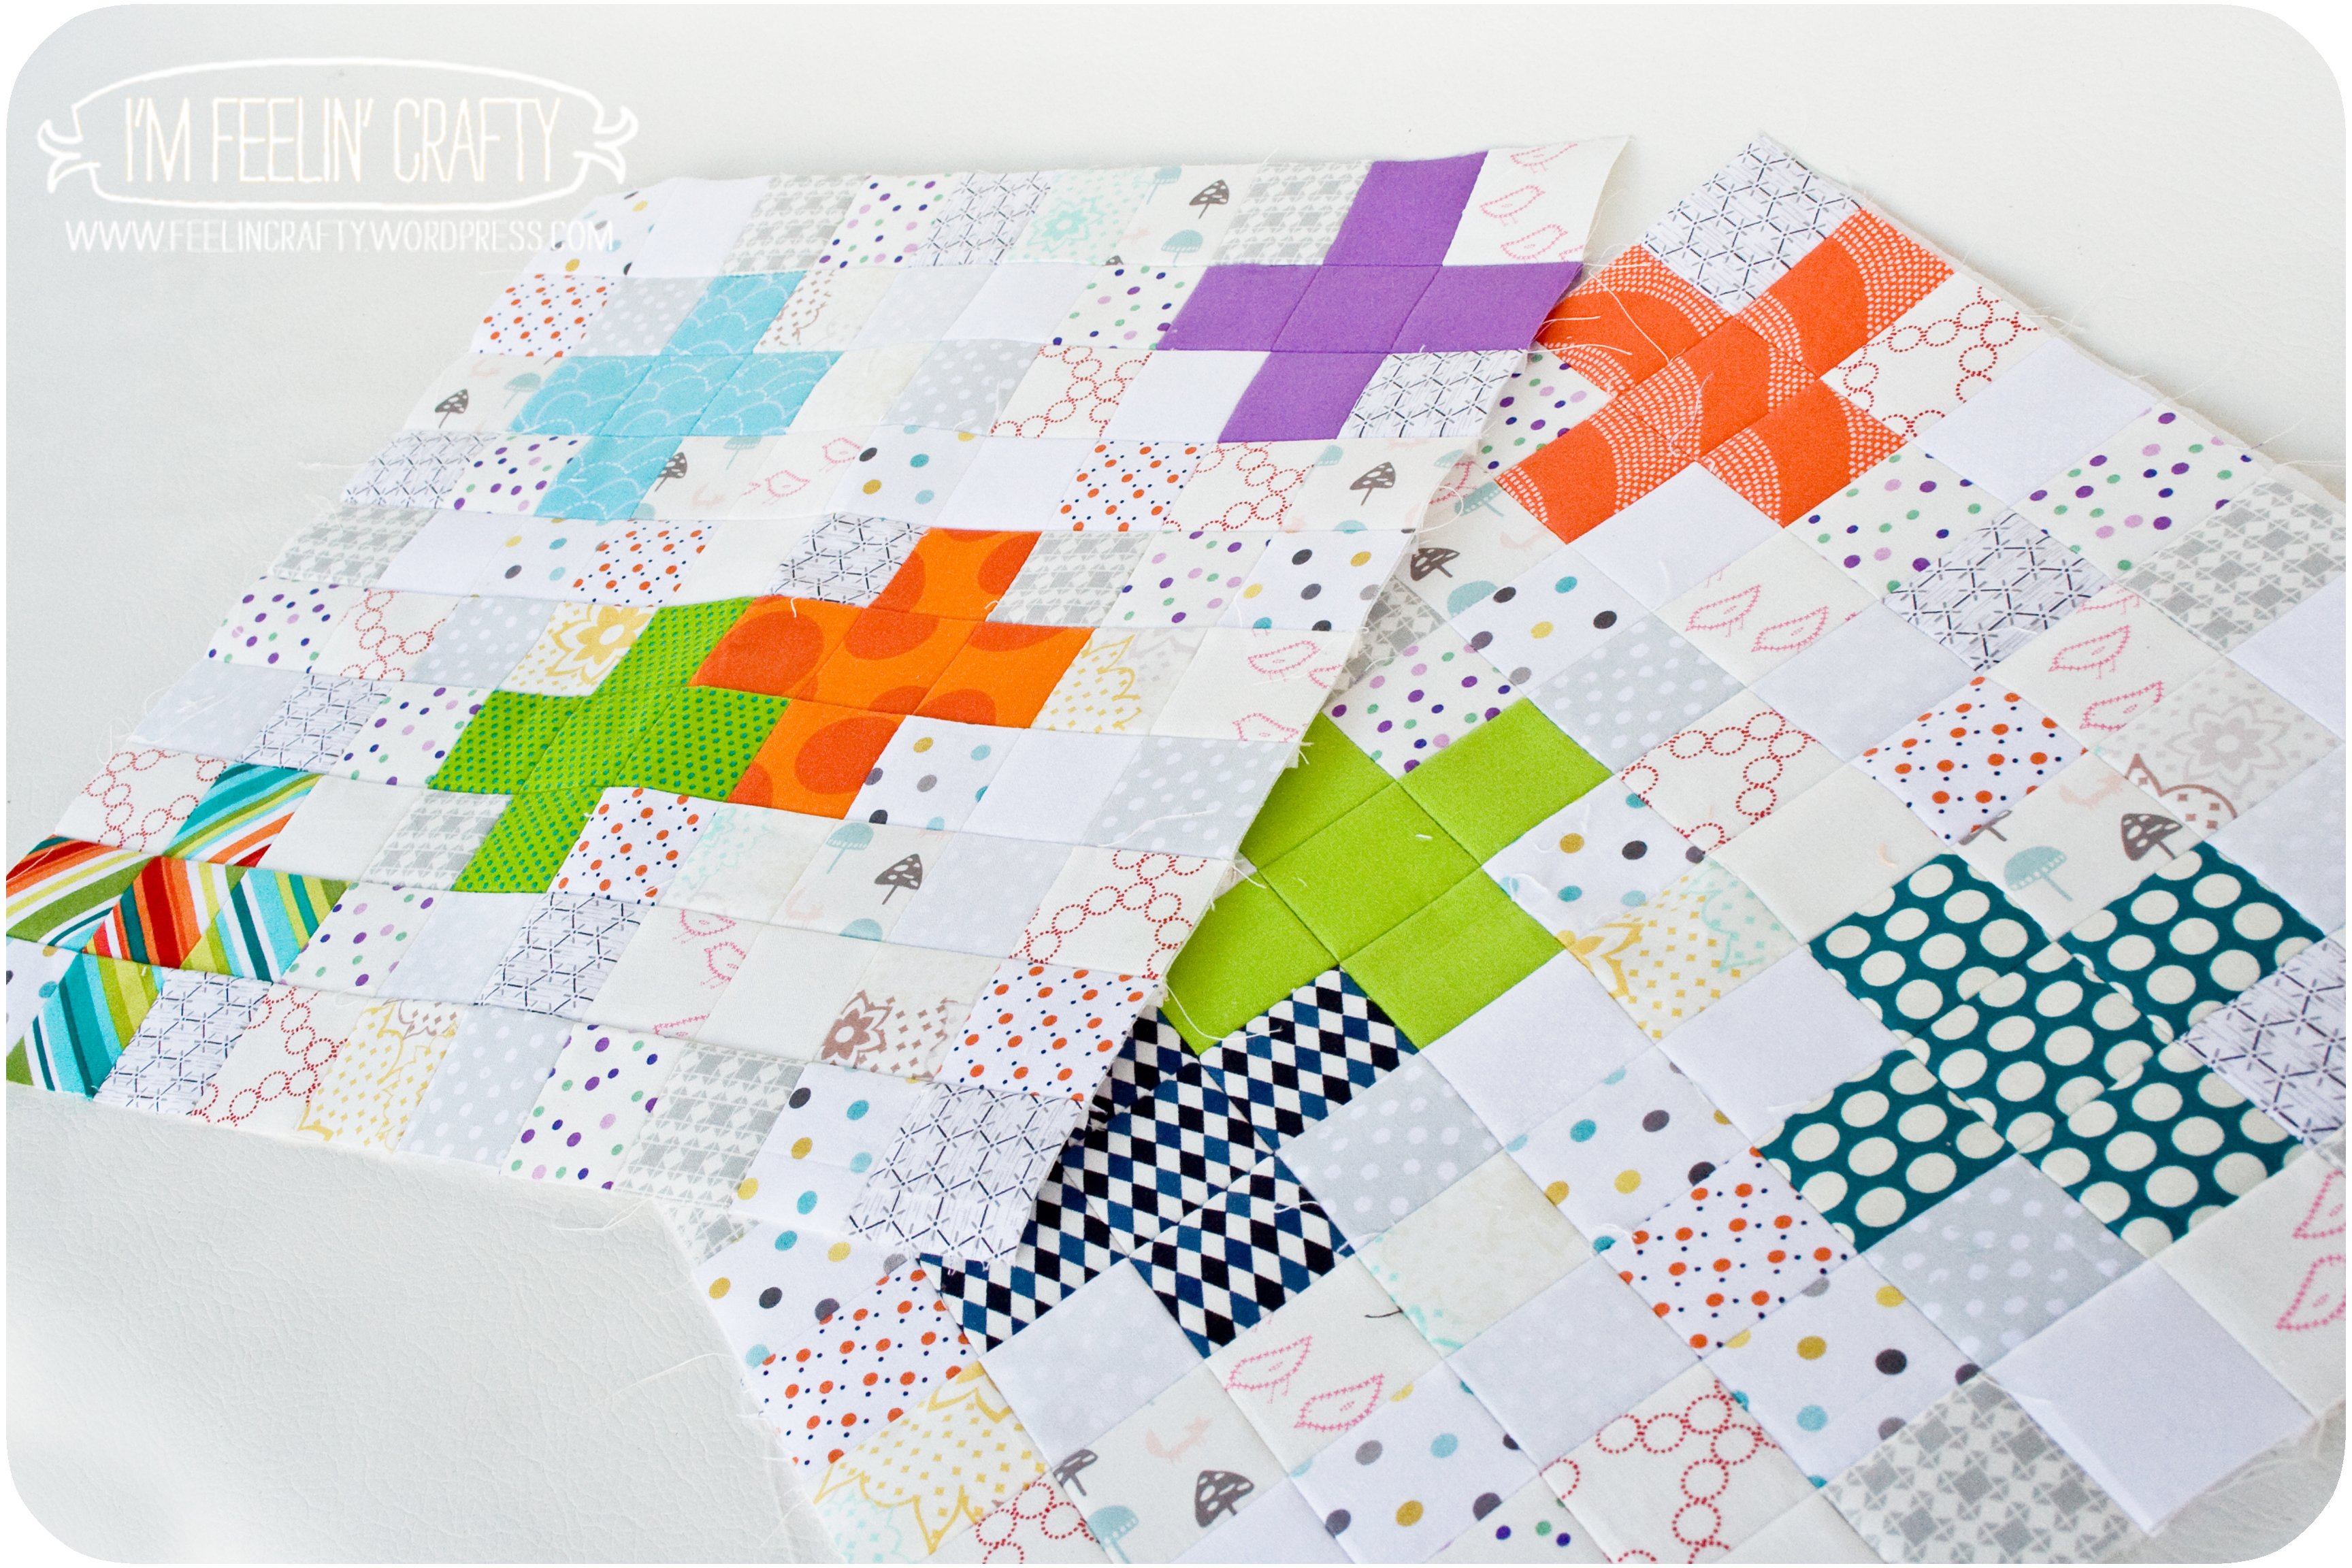
Yep, more quilting! I’ve been debating and debating over what quilt design I wanted to do for my next do Good Stitches quilt. Then I figured it out! I love postage stamp quilts. This low volume thing is kinda cool. I’ve seen a lot of little cross quilts lately that I am loving. So why not combine all these?

doGood-Main-ImFeelinCrafty

Ta-da! This month’s block is going to be a ‘Low Volume with Bright Contrast Crosses Postage Stamp Quilt block’. How do ya like that title!?! Sounds complicated, doesn’t it? But it’s not! Seriously! Trust me!

doGood-Colors-ImFeelinCrafty

First off the fabrics! And you’ll need a 20×20 inch piece of the thinnest fusible interfacing you can find, like featherweight or sheerweight.

doGood-Brights-ImFeelinCrafty

For the bright crosses, I poured out my scrap bag and found the colors that I had enough to make 5 2×2 squares out of. It can be patterns, but please include an all solid cross (or two). (yellows are not good… You’ll see as you read along!)

doGood-LowVolume-ImFeelinCrafty

The background is the low volume part. Use whites, light greys, small colored patterns with white backgrounds.

The amount of fabric you’ll need really depends on the amount of crosses you want to make. In total you’ll need 100 2×2 squares, the majority being low volume fabrics. Since each cross is made of 5 2×2 blocks, if you are doing 5 crosses you’d have 5 colors and then an assortment of 75 2×2 blocks. And etc, etc….

doGood-FinishedBlocks-ImFeelinCrafty

And then how to put it together? You can do it however you’d like, but this process makes it super easy! I can’t take credit for the process, by any means. I found the process tips from Oh, Fransson. I’m going to show you here because I also want to talk a little more about the low volume part! (bear with me, there’s a lot of pics!)

doGood-CuttingPlace-ImFeelinCrafty

First, cut out all your pieces!

doGood-BadLighting-ImFeelinCrafty

Ok, so I have to apologize for the pictures. I have a can light right over my work space and it doesn’t lend itself to very good photography!

doGood-Squares-ImFeelinCrafty

OK, so back to your pieces. See how I lined up my low volume pieces. Don’t!

The low volume pieces are going to be as random as can be. And for me it’s easier to be random when I’m not picking them out of their special stacks. Hence the reason for the bowl. I mixed and mixed the squares in the bowl!

doGood-Grid-ImFeelinCrafty

Then I remove my cutting mat to reveal my secret postage stamp quilt block work area!

doGood-Owl-ImFeelinCrafty

Did you notice my owl picture? I love how this owl stares at me as I make things, like, ‘Um, what are you doing now?’

doGood-GridDtl-ImFeelinCrafty

Ok, once the cutting mat is removed, you can see my set up. A bit of batting over the countertop for ironing. Then my grid. And notice the white over my grid? That’s where I accidently had my fusible interfacing facing the wrong way one time.

So be sure the fusible side of the interfacing is facing UP!

doGood-Colors-ImFeelinCrafty

Lay out the crosses. Right sides UP!

doGood-LV-ImFeelinCrafty

Then infill with the low volume.

doGood-Photo-ImFeelinCrafty

Then I take a quick pic, turn pic to black and white and see how it looks.

doGood-Rejects-ImFeelinCrafty

I felt like the yellow ended up being to low volume and these grey and blue squares were too high contrast. So I took them out.

doGood-ColorsFinal-ImFeelinCrafty

And filled in with a different high contrast color and more low contrast background pieces.

doGood-Photo2-ImFeelinCrafty

Take another picture, turn it black and white and what do you think? I think it works much better!

doGood-Iron-ImFeelinCrafty

Once you are happy with the lay out, iron. I lay a piece of thin fabric over it. Don’t pull the iron around. It works best if you iron a spot, pick it up, move it, iron a spot, over and over and over until it’s all ironed!

doGood-OnePiece-ImFeelinCrafty

After it’s ironed together, it’s kinda like you have a new piece of fabric!
doGood-Sew-ImFeelinCrafty

Next, fold between each row of pieces and sew with a 1/4″ seam.

doGood-SewingRibs-ImFeelinCrafty

Repeat for each row.

doGood-TrimRibs-ImFeelinCrafty

Trim the rows. You can snip the seam with scissors, but I find it easier to just trim off about 1/16th of an inch. barely anything!

doGood-IronRIbs-ImFeelinCrafty

Then iron each seam open.

doGood-IronRIbs2-ImFeelinCrafty
And repeat the sewing, trimming and ironing in the opposite direction.

doGood-Finished-ImFeelinCrafty

And viola, you’re block is done!

doGood-FinishedBlocks2-ImFeelinCrafty

So for the do. Good Stitches group, please send me one block. I need 12 blocks for a 45×60 quilt. There are 10 of us and I made one extra, so I’d need one extra.  If anyone wants to do more than one, I’ll gladly take more. The more I get the bigger the quilt! But it’s totally up to you guys! One each is perfectly fine!

doGood-FinishedBlocks1-ImFeelinCrafty

Thanks to all the do. Good Stitches Nurture Group! And to everyone else, enjoy the tutorial!


Shared with these Link Parties.

Sponsor Thank You!

And my monthly Thank you to my sponsors!

WSF-130600


Thank you West Seattle Fabric Shop! They are very excited about their rag quilt kits! I love the pirate one! Which one is your favorite?

And we have another New Friend:

SewingPartsOnline

Sewing Parts Online! Have you found a great goodie from them yet?

mary-kay-new-translucent-powder-hero-2-237515

My mother and wonderful Mary Kay director, Jenny Mullins for Mary Kay! I haven’t tried the Translucent Powder yet, but  I want to!

DMK-130600

The awesome Kids Clothes pattern maker, Dear My Kids! How cute is this little tunic?

Michele Made Me Ad Button 150 x 150

And last but not least! Michele from Michele Made Me! Check out her shop for great ideas to do with your recycling!

The Rose Quilt

Man, I keep saying I’m going to sew clothes for me and the kiddo, but what keeps emerging from the sewing machine are quilts!

RoseQuilt-Main-ImFeelinCrafty

Here’s another one! This one a friend asked me to make for her and her co-workers to give to their boss as a baby present. Her requests were an under-the-sea creature fabric, blues and greens and the baby’s name on it.

RoseQuilt-Name-ImFeelinCrafty

As soon as she said she wanted the name on it, I knew I wanted do to the name just like this! I have never quilted words before and Was excited to give it a try! And once I knew the fabric we were using I made sure to fuzzy cut the anilamls into the letters. I am very excited about how the name turned out.

RoseQuilt-Side-ImFeelinCrafty

I was a bit worried about finding the fabric, honestly. Everything I kept finding just wasn’t exactly what we wanted. I didn’t want to order online, because she needed it NOW. And I wanted it to be something I liked too, since I was going to be sewing it. Online I kept finding things I liked, but they weren’t the right colors or the creatures just weren’t right. Or I would find cheesy. Um, nope! And then I found this! Local. We both loved it!

RoseQuilt-Quilting-ImFeelinCrafty

The sea creatures inspired the quilting. The design I came up with had some large blocks that I knew would need some quilting on the inside of the blocks. I quilted around the animals for the bit of quilting needed inside the large blocks.

RoseQuilt-Folded-ImFeelinCrafty

I debated and debated about the color of the letters. My husband didn’t think they stood out enough. But I didn’t want them to stand out any more than they do. So I was content, until I started second guessing myself. In the end I kept it the way it was and perfectly please with the decision!

RoseQuilt-Last-ImFeelinCrafty

And my friend was in love! Whenever I make something for someone and go off in my own direction, I always worry if they will like it or not. So, needless to say, seeing her excitement put me at ease!

Vintage Quilt Looking!

I’d for the title to be shopping, but it’s just looking! As you know, we recently took our yearly trip to my home in Alabama and our family beach house.

beachhouse-ImFeelinCrafty

See that screened in porch?? That’s where I LOVE to sew and where I was telling you about in this post.

montgomery-ImFeelinCrafty

But we didn’t start off our visit at the beach. We started in Montgomery visiting my Dad and Stepmom. Where we had our yearly trip to the zoo and Max had his first bowling adventure with the funny shoes!

MontQuilts-ImFeelinCrafty

There was a day or two when the grandparents had to work, so the kiddo and I went and checked out some flea markets! The kiddo got lots of vintage books and I got to look at some great quilts! That blue hexi one was my favorite! I’m still in love with it and I still want it. I even negotiated the price a little, but they only came down from $175 to $150… It’s totally worth $150, but I didn’t have it to be spending on a quilt top this year! The other quilts were fantastic too. And, Ok, I couldn’t help but through in this AMAZING vintage dress too!

VintageHexis-ImFeelinCrafty

I didn’t get the hexi quilt, but I did find these hexi flowers that were way more in line with my budget, so I brought those home! And I’m pretty sure they are leftovers from the blue hexi quilt top!

moseT-ImFeelinCrafty

Also at this place I found these amazing paintings by the Southern Folk Artist Mose T that I love! We don’t have any of his painting in our little folk/outsider art collection and I wanted to add one of these. But like the quilt tops, they were slightly out of my price range for this trip and they didn’t’ come home with me… sad, but true…

beach-ImFeelinCrafty

Then the rest of trip looked more like this everyday!

beachquilts-ImFeelinCrafty

We did leave the beach one day and headed inland to do some shopping. We were supposed to be going to a fabric shop, but somehow we missed it and they closed before we could get there….. I guess that’s what happens when your the only girl shopping with 2 boys! Instead we found a few more antiquey flea markets and these were some of the quilts we found! These were more my price range, but I wasn’t in love like I am with the blue one up top.

beachplaying-ImFeelinCrafty

Then we finished all the trip like this again! Check out that amazing storm cloud! We watched it roll down the beach. We were going to wait it out, but it also brought wind and freaked out the little guy. As we were headed to the car we realized it was a HAIL cloud! Once we made it to the car, packed the car and got in, it was over! I’d never been hailed on at the beach!

I’ll have to keep ya posted on what I do with those vintage hexi flowers I found! Do you have any summer plans?

Shared with these Link Parties!

Coastal Cargos

I think I’ve probably mentioned this before, but when we go to our beach house in Orange Beach, AL one of my favorite things to do is sit out on the porch and sew. Everyone goes to bed and I sit out and listen to the waves, the quiet, the occasional night fishing boat and sew. Love it! And this year I made clothes for the kiddo!

CoastalCargos-Main-ImFeelinCrafty

I didn’t sew as much as I typically do, but I did get 2 pairs of pants done for the kiddo. The first pair of pants I made for him was the Coastal Cargos by Blank Slate Patterns (affiliate link).  This pattern is an intermediate pattern with all sorts of little details! Like welt pockets in the back, bias tape closures on the seams, zippers, belt loops, pockets….

CoastalCargos-Long-ImFeelinCrafty

What I loved most about this pattern was that it’s not just pants, but it’s shorts too! Yeah! The pattern called for the use of buttons for the strap to hold up the pants. And of course, I used snaps! Like usual. No buttons for this gal! So it’s long pants.

CoastalCargos-Short-ImFeelinCrafty

No it’s short pants!

So I always thought that cargo pants were pants that transformed from pants to shorts. But I just learned a little something! It has nothing to do with the length, but it’s all about the pockets! According to m-w.com, cargo pants are pants with cargo pockets typically on the sides of the legs at thigh level! And that they have!

This pattern is an intermediate pattern with all sorts of little details! Like welt pockets in the back, bias tape closures on the seams, zippers, belt loops, pockets….

CoastalCargos-WeltPockets-ImFeelinCrafty

Welt pockets are something I have never actually tried before, so I loved learning how. Pretty darn simple, actually! Mine didn’t turn out as pretty as some other things I have done before, hence no close ups! And check out the coordinating belt loops. Yep!

CoastalCargos-InsideBinding-ImFeelinCrafty

The bias tape closure over the seams is a great idea! I have to admit that I have a love hate relationship with this detail! It took me a little while to figure out why the pants are designed this way. Ah, ha! So they don’t have any visible seams once the pants are rolled up! LOVE it. The hate it part is mostly user error. The fact that I was ironing my bias tape outside in the coastal humidity, so the seams didn’t stay too well. Ok, they didn’t stay hardly at all! Note to self, don’t expect crisp seams when ironing outside at the beach in the south.  And, secondly,  I wasn’t using my own machine that I can maneuver fabric around easier in.

The pattern even warns ya that the hard part is coming up! And it wasn’t hard. It’s slow moving. It was just the moving everything around to get it so you aren’t sewing over other pieces! Was it worth it in the end? Yes! Hence the LOVE part!

CoastalCargos-End-ImFeelinCrafty

Will I make them again? You betcha! (but not outside at the beach on my beach sewing machine) I love how they turned out!

Be sure to check out all of the Blank Slate Patterns and see which one you want to try!

(All links to Blank Slate Patterns are affiliate links! Thanks!)

Shared with these Link Parties!

Pinwheels for PreSchool- Another Quilt

Man, I seem to be posting a lot lately about quilts! I seem to have been doing a lot of them lately!

PreSchoolQuilt-Main-ImFeelinCrafty

And this is one that I love! I wish I could have kept it, but it went for a nice chunk of money that I couldn’t spend on it!

PreSchoolQuilt-Front-ImFeelinCrafty

Our pre-school has an auction every year, like most pre-schools in Seattle. Do the ones near you?? Anyway, our school has two classes and each year each class does a project to be auctioned. This year my son’s class decided to do a quilt. And no, I didn’t have anything to do with the idea! But… They did ask if I’d put it all together! And what could I say?

Of course I did it! Of course I said yes!

PreSchoolQuilt-Process-ImFeelinCrafty

We cut all the shapes, each one in different colors. Then I made all the pinwheel blocks while I was waiting on the pieces from the school kiddos. And then they all went together quite nicely.

PreSchoolQuilt-Stories-ImFeelinCrafty

As each one was drawing their blocks they told a little story. You have to hear some of my favorites!

Daniela said ‘It is a house. It has people inside. The people want to go for a walk, but they can’t because it’s very rainy.’

Ardin, Max’s best school friend, drew one of my favorite pictures and said, ‘It’s a monster. It has two claws on it’s feet.’

Max’s picture, ‘Is a wolf kingdom. I forgot to draw the wolf.’

Nevia doesn’t have a story, but I loved her very orderly picture!

And Max’s other ‘bestie’, Ali, says, ‘It’s called a red rocket. It has rockets. It doesn’t go into space, only clouds.’

PreSchoolQuilt-Back-ImFeelinCrafty

And then on the back we had the teachers draw their own blocks.

PreSchoolQuilt-FrontDtl-ImFeelinCrafty

And I made my own block. You can get the pattern pieces here. The pieces include a quarter inch seam allowance. Sew together pieces 1, 2 and 3. Then sew together pieces 4, 5, and 6. Then sew the two halves together. And lastly, I trimmed them down to 6 1/2″ blocks. Changed the colors around in each block and randomly rotated them in the quilt. I love the overall effect!

PreSchoolQuilt-FrontMax-ImFeelinCrafty

I wonder what next year’s project will be!


Shared with these Link Parties!

The Winner of the Best Father Ever Goes To…..

Happy Father’s Day to You….

Happy Father’s Day to You….

Happy Father’s Day to the Best Daddy Ev-ver…. (can you hear me singing it??)

FathersDayAward-Main-640-ImFeelinCrafty

Awesome Best Dad Ever Printable  via Yesterday on Tuesday.

And the winner is…. You decide! And when you do, be sure to make him this super simple Happy Father’s Day Award!

Be sure to go to Go To Sew to see how I made it! Seriously, it probably takes longer to gather materials than it does to make the award. Every great Dad deserves one!

FathersDayAward-Dad2-ImFeelinCrafty

And I know one kiddo who believes that the Best Dad Ever is the one who lives in our house! Thank you Daddy!

Star Quilt Show by the Seattle Modern Quilt Guild

I’m not exactly what sure what happened to Friday’s post. I missed it. And I didn’t make it up… Instead I headed to Vashon Island and the Island Quilter to see the opening night of the Seattle Modern Quilt Guild’s Star Show!

StarShow-SMQG-Main-ImFeelinCrafty

As we were there looking around, my son said, ‘Hey, every one of these quilts has a star in it!’ Observant little fella that kid!

StarShow-SMQG-doGood1-ImFeelinCrafty

I included my star quilt that I made with the help of my do. Good Stitches group. I knew the show was coming up, but I had resigned myself to not participating because I didn’t have a star quilt and I didn’t have time to make another one. Then my friend Debbie from A Quilters Table, who is also in another group of the do. Good family, pointed out that I DO have a star quilt to enter! Hello!  I do! I ran it by the group and didn’t get any opposition, so in the show it went!

StarShow-SMQG-Fav-ImFeelinCrafty

One of the families favorites was this one by Ara Jane Olufson.

StarShow-SMQG-Window-ImFeelinCrafty

The main quilt it the front window was also AMAZING! I loved it! Refresh by Anna Boenish.

StarShow-SMQG-North-ImFeelinCrafty

Top: Starry Eyed by Megan Riley, Middle left: Traveling Stars by Amber Arnold, Middle Right: Summer Stars by Vicki Christensen, Bottom left: no tag and Bottom Right: Lone Star by Season Evans.

StarShow-SMQG-GreyYellow-ImFeelinCrafty

Another one of my favorites is Elliot’s Quilt by Amy Kilian. I sat by her at a guild meeting not long ago while she was working on this and I fell in love! All the nad stitching is fantastic. From afar it looks kinda like a grey quilt with yellow binding. But once you zoom in a bit closer, you see all the hand details, time and love that went into it!

StarShow-SMQG-East-ImFeelinCrafty

In one corner there seemed to be a teal theme going on! Left: Echo Star by Blair Stocker, Top Right: no tag and Bottom Right: Seeing Stars by Katie Pederson. And that little one in the bottom right didn’t have a tag either!

StarShow-SMQG-South-ImFeelinCrafty

StarShow-SMQG-South2-ImFeelinCrafty

Top left: Stars for Robert by Meaghan Quinlin, Top RIght: Auspicious Sky by Debbi , Middle Left: A Tidal Pool of Starfish by Kirsten Ballou, Middle Right: detail from the bottom quilt, Bottom: Seattle Star by Katie Pederson. I’ve had Katie’s Seattle Star in my flickr favorites for quilte some time. It was lovely to actually see it in person and to see all the amazing quilting!

StarShow-SMQG-Bird-ImFeelinCrafty

The last one I wanted to show you is this one with the bird! Stealing Stars by Carrie Franklin. How cool! The detail is amazing. There are tiny little pieces! I just love the bird! As with most of my indoor quilt photography, this didn’t turn out as beautiful as it is!

StarShow-SMQG-doGood-ImFeelinCrafty

And of course, it’s always nice to see people checking ours out! I hope they are saying nice things!! 🙂

And that’s pretty much it! It was a great show! Thank you Island Quilter and the Seattle Modern Quilting Guild for an awesome show!


Shared with these Link Parties!

A Low Volume Modern She Made Swap

This swap, like the quilt block I told you about on Monday, was also a learning experience. My partner requested a low volume piece. A What???

ModernSheMade-PIllowDtl-ImFeelinCrafty

What in the world is low volume?? Can you say totally foreign to me with all my bright crazy colors? Um. Yes. So I had to do a little research on the subject. fast.

ModernSheMade-Fabric-ImFeelinCrafty

Basically, in a few words, it’s quilting with fabric that lacks contrast. I’ve since learned it’s a pretty popular quilting trend right now. I’m pretty embarrassed to even say this, but something I didn’t even know was going on… But I’m in the ‘Know’ now! It’s inda like the definition of Modern Quilting, in that I can’t find a real definition. Here’s what I’ve put together. It’s a lot of white/light grey. Mostly white. Pastels. No/Low contrast. Whites with small prints. Don’t use bright/saturated colors.

ModernSheMade-LowVolume-ImFeelinCrafty

So, based on those definitions, I got closer to low volume than I usually do, but I didn’t quite hit it on the head or anything! The light grey should maybe have been white… And there is contrast, just not as much as I usually do.  You can download a PDF with a nicely written story on Low Volume quilting here at Quilting Daily.

ModernSheMade-LowVolumeDtl-ImFeelinCrafty

In my attempt at low volume, I made a ‘Lone Star’ pillowcase. I used this tutorial by Hopeful Homemaker for my star. Like so many quilt blocks, it can be addicting too! I was to make more!

ModernSheMade-Goodies-ImFeelinCrafty

ModernSheMade-MugRug-ImFeelinCrafty

And for the goodies, I sent a bright (HA!) flexible ruler, a fun quilt shape template key ring and a little mug rug from the scraps.

ModernSheMade-Recieved-BeachgirlSews

And then… Back to the bright and bold! I was a lucky duck in this swap, too! Look at the wonderful placemats I received from Beachgirl Sews!

ModernSheMade-Recieved4-BeachgirlSews

Each one is different! They are fantastic! I hate to use them. But I also hate not too! Even the husband and kiddo are excited for the new placemats at the dinner table.


Shared with these Link Parties!

March do. Good Quilt

I’m back! Vacation was wonderful! As usual! Now we’re just trying to get back in the swing of things and as I started unpacking I realized I had to clean my closet before I could put anything back in it. That has led to a huge purge. Of the whole house. And the spear heading of a neighborhood garage sale! I’ll let you know how it goes!

do-Good-March-TweetyBeeStitches-1

image via Tweety Bee Stitches

But in the mean time I want to share our latest quilt from our do. Good Stitches Nurture Group! The March quilt was totally new to me!

do-Good-March-Block1-ImFeelinCrafty

The block is much more traditional than I typically do! It is also an applique block. Another thing I haven’t done. The tutorial for the block is here at Tweety-Bee Stitches blog!

do-Good-March-Block-Dtl-ImFeelinCrafty

And I learned something about fabric, too! The fabric request was for 1930’s fabric. I had to admit that I had no idea what she was talking about! And if you notice on the tutorial there’s an asterisk and a definition of ’30’s fabric. I think that was for me! Here’s her description:

1930’s fabrics are also know as “Feedsack” or Reproduction fabrics

– small vintage prints –

-in PASTELS – blue, pink, yellow, green, lavender, peach are all good choices-

do-Good-March-Fabric-ImFeelinCrafty

And it ends up we have a whole little section of just these fabrics at Stash, the shop where I work!

do-Good-March-TweetyBeeStitches-2

So a huge thank you to Debi, aka Tweety-Bee Stitches, for introduicing me to this new fabric collection and quilt block. And more importantly, for designing and quilt a wonderful quilt for our bee! Thank you!

OH, and I have some news I almost forgot to share! While I was on vacation I got emails from Melissa, our group host, and Rachel, the host of the bee itself, asking if I could be the new group host! Melissa had to step down due to some super fun family obligations. I was honored that they thought of me and of course I said yes! Yea!