Wonder Woman Crown Tutorial

Remember back when I shared our Sculpey Crazy Crowns? When we made those crazy crowns, we also made a Wonder Woman crown!

WWCrown-Main-ImFeelinCrafty

Let me just give you a little background… I’ve always loved Wonder Woman! She was one of my favorites as a child. That little kid below is me, circa, maybe, 1978ish….

WWCrown-MeBefore-ImFeelinCrafty

I don’t feel so comfortable in a Wonder Woman costume (one day I will again…), so I thought a crown would be fun! Ok, honestly, I was just playing with the gold Sculpey and all I could see was a Wonder Woman crown! It’s ingrained in me, what can I say. When I think crown, I think gold Wonder Woman crown….

WWCrown-Me2-ImFeelinCrafty

Here’s how I made it.

WWCrown-Step1-ImFeelinCrafty

Step 1- This was made with one (1 oz) block of gold Sculpey and a little bit of red. Roll out the gold!

WWCrown-Step2-ImFeelinCrafty

Step 2: Flatten the gold. I made mine about 1/8″ thick.

WWCrown-Step3-ImFeelinCrafty

Step 3: Cut out the shape. I don’t have a template, but I have faith in you that you can wing it! The sides are about an inch wide and the whole thing is about 8 inches long.

WWCrown-Step4-ImFeelinCrafty

Step 4: Flatten your red to the same thickness of the gold and cut out a star.

WWCrown-Step5-ImFeelinCrafty

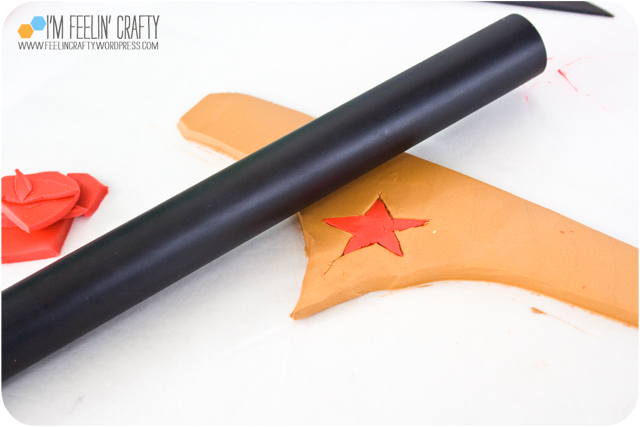
Step 5: Set the red star on top of the crown and trace the shape of the star. Then cut out the star outline from the crown.

WWCrown-Step6-ImFeelinCrafty

Step 6: Insert the red star into the crown. I know it looks a little rough, huh?

WWCrown-Step7a-ImFeelinCrafty

WWCrown-Step7b-ImFeelinCrafty

Step 7: Roll out the crown with just a bit of slight pressure. Eventually it will be nice and smooth!

WWCrown-Step8-ImFeelinCrafty

Step 8: Make a hole in each side.

WWCrown-Step9-ImFeelinCrafty

Step 9: Hold up the crown to your head to get the right curve. And try your best to hold the curve as you set it on the pan for cooking. It will move slightly, but I was able to keep the curve pretty close to the right one for my head. Then cook per directions.

WWCrown-Step10-ImFeelinCrafty

Step 10: Add elastic and you’re on your way to being Wonder Woman!

WWCrown-Me1-ImFeelinCrafty

You can wear it around the house just to remind your family of who you really are….  Oh, yeah! Now I just need to fit into my Wonder Woman suit and find that invisible plane I misplaced and I’m outta here!

Who’s your favorite Super Woman???

I have been compensated with either payment or product for this post. All opinions are my own, honest opinions!

I’m the Lorax And I Have a Tutorial!

And I speak for the trees!

I’m super excited about the movie coming out TOMORROW! Yea!! If you’ve been reading for a little while, you’ve probably noticed I LOVE DR SEUSS stories! I think my son’s birthday party might have given you a hint!

Did anyone go to the story time at Target last week?? I really wanted to because I know they give away things too… But of course, I forgot. But my best pal back home didn’t forget! She was telling me about all the cool things they got and one of the many fun things they got was a Lorax mask. I asked her to send a picture, but she never did… (hint hint…. in case you’re reading this….) Anyway, ever since she told me about the mask I haven’t been able to get the idea out of my head. But how would I make it? I had no idea what to make it out of….

That is until I found these great little poofs! I was actually looking for feathers for this little hat I’m making. But with the bright and perfect find of feathers I found, there were these little poofs! And there just happened to be 2 orange ones! I thought that they were little hair ties or something, but the receipt called them wine glass charms. Who knew??

I even went back to the store the next day thinking that maybe I had missed some orange ones. I needed more for eyebrows, you know! But nope…. So there’s no eyebrows…

Ok, I have to say, I’m totally in love with my Lorax mask!! Even the Gak (I think we have the only one in town you know) is smiling about it!

If you can get to JoAnn’s and find some orange poofs (or wine glass charms, if you’re feeling too sophisticated to call them poofs…. I actually like saying Poof! Say it with me, poof poof poof! You kinda just start smiling if you say poof too many times! I digress). Ok, I’ll start over… If you get to JoAnn’s, that’s where I found mine,  and find some poofs you can make your own as well! or what else would you use if you don’t have poofs? I’d love to know!

And here’s how I made mine!

Step 1: Materials:

2 orangey yellowish poofs

heavy cardstock. I used orange, but you can’t really see it in the end, so it doesn’t really matter what color it is.

scissors

hot glue gun

orange fleece

a stick. Could be a popsicle stick, but I just happened to have some fancy fan sticks left over from my wedding (yes, that was almost 6 years ago and I still have them. I don’t get rid of craft supplies very often!).

Step 2: Cut out the back. You can download my template by clicking here.

Step 3: Cut out the little fleecy nose. I did mine the orange. My husband thinks it should be black. The movie, it’s orange. THe book, it’s both. SOme pictures orange, some black…. It’s up to you, of course. Notice the shape I cut my fleece… So it’s round on the bottom, but will fit and wrap around the circle nose.

Step 4: Hot glue the fleece to the back.

Step 5: Hot glue the fleece down on the back of the nose.

Step 6: This is how the nose looks!

Step 7: Hot glue on the poofs.

Step 8: Hot glue on the handle stick.

And wahla….  A 15 minute, no sew, Lorax mask!

And while I was making the poof mask, my son was making his own version of the Lorax mask. Ahhhh… another way to go.. Layers of fleece will work if you can’t find the poofs!

Have fun! I’m about to buy my tickets to the movie now….

And of course, Happy Birthday to You, Dr Seuss!

Shared with these Link Parties!

More Dragons!

I’m just so impressed with all the dragons that have been made this Halloween from my Dragon Wings Tutorial!! It’s just awesome to see people using my tutorial and blog and making such incredible pieces. I just have to show off a few more before I move on from Halloween and back to the Dr. Seuss Party Tutorials!

I can only say that I am totally wowed by Tamara’s dragon costume! Such amazing details, cool wings and love the baseball hat idea for the dragon head!

Check out this ‘Night Fury’ dragon from ‘How to Train Your Dragon’! I love the awesome tail detail! Ellie had such kind words, ‘Thank you so much for helping make me the coolest mom!’  ahhhh… I’m blushing!

I had mentioned that I had made a pair of wings for a reader and didn’t take a picture. Well, Natalie sent me a picture of her beautiful dragon wearing the pair that I made. Natalie told me that her son loves them, ‘taking them off last night after Trick-of-Treating was like torture for him.’ I actually had a great time pulling out the pattern again and putting another pair together!

Thank you all for your pictures and kind words! It really means a lot to me to see people enjoying my blog and seeing the projects in action! Thank you!

Curious George Dressed Up Like a Monster

I have this thing about making Halloween Costumes! not sure exactly where it came from… But it’s there, so I’m going with it until my son protests the Momma made costumes. The first one was Max from Where the Wild Things Are and last year was a Fireman.

I can’t remember if I mentioned this before or not, but of all things my 3 year old could have wanted to be for Halloween he chose Curious George Dressed Up Like a Monster! Once I asked, before the Curious George idea, he wanted to be the ‘Yes Man and the No Man.’ And then it was the ‘Guy Who Holds Up Signs’…. Ummmmm… No idea what those were, so I was super excited when the Curious George Dressed Up LIke a Monster came around. And he’s stuck with it for a few months now.

Some friends tried to make it easier for me by saying why not just a monkey or why not just a monster. But no, I was totally excited about his creativity in coming up with such a fun costume idea. So that’s what he got!

First I made the monkey costume. Nothing too creative. Basic pattern. Easy. Well, except for the hat… This is the fourth rendition. I just couldn’t get it to fit him… I wanted to get that perfect shape of brown around the face that makes Curious George recognizable as Curious George. The first one was nothing like what I wanted, but then as I started altering the pattern it kinda got bigger. Anyway… It’s cute none the less….

Second. The monster. How to make the monster part?? I kept trying to figure out how to make it part of the monkey costume. But then it hit me… He wanted to be Curious George Dressed Up Like a Monster. So why wouldn’t Curious George be wearing a costume! So, then came the hooded cape idea! Then once that came, the rest of it just fell together as I was going along. Including the scaley monster skin, AKA yarn pom-poms (recycled Dr. Seuss party decorations!).

And together we were The Man with The Yellow Hat and Curious George Dressed Up Like a Monster.

One of my favorite parts of the evening…. We had such a blast, there were many memories that made an impression, but this one… As the evening wore on the kiddos started slowing down. His buddy took a little snack break, so my son decided to take a little break as well. Right in the middle of the sidewalk. He just needed ‘a little rest’ while he waited on his ballerina buddy!

I hope everyone else had as much fun as we did!!

Shared with:

Visit thecsiproject.com

Sew Ready to Play Continues On

Well….. Yes, the series was supposed to end last Friday… But the fun continues! Come on, let’s keep playing!

Have you ever played Mr. Fox? Well, I had never heard of it until a playdate this summer. Maybe our friends made it up, I don’t know… But either way it’s fun and my son loves it.

Here’s how it goes. Someone is Mr. Fox. Everyone else lines up away from, but facing Mr. Fox. Then someone from the line calls out, ‘What time is it Mr. Fox?’ Mr. Fox replies back with a time, ‘It’s 2 o’clock.’ The line takes 2 steps towards Mr. Fox. This goes on until the answer from Mr. Fox is, ‘It’s LUNCHTIME!!!’ Then Mr. Fox chases everyone and the first one he tags becomes the new Mr. Fox!

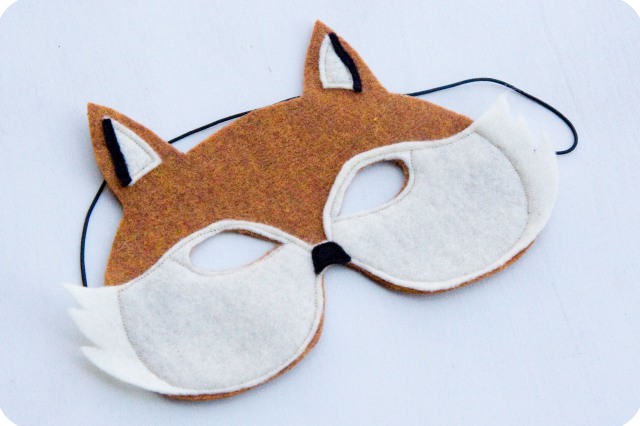
When I was figuring out what my project would be it was between making something related to Hullabaloo or Mr. Fox. I went with the Hullabaloo project. But then realized that the twins who taught us this game have a birthday coming up this week. Soooo, I decided to continue with my plan for the Mr. Fox inspired project, a fox mask!

And here’s how I made it. Pretty simple!

Step 1 Materials:

3 colors of felt, brownish red, cream and black. I bought a quarter yard of each, but you don’t even need that much, a fraction of that! I bought the felt on a bolt versus the craft felt.

Thin elastic, about 12″

Scissors

Exacto Knife

Thread, cream and black

Pattern, click here for the pattern

Fabric Glue, optional. I didn’t use it, but I prefer to sew. If you don’t want to sew, use the glue.

Step 2:

Cut the pieces out of each color. Careful around the eyes, I had to cut mine twice!

Step 3:

Poke holes in the brown piece for the elastic to thread through.

Step 4:

Cut the elastic, 12″.

Step 5:

Thread the elastic through the holes.

Step 6:

Sew down the elastic. I did a line of stiching through the elastic and then I went over it with a zigzag stitch for a cleaner finished look on the back

Step 7:

Sew on the cream pieces.

Step 8:

Sew on the black pieces.

Step 9:

Watch out for foxes lurking about the house…. They’re sly ya know!

Friday Link Love from Celebrate the Boy

Yep, I know, I had a link love from Celebrate the Boy already, but I think I’ll do it this week and maybe next week too. There is just so many cool things being shown! I debated, something different, maybe St Patrick’s Day, but no…

Here are some of my favorites from Celebrate the Boy month:


1. Oh, my! How cool are these dino tails from Running With Scissors? They are too cool!! And wouldn’t they go great with my dragon wings? Well, then they would have to be dragon tails, but I think that would work. And I also just love the picture, don’t you? Yep, must add to the To Do List!

2. I have been thinking about a special outfit for my son for an upcoming event. Thinking maybe some cool, tailored overalls/onesie type thing, but a I really like the idea of a seersucker suit… Then I saw these Dapper Dillinger’s pants done by Made by Rae. I love them and keep imagining them in seersucker with white pockets, a white shirt and a cute little white and blue sweater….  hmmmm…..

3. And the hoodie by I Am Momma Hear Me Roar. This is another thing on my list of things I want to tackle. A hoodie for the kiddo…. I love this one and the tutorial is nice and easy to follow! I love how easy the actual hoodie part is. Great idea!

4. I have been in love with the Fort Kit for ages. I saw it probably a year ago, but forgot where. I might have forgotten where I saw, but never did I forget about it! And then the awesome kit and tutorial from Saltwater Kids was featured as a giveaway this month on CTB and I was like, ‘There you are, my lovely fort kit!’ So glad to have found it again!

There ya go, 4 of my favorite boy things this week!

Super M!

My son wants his own island playmat. And he’s been after me everyday asking about his playmat….

Yesterday was a rough day. I needed to make something (for my own sanity) and I need to make my son something to occupy him while the play mat is getting made.

And wha-la it’s Super M!

The other day I saw this tutorial for a cape from Southern Institute for Domestic Arts and Crafts and loved it! I added it to my to do list right away. I must have been so excited that I added it twice….

It was amazingly simple. It took all of about 30 minutes. And if i hadn’t had to keep running upstairs, it might have been even quicker!

I started with a t-shirt from Dad’s ‘to Goodwill’ bag and a half hour later had a cape.


A little no sew velcro and a little no sew heat n’bond for the applique = no sewing machine required!

I love how the star and the M turned out! He wasn’t quite as excited. I asked if he wanted to go outside and fly like the other superheros and he said, ‘No, I can’t fly. I don’t have wings.’

And back to the play mat…. I got the backing fabric last night and the sand fabric. I have run out of pieces from my recycled stash for the sand. I still have water fabric from the others I had made. He loves it. We had to take the fabric into the bed for our before bed book reading…. Here’s a peek… Now I want more so I can cut the bubbles out and make bubble pillows….


What projects are your kids waiting on????

Happy Halloween!

We had a beautiful day yesterday with the family and the weather! My little guy was a fireman, with a costume made with love.

I used a McCall’s pattern for a kids fleece coat and made it a size too big because those coats the Firemen wear always look so huge! So obviously I had to alter the sleeves a bit.

No fireman wears a plain black coat, so we needed some reflectors. I had cut out my yellow fabric strips to make the reflectors and was going to iron over each edge, sew them on and then sew on a silver ribbon… Then one day at the fabric store I asked for reflective ribbon and she showed me the yellow and silver iron on reflector tape!! So much easier than what I had planned.

And a badge, of course… We found a badge online and with some Photoshop work, changed the name and wa-lah we had a badge. I printed this on printable fabric with a fusible side and ironed it on the front.

And the back needed some letters for Max’s Fire Department. So I used my same technique that I used for the bunting. Iron on fusible adhesive to fabric, cut out the letters and then iron them on. Boom. Jacket done!

The pants were done with a super easy tutorial from Prudent Baby. although I didn’t do a few of the last steps. I made it a bit more simple for the Halloween costume.

And another thing a fireman can’t be without is his crew. I embellished sweatshirts for us and his grandparents!

Spotty the dalmatian was bought. I got the fabric and found a pattern to use to make him as well, but it just didn’t happen… It still can, one day soon….

Dragon Wings Tutorial

Yes, I’ve only posted about my dragon wings about 10 times, and here it goes again. Only this time I’m sharing how I made them.

OK, here is goes, my first ever tutorial…

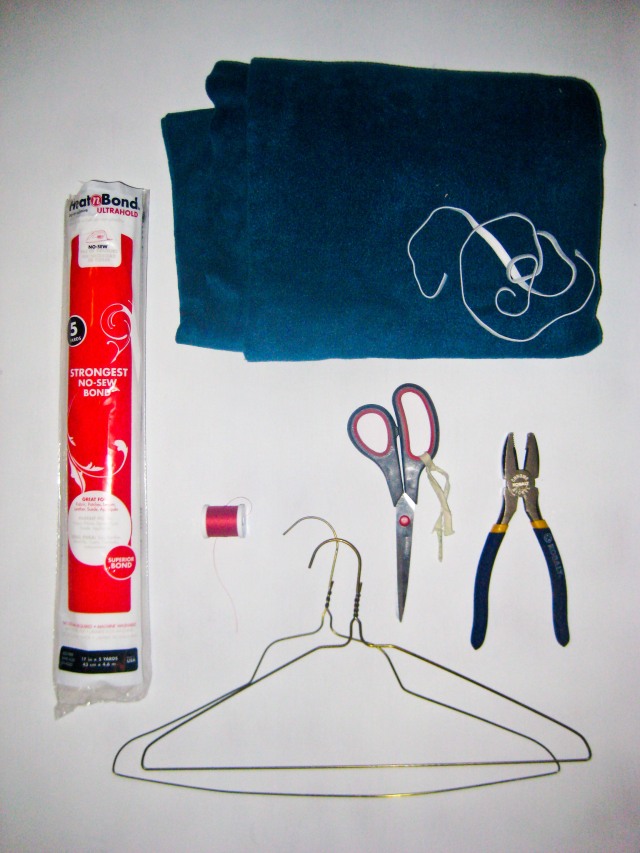
Materials:

Fleece

2 metal hangers

Fusible Adhesive, like Steam to Seam or Heat’n Bond Ultra

Eleastic, 18inches

Thread

Scissors

Wire Cutters

Your Dragon is Waiting….  What are you waiting for!

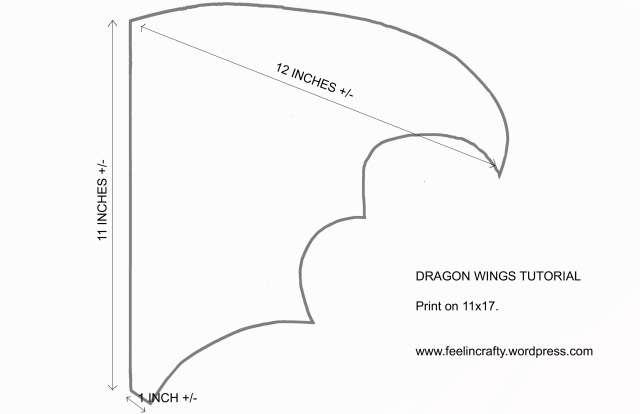
Step 1- Print pattern, or use your own. Print Pattern here

Step 2- Lay the pattern on the fusible adhesive. (I used the Heat’n Bond Ultra roll.) Fold the fusible adhesive so that the non-paper sides are together. Trace pattern and Cut. I added a ¼” width around the pattern piece, but you don’t need to.

Step 3- Lay the fusible adhesive on the wrong side of the fleece and iron on. I never iron fleece directly. I always use a thin piece of cotton between the iron and the fleece.

Cut the fleece around the fusible adhesive wing pattern.

Step 4- Time for the wire cutting! Get out your hangers and wire cutters.

Hanger #1- Clip off the hanger piece. Then bend the hanger at the middle of the straight bottom piece, so that you have an upside W. Next, lay the hanger on the dragon wings and bend the hanger so that it somewhat aligns with the top edge of the wings. This doesn’t have to be exact by any means!

Hanger #2- Clip the bottom into 2 piece and the sides into 2 more pieces for the ‘bones’ of the wings.

Step 6- Next step, putting the wings and bones together.

Remove the paper side of the adhesive and lay out this set of wings with adhesive up. Layout the ‘bones’. Lay the second piece of fleece over the bones with right side up. Iron. This ironing step takes a little while to get the fusible adhesive to adhere to the fleece, so be patient. Last part of Step 6, cut out the dragon wings!

Step 7- Stitch! First, stitch around the edges. Second, stitch alongside each of the inside bones

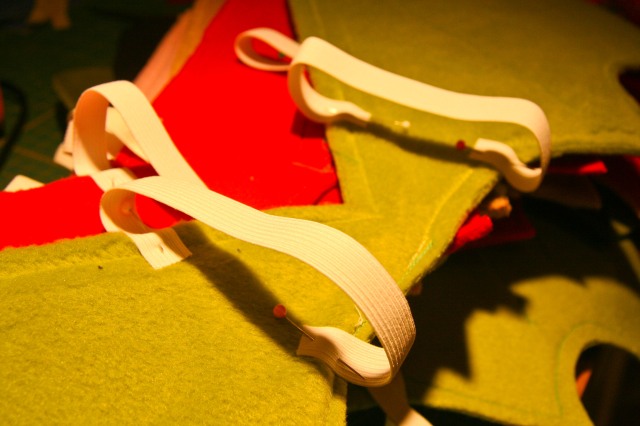
Step 8- Elastic. Almost done… Add two 9inch pieces of elastic to the back side of the wings, spaced about 5inches apart. Although these lengths for the elastic were made for 2 year olds, they even fit some adults. Lastly, Stitch the elastic to the top and bottom of the wings.

And WA LA! You’re done! Get those wings flying!

Please excuse the photography! The lighting in my crafty room is not set up for photography… That’s a whole ‘nother project…. I considered making another set and taking better pictures along the way, but with Halloween just around the corner I decided to post what I have.

Comments and questions are greatly appreciated! Like I said this is my first ever tutorial, so I know there is room for improvement for my next one. I’d also love to see pictures of other little dragons.

And if you’d like to own a pair, but want someone else to make them… Check out my etsy site!