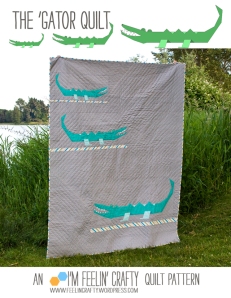
The ‘Gator Quilt is a paper piecing pattern. Do you have to have experience? Nope! I’m sure it will make it easier if you do have experience, but it’s a pretty easy technique to pick up! And I’ll show ya how!

Are you wondering what paper piecing even is?? I wondered the same thing once before! I remember seeing a really old quilt top one time and this lady talking to me about it and was marveling at the fact that it still had the paper piecing on it. It was a newspaper from near the 1930’s. But I was like, why in the world would anyone sew paper to thier quilt! I will say I just nodded and smiled during my conversation with this woman. I did not admit I had no idea of the signifigance other than it dating the quilt top!
And even when I first started paper piecing, I would cut out every single piece and then cut a million little pieces of fabric. I didn’t get it, but I knew there had to be an easier way! And there is! The real way to paper piece! Wanna learn?
Paper piecing is basically a way to piece almost perfect quilt blocks! Without having to measure everything out!

So here we go! First you need a pattern (I recommend my ‘Gator Quilt, of course! HA!), fabric, a rotary cutter works best for me and a cutting surface. For the purpose of this quilt tutorial I am going to use a quick little pattern I love! This is the Mini Trajectory pattern from Simply Cotton and it’s only 3 pieces.

I’m using scraps for this one. So I trim my scrap close to the right size. Some people cut it more precise, but to me the beauty of paper piecing is that I don’t have to be precise on cutting my pieces and still end up with a beautiful block!

Fold your pattern along the line you are going to sew. The pieces are mubered, so you go numerically. Sew piece 1 to piece 2 and so on. Here I’m folding the line between 1 and 2. Then use your ruler to line up a 1/4 over the paper. and trim your fabric, creating your seam allowance.

Place you fabric for pieces 1 and 2 right sides together. Again, leave the 1/4 inch seam allowance past the fold.

Go to your machine and sew along the line between pieces 1 and 2. You’ll notice that the beginning of my stitch line has normal stitch lengths, but the end of the line has a tiny stitch length. Go TINY! I use about a 1 or 1.5 stitch length on my machine. It’s much easier to tear the paper off without pulling on your stitching once you are done with the block.
Here’s another thing I do. If my stitch line runs to the edge of the block, I take it all the way. This this pattern it’s easy. There are some other pattern that you’ll need to think through and see if this is right. Typically you only want to sew on the stitch line shown in the pattern. But I’ve found that if I take the lines that extend all the to the edge of the block, it helps with pieces multiple blocks together. Your seam allowances won’t be floppy! 🙂 Does that make sense? Let me know if it doesn’t!

I’m one of those that irons every piece. Some don’t… I do. I feel like it sews together better if you do. Therefore, this step is to iron over the fabric.

And start again. Fold the pattern over at the line between piece 2 and 3.

Trim the pieces with your 1/4 inch seam allowance.

And fabric piece 3. Right sides together. Line up along the seam allowance edge. Again, I’m using pretty big piece here for a tiny little block to help illustrate the process. You can use smaller piece. But you want to make sure that it’s big enough to be covered fully by the pattern once the piece are sewn together and ironed out flat!

Sew along the line between piece 2 and 3.

Iron it all open!

Trim all the excess off along the outside of the block. The outside lines typically are including the 1/4 seam allowance.

Remove the paper.

And you’ve got a cute little quilt block! Really, if you can sew a straight line over a line on the paper, you can do paper piecing. You just take the steps and repeat and repeat until it’s all done, depending on how many pieces there are to a block!

This is the pattern I used for one of my do. Good Stitches quilt blocks. See how close to perfect each little block is? I couldn’t have done that without the paper piecing, I don’t think!
OK, you ready to wrestle the ‘Gator? Sure you are!
Buy the pattern here!
June 10th- I’m Feelin’ Crafty
June 11th- A Quilter’s Table
June 13th- Marci Girl Designs
June 14th- I’m Feelin’ Crafty– showing off other Testers work!
June 15th- Made By Amanda Rose
June 16th- Wombat Quilts
June 17th- Wips and Tuts
June 18th- Shaffer Sisters
June 19th- Crafty Shenanigans
June 20th- I’m Feelin’ Crafty


This is great! Thank you! I’m pretty new to quilting and for some reason I just couldn’t figure out paper piecing without actually seeing it you know? I really appreciate this post! Now I can see it’s pretty easy! Cheers 🙂
Me too! I had no idea what I was doing when I first started it! I”m so glad I could help you feel more comfortable with the process!