Search Results for: Wonky Star Quilt Block

A Wonky Star Quilt Block Tutorial

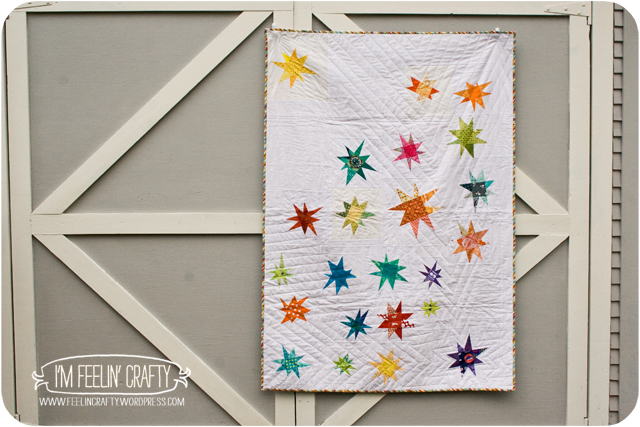
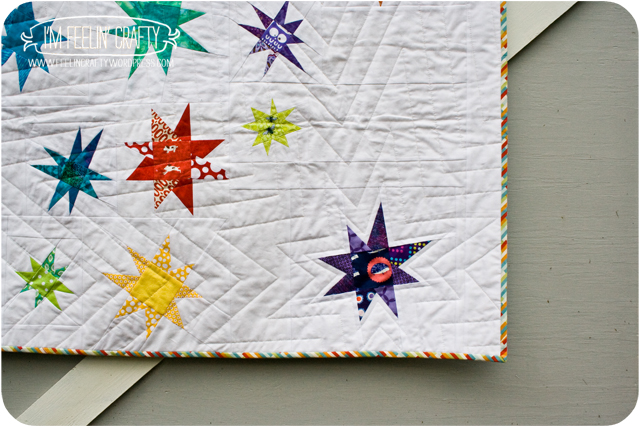
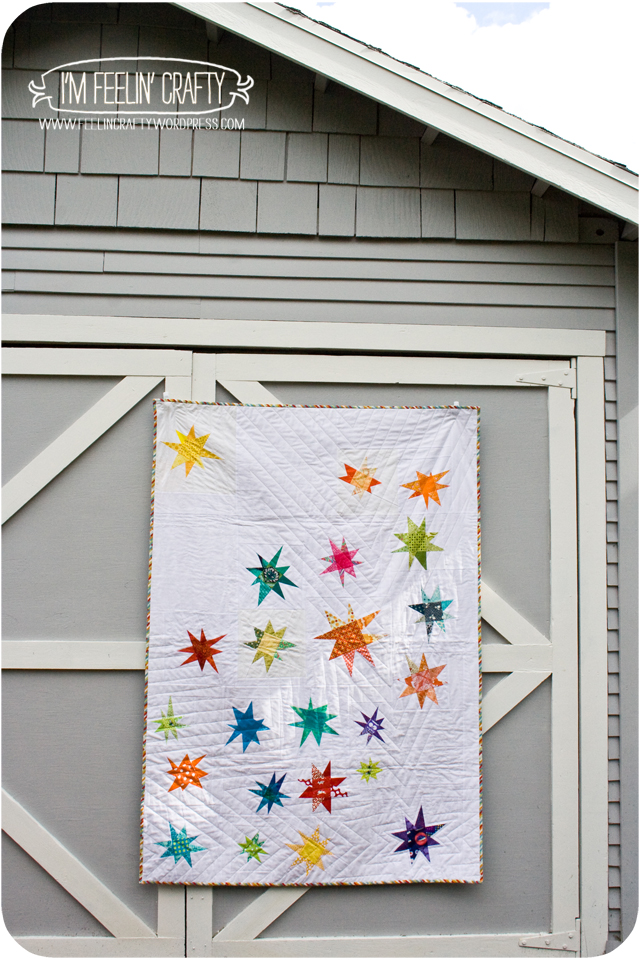
Like I mentioned on Monday, I’m LOVING the stars right now! And I’m loving them with a little ‘wonkiness’ added in!

WonkyStarTutorial-Title-I'mFeelin'Crafty

The straight up and down ones are cool too, but I’m loving adding them in at a slant! And today I’ll show you how I make them.

Materials. Materials are um, simple… fabric, your cutting tools and thread (not pictured)

WonkyStarTutorial-Materials-I'mFeelin'Crafty

Step 1: Cut your fabrics! You’re going to make the quilt block much bigger than you actually want it to be. For this one I wanted about a 9 inch block with a 6 inch star. (plus or minus…)

WonkyStarTutorial-Step2-1-I'mFeelin'Crafty

You’ll need four corner squares. To make my 6 inch star, I started with (1) 3×3 inch center. I also needed (4) outer corner squares measuring 6×6 inches and (4) middle rectangles that measure 3×6 inches, both out of the background fabric. And you’ll need a pile of scraps about 2×4 inches or so. These star corners I don’t really measure!

WonkyStarTutorial-Step2-3-I'mFeelin'Crafty

Step 2: Putting all the stars points together!

WonkyStarTutorial-Step3-1-I'mFeelin'Crafty

Put the two fabrics right side together and fold over.

WonkyStarTutorial-Step3-2-I'mFeelin'Crafty

Although it doesn’t matter what the size of the star point fabric is, it does matter that it covers the 3×6 rectangle. Like so.

WonkyStarTutorial-Step3-3-I'mFeelin'Crafty

Sew the two pieces together once you get the star point laid out how you like it.

WonkyStarTutorial-Step3-4-I'mFeelin'Crafty

Then iron it flat.

WonkyStarTutorial-Step3-5-I'mFeelin'Crafty

Step 3: Trim!

WonkyStarTutorial-Step4-1-I'mFeelin'Crafty

I love using my little quilting square! You want to trim it so that you again have a 3×6 inch rectangle.

WonkyStarTutorial-Step4-2-I'mFeelin'Crafty

And then trim below to get a straight seam allowance.

Step 4: Repeat. Repeat.

WonkyStarTutorial-Step5-2-I'mFeelin'Crafty

You want to repeat Steps 2 and 3 on the other side of the rectangle for the other star point. And often you can use a scrap from the other side!

WonkyStarTutorial-Step5-1-I'mFeelin'Crafty

Then repeat and repeat and repeat for each side of the star!

Step 5: Sew the squares and rectangles together.

WonkyStarTutorial-Step6-1-I'mFeelin'Crafty

Sew two rectangles to the center square.

WonkyStarTutorial-Step6-2-I'mFeelin'Crafty

Sew one rectangle to two background squares. And repeat with the last three pieces.

WonkyStarTutorial-Step6-3-I'mFeelin'Crafty

Then sew all three pieces together.

WonkyStarTutorial-Step6-4-I'mFeelin'Crafty

And you have a block!

WonkyStarTutorial-Step6-5-I'mFeelin'Crafty

But you have a block that looks like the one above….

WonkyStarTutorial-Step6-6-I'mFeelin'Crafty

And we really want a block that looks like this one (above).

Step 7: Trim!

WonkyStarTutorial-Step7-1-I'mFeelin'Crafty

Rotate the block to the position you want it to be. Then trim off each side. You’ll end up with 4 triangles and one square block!
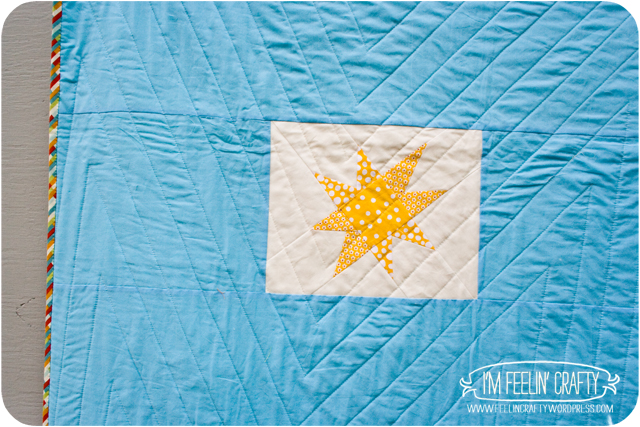
WonkyStarTutorial-Step7-2-I'mFeelin'Crafty

A wonky star block!

WonkyStarTutorial-Step7-3-I'mFeelin'Crafty

And then you can repeat and repeat and repeat until you’re hearts content! Enjoy!


Shared with these Link Parties!

Mini Series Mini Halloween Quilt

I made all these blocks last fall and was able to finish the quilt prior to Halloween this year! Giucy Guice and Alison Glass had a sew along to make their mini series paper piecing mini blocks and I decided to play along. I tried to play along on past sew alongs, but never succeeded in finishing all the blocks. This time I did and I even made some more than once!

I was inspired by a fabric pull I saw on Fabricbubb’s website. I love the fabric pull! A very bright Halloween pull to me.

The first two blocks we worked on were the Log Cabin Block and the Triangle Cabin block.

The Triangle Cabin block I didn’t use in the quilt, but in the Halloween Banner Garland I shared last week.

When I first started out, I knew I wanted the blocks to be Halloweeny, but I wasn’t sure what I was going to do with them. I knew pretty soon it was going to be a quilt! For the Log Cabin block, I decided to add in some other spooky elements! I started playing with the Spooky FPP Patterns by @spunstraw.

The next two blocks were the Courthouse Steps and Diamond Sidestep blocks.

I added the cat from the spooky FPP patterns to the Courthouse Steps block. I like showing the block itself with the candy for scale! These are tiny piecing patterns! Did I mention that?? Very tiny! But the blocks are made so that you can have tiny blocks or make them larger. I made this larger so I could add the cat in the middle!

Then I made the Diamond Sidestep block. When I made it all I could picture was an eye, in particular a cat eye! Warning, you may never see this block as not a cat eye again if you continue to read!

So I made two of these blocks!

Then sketched out the cat to go with these eyes!

The cat fits in the quilt just right if you ask me!

Next up were the Pineapple and Hexagon Steps blocks.

The Pineapple block plus the witches hat spooky block!

And the Hexagon Step block. This is one of only two blocks that I added in black into the halloween rainbow of fabric and I like it!

Next up Triangle Geese and Bloom blocks.

The Triangle Geese block also looked like an eye to me! So I made two to make another eyeball!

The Bloom block is probably one of my favorite of the series!

Next up was the Stretched Geese and Criss Cross blocks.

I added the ghost to the middle of the Criss Cross block!

And lastly, we made the Curved Cabin and Rainbow blocks.

I really did love the Curved Cabin block, but it got a little wonky when I quilted the quilt! I do love the little skulls in the corners. they fit perfectly!

At this point you can probably imagine what I thought about this Rainbow block! Yep, another eye ball! This one is a Cyclops Eye, though! But again, to get the eyeball, you need to make the block twice…. And there seemed to be an extra million pieces in this block!
Then came the paper removal… Luckily, it didn’t take as long as I had anticipated that it would.
For all the piecing on the front, a solid back seemed just fine for this mini quilt! I love this fabric and I’ve been holding on to it for some time. the colors were perfect and the piece I had left was almost just the right size! I think I’m down to scraps only left of this fabric.
The label picture! 🙂
I got a little over the top on this sew along. I made duplicates of 4 of the 12 blocks. I think if I do this sew along again, I’m sticking to one of each! 🙂

We’re enjoying having this one hanging in the dining room for the holiday!

Off the Path- A Mini Quilt Tutorial

You may recognize this little guy from some of my other quarter circle quilts. I do have a fondness for quarter circles! I’ve used this technique in my 2020 Temperature Quilt, Off the Path Version 1 and Weeping Willow in Black and White. Off the Path takes the traditional Drunkard’s Path down a windy, smaller road! In the spirit of small piecing this little mini quilt was born from some of my office doodles and from scraps from larger projects! This is an easy one to use up your scraps and make one for yourself!

OffThePath-magazineCover-ImFeelinCrafty
OffThePath-magazineStory-ImFeelinCrafty

I realized I had not shared this mini quilt, nor had I shared that it was featured in Quiltmaker Magazine back in 2019!

OffThePath-Last-ImFeelinCrafty

It’s been a while since I shared a tutorial, so I thought I’d share this one today. This mini finishes at 12.5 x 12.5 inches. And ot make it I grabbed (4) colors and (3) cream colors.

Cutting:

From Cream solids, cut:
15 (2.5” x 2.5”) squares
18 (3.5” x 3.5”) squares
3 (4” x 4”) squares
From Colors, cut:
24 (2” x 2”) squares

There are 2 different blocks in the quilt, a single and double quarter circle blocks.

Assembly of the single quarter circle blocks:

OffThePath-Ill1and2-ImFeelinCrafty
  1. Pair a cream square with a colored square. Stack the two squares in the bottom left corner. Align the fabric squares with your cutting mat squares. (illustration 1, above)
  2. Here’s where the improv comes in! No templates needed to cut your curves. You will cut a curve in the two pieces of fabric starting at ‘about’ 1 1/2” and ending at ‘about’ 1 1/2”.
  3. Keep the colored quarter circle and the cream background piece.
  4. Sew the two pieces together, right sides together. Do not pin! Align the quarter circle about a ¼” in from the edge of the background. (illustration 2, above) To sew without pinning, as you sew the pieces together hold the quarter circle, which is on top, with your left hand and hold the background piece with your right hand and guide them through your machine. As the fabric moves through the machine, you will gently pull the two fabrics so the edges align as you sew your ¼” seam.
    Remember: These are improv quarter circles. You are not sewing a perfect quarter circle!
  5. Iron the seams toward the center of the circle.
  6. You will now have a pretty wonky block. Trim this down to a 2 ½” square.
OffThePath-Ill3-ImFeelinCrafty

Assembly of the double quarter circle blocks:

  1. Follow steps 1 and 2 above, but for this one you will cut a curve in the two pieces of fabric starting at ‘about’ 1 ¾” and ending at ‘about’ 1 ¾”.
  2. Follow steps 3, 4 and 5 above.
  3. Trim the block to 2 ¾” square.
  4. Repeat steps 1 and 2 above using the plus or minus 1 ¾” curve. Ideally you will have about ½” to ¾” between your cut and the previously sewn curve. (illustration 3, above)
  5. Repeat steps 3, 4 and 5 again.
  6. Trim block to a 2 ½” square

OffThePath-Detail-ImFeelinCrafty

Once you have all the mini quilt blocks completed, you can lay out and assemble your blocks. You can match my layout, so design your own! It’s a pretty quick and fun little design to play with.

OffThePath-Side-ImFeelinCrafty

Once you lay out piece together all the blocks, quilt it however you feel most comfortable. I like to use curved quilting, but straightline and freemotion quilting would both work as well!

OffThePath-Label-ImFeelinCrafty

My token label shot! This was the old black and white label…

OffThePath-Tiny-ImFeelinCrafty

I love this picture and how tiny it looks! What do you think? Do you want to try it???

Quilts 2013

DoGoodJuly-MainFront-ImFeelinCrafty

The Low Volume, Bright Crosses Postage Stamp Quilt

48×60

Made using the Low Volume, Bright Crosses Postage Stamp Quilt Block Tutorial

with the help of Nurture Circle of do.Good Stitches

GreenEileen-Main-ImFeelinCrafty

Green Eileen Chop Challenge Quilt

48×72

GreenEileen-Mini-ImFeelinCrafty

Green Eileen Chop Challenge Mini Quilt

16×16

RoseQuilt-Main-ImFeelinCrafty

The Rose Quilt

36×36

PreSchoolQuilt-Front-ImFeelinCrafty

Pinwheels for Preschool

36×36

FLQS-Finished-ImFeelinCrafty

Shooting Star

12×18

do_Good-Feb-Finished-Main-ImFeelinCrafty

Wonky Stars

48×72

Made using the Wonky Star Tutorial with the help of Nurture Circle of do.Good Stitches

DollQuiltSwap-Mine-ImFeelinCrafty

Kaleidoscope Mini Quilt

18×18

SquareinaSquare-Main-I'mFeelin'Crafty

Giraffe Quilt

36×36

Quilting Tutorials

Quilting Tutorials

SewingBlocks-2014-paperpiecingSewingBlocks-2013-ChristmasTreeBlockSewingBlocks-2013-QuiltedpotholderSewingBlocks-2013-RoseBlockSewingBlocks-2013-LowBrighQuiltBlockSewingBlocks-2013-WonkyStarSewingBlocks-PinwheelQuiltSquare

do Good Stitches Quilt

My bee mates might be a little annoyed at me… It took way to long to get these pictures to them!

DoGood-Feb-Main-ImFeelinCrafty

This is the quilt I ‘designed’ for the February do Good Stitches bee. I say designed in apostrophes, because I did wrote the tutorial, but I can’t claim it’s totally my own idea. I’ve seen similar around, but you can check out the tutorial to make our own here.

doGoodFeb-Step7a-ImFeelinCrafty

DoGood-Feb-Detail-ImFeelinCrafty

Once I got all the blocks, the quilt top came together super easy!

DoGood-Feb-CloseUp2-ImFeelinCrafty

I love how even though each block is by a different person, it looks like it was made by one person! All the pieces are perfect together!

DoGood-Feb-Binding-ImFeelinCrafty

I’ve also gotten to where I rarely use one color for the binding. I love different colored bindings!

DoGood-Feb-Back-ImFeelinCrafty

We started sending pillowcases with our quilts, so I choose to match the back to the pillowcase that was sent along. I don’t have a picture of it. hmmmm. But it’s red and yellow and green. I’ll have to take a picture!

DoGood-Feb-BackDtl-ImFeelinCrafty

The back shows the random striaght line quilting better than the front. On the front it starts to blend in with all the piecing. But it stands out l=nicely on the back!

DoGood-Feb-Label-ImFeelinCrafty

We always put on our labels!

DoGood-Feb-CloseUp-ImFeelinCrafty

Another picture of the front with the blue binding! My husband LOVES this one. He keeps trying to come up with ways that we can keep it. So far none of his ways have worked. So it looks like another one of these is in my near future! Only I wont have the group to help make the blocks!

DoGood-Feb-Main2-ImFeelinCrafty


And I can mark this off as 1 of my Q2 Finish Along finishes!
2015 FAL at On the Windy Side


A Wonky Block with a Tutorial

I usually don’t post my picks for my do.Good Stitches quilting months, but I posted a picture of the block coming together and I learned that some of my circle friends aren’t excited about wonky! And I learned a little something about wonky while I was making these, so I thought I’d share!

doGoodFeb-Main-ImFeelinCrafty

The block we’re doing for the February Nurture Circle of do.Good Stitches is made up of 5 blocks and 2 solid pieces. And once you put them all together you end up with 1 12.5 x 24.5 inch block.

doGoodFeb-Pieces2-ImFeelinCrafty

I’m loving the look of these blocks. Log cabin wonky, my friend! Love it! For this large block you’ll need:

(1) 12.5 inch wonky log cabin block

(1) 8.5 inch wonky log cabin block

(3) 4.5 inch wonky log cabin blocks

(2) 4.5 inch solid back ground blocks, these can be pieced or just a simple cut piece of fabric. However you do it, it need to be all background color.

doGoodFeb-Fabric-ImFeelinCrafty

You’ll need some fabric, of course! Ha! For the center piece you’ll need scraps. Any scraps. I’d prefer mostly solids, but…  And an array of whites and/or creams for the outside. For mine I used, Kona Snow, Kona White and Kona Oyster. I also added in a few white pattern on white fabric scraps.

doGoodFeb-Step1-ImFeelinCrafty

Here’s what I learned. When I start with a square, the wonky log cabins always turn out looking nicer.

doGoodFeb-Oops-ImFeelinCrafty

This is a big ole oops that didn’t make it into my block!  First off, I started with a wonky shaped center and tried to make it work. Secondly, I was using all scraps. So I sewed on this triangle. When I think wonky, I also think I can use odd shaped pieces. But, um, no. I mean I guess if you’re really good at it you can…. But mine always turn out nicer starting with a square.

doGoodFeb-Step2-ImFeelinCrafty

Then make your little log cabin. Mine stayed between 4 inches to 2 inches, approximately.

doGoodFeb-Step3a-ImFeelinCrafty

doGoodFeb-Step3b-ImFeelinCrafty

Here’s the key to wonky (at least for me)- The wonky part of the whole thing comes in the cutting, not the piecing! After piecing I ended up with a traditional square. After cutting, I ended up with a wonky block! Just rotate that cutting square!

doGoodFeb-Step4-ImFeelinCrafty

Next you keep building on the center piece just like you would any log cabin. This one just happens to not be a square! For the do. Good quilt, I’d like these to have the colored center off center. The off center thing seems to go along with the whole wonky thing, don’t you think!

I use scraps, not straight pieces for the side of the log cabin. Different widths, some are pieced, most aren’t straight. This also helps add to the wonkiness!

doGoodFeb-Step5a-ImFeelinCrafty

doGoodFeb-Step5b-ImFeelinCrafty

Just like you did with the center, you use the cutting square to cut your SQUARE off kilter from the middle. This is where you do want to cut a real square!

doGoodFeb-Step6-ImFeelinCrafty

Like I mentioned before, here are the blocks you need:

(1) 12.5 inch wonky log cabin block

(1) 8.5 inch wonky log cabin block

(3) 4.5 inch wonky log cabin blocks

(2) 4.5 inch solid back ground blocks, these can be pieced or just a simple cut piece of fabric. However you do it, it need to be all background color.

doGoodFeb-Step7a-ImFeelinCrafty

doGoodFeb-Step7b-ImFeelinCrafty

The fun part… Arranging the ‘mini’ blocks to make the overall block.

doGoodFeb-Step8-ImFeelinCrafty

Then back to the sewing machine! Sew the pieces together so that you end up with a 12.5 x 24.5 inch block.

doGoodFeb-Last-ImFeelinCrafty

I’m so exicted to see how this comes together for the quilt circle!!! Yea!!!

Blogger’s Quilt Festival- Star Quilt

Over the years I’ve been seeing the Blogger’s Quilt Festival online and always wanted to participate, but never have. So even though I’m on vacation, I decided I’d play along this year and enter a quilt or two!

do_Good-Feb-Finished-Main-ImFeelinCrafty

For the Group/Bee Quilt category, I’m  sharing a quilt that you have seen before quite recently…. The Nurture Group of do. Good Stitches Star quilt.

do_Good-Feb-Finished-corner-ft-ImFeelinCrafty

I’ve had a bit of an obsession about star quilts lately, as you probably know. Which means when it was my time to pick a block design I decided to use my own star block tutorial and have the group help me make the stars!

do_Good-Feb-Finished-Back-ImFeelinCrafty

Each group member made 2 blocks, and size and any bright color! Once my son and I decided on the layout the quilt finished around 46” by 60”.  The group decided to hang it in the Seattle Modern Quilt Guild’s Star show coming up next month and then it will go to our group’s charity, My Very Own Blanket.

do_Good-Feb-Finished-corner-bk-ImFeelinCrafty

I quilted it in a star pattern as well. Starting with the one in the bottom and working out from there across the quilt! I love how it turned it. I do hope whoever receives it loves it as much as my household does!

Print

do. Good Stitches Star Quilt

The second quilt for our do. Good Stitches group is FINALLY complete!  And I can say that because I was the quilter for the February quilt!

do_Good-Feb-Finished-Main-ImFeelinCrafty

I was the quilter, but I can’t say I created the quilt by myself! As a quilter, you get to pick the block and the colors. Then each person in the group makes the blocks and sends them to you. Then the quilter pieces it and quilts it. So I had the help of the group making all the fantastic blocks from my wonky star tutorial!

do_Good-Feb-Finished-WonkyStar-ImFeelinCrafty

And then I had the help of my kiddo to lay the whole thing out!

do_Good-Feb-Finished-corner-ft-ImFeelinCrafty

do_Good-Feb-Finished-corner-bk-ImFeelinCrafty

I love how the stars came together! I don’t know who well you can see it, but the quilting is the outline of the bottom star and it repeats out over the rest of the quilt. I really like it, just wish you could see it a little bit better on the front!

do_Good-Feb-Finished-Back-ImFeelinCrafty

My request was to use bright colors for the star on a white background. Then as I was putting it together I realized that my ‘white’ was actually a creamy white. WHat really stood out bad was the pieceing of my cream fabric between the white background of the stars. So I redid my stars, which left me with some extra stars. One ended up being my SMQG name tag. The other ended up on the back!

do_Good-Feb-Finished-BkStar-ImFeelinCrafty

If you are the quilter for, let’s say February, then you actual make the quilt in March. Unfortunately, I didn’t get all the blocks in time before my surgery and then my surgery set me back… So I didn’t actually finish my quilt until the end of April.

do_Good-Feb-Finished-Last-ImFeelinCrafty

I guess when it gets done isn’t the important part. The important part is finishing the quilt for the charity our group quilts for!


Shared with these Link Parties!

Quilting with the Kiddo

Today was a busy day, but I had a wonderful moment of parenting bliss!

do_Good-Feb-Planning-1-ImFeelinCrafty

I wanted to lay out the star quilt  with the wonky stars I’m doing for the do. Good Stitches group. My son was home and being very helpful with everything I asked. Yes, sounds kinda like I’m making it up, right? I’m not really! So I knew I wanted to get started on the quilt, so I asked him to join in. He loved it!

do_Good-Feb-Planning-process-ImFeelinCrafty

He really stood back and looked at each one. Thought about where it should. Laid it out. Then rearranged it! Again and Again. The fun part was that I let him lay out all the blocks. Then we both sat down and rearranged a little here and a little there. Too many of the same size in a row. Bad. Two greens next together. Welllllll… Maybe, maybe not… What about this one here? Well, then, we need to move this one here.

gif creator
picasion.com gif creator online

I had to take a few videos of the process and you’re welcome to take a look! They are on flicker here and here!

He hasn’t quit grasped the concept of white space yet. The holes of no stars were kind bugging him. I still have to make mine and he let me know the sizes and locations that mine need to be inserted!

do_Good-Feb-Planning-last-ImFeelinCrafty

It was just one of those moments where you totally have one of those ‘melty heart, I want to stay right here’ moments. Unlike other projects where it’s hard to let go of control, this one I totally put him in the driver seat and it was fantastic watching him be inspired by the colors and sizes and create something very special!

What do you think of our final layout??

Shared with these Link Parties!